Adorable Crochet Pig Amigurumi Pattern: Free Step-by-Step Tutorial
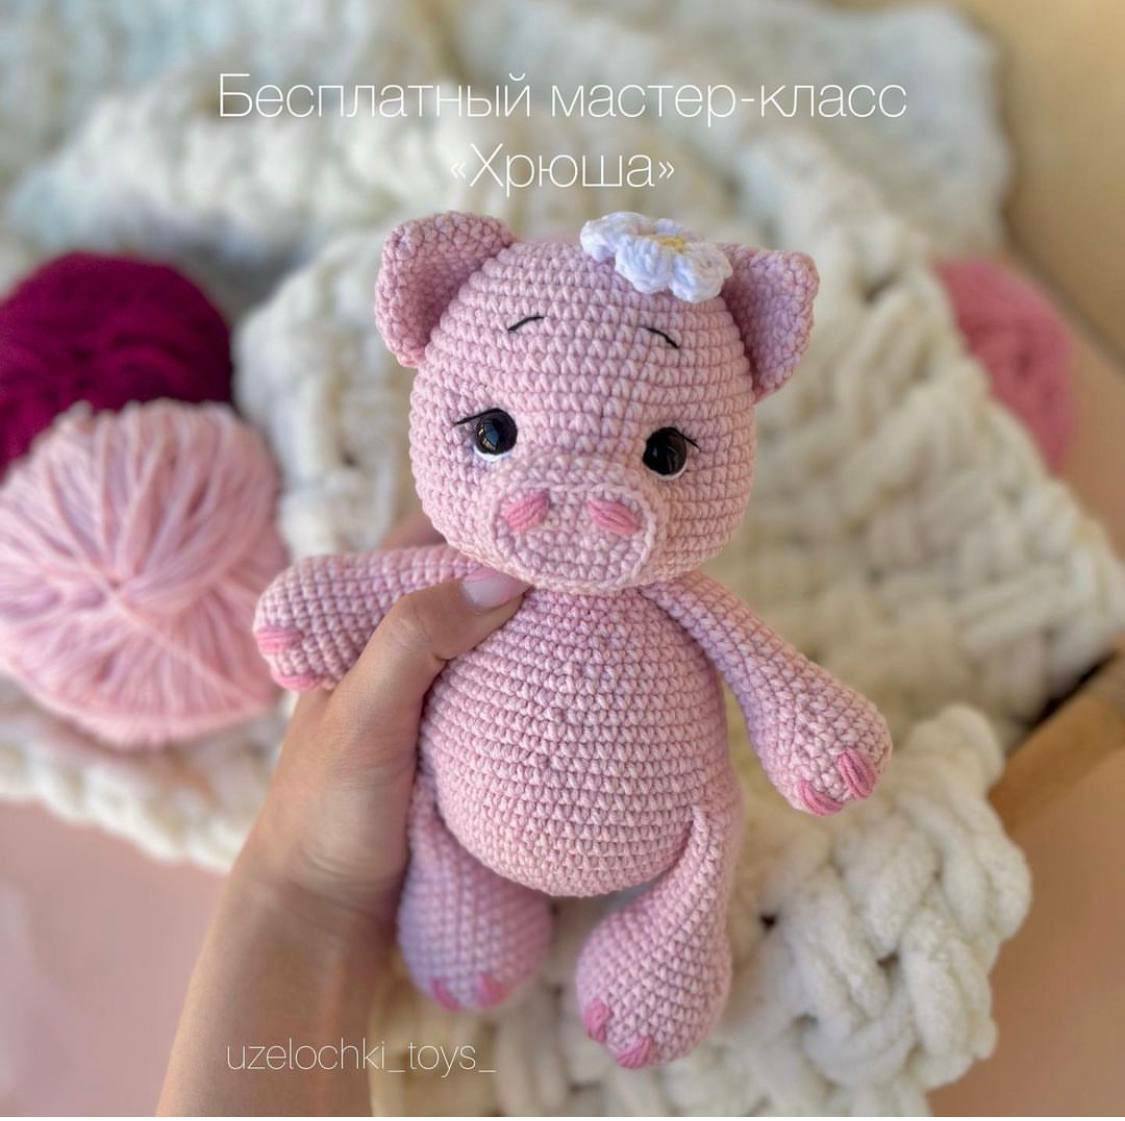
Looking for a sweet and cuddly project to add to your crochet collection? This adorable crochet pig amigurumi is the perfect choice! Whether you are looking to make a handmade gift for a baby shower or just want a cute companion for your desk, this little piggy is designed to be beginner-friendly and irresistibly squishy.
In this tutorial, we will walk you through every stitch needed to create this little character, from the round rosy cheeks to the tiny hooves. We will use standard US crochet terms and imperial measurements to make it easy for everyone to follow along. Let’s get hooking!
Materials & Abbreviations
Before we dive into the pattern, gather your supplies. To get the look shown in the photos, we recommend a sport-weight cotton blend yarn, which provides great stitch definition and a smooth finish.
Materials Needed
- Yarn: Sport weight cotton blend yarn (approx. 175 yards per 50g ball). You will need pink for the body, white for the flower, and a small amount of yellow for the flower center.
- Crochet Hook: 2.0mm or 2.5mm hook (depending on your tension).
- Safety Eyes: 12mm safety eyes.
- Stuffing: High-quality polyester fiberfill.
- Tools: Tapestry needle, scissors, and stitch markers.
- Optional: Pink embroidery thread for the nose and hooves.
Abbreviations (US Terms)
- MR: Magic Ring
- sc: Single crochet
- inc: Increase (2 sc in one stitch)
- dec: Decrease (invisible decrease recommended)
- ch: Chain
- sl st: Slip stitch
- BLO: Back loop only
- st(s): Stitch(es)
Step-by-Step Instructions
The Head
The head is worked in continuous rounds. Do not join the rounds with a slip stitch unless specified.
- Round 1: 8 sc in MR (8)
- Round 2: 8 inc (16)
- Round 3: (1 sc, inc) x 8 (24)
- Round 4: (3 sc, inc) x 6 (30)
- Round 5: sc 2, inc, (4 sc, inc) x 5, sc 2 (36)
- Round 6: (5 sc, inc) x 6 (42)
- Round 7: sc 3, inc, (6 sc, inc) x 5, sc 3 (48)
- Rounds 8-11: sc in each st around (48) – 4 rounds total
- Round 12: (7 sc, inc) x 6 (54)
- Rounds 13-14: sc in each st around (54) – 2 rounds total
- Round 15: sc 4, inc, (8 sc, inc) x 5, sc 4 (60)
- Rounds 16-22: sc in each st around (60) – 7 rounds total
- Round 23: (8 sc, dec) x 6 (54)
- Round 24: sc in each st around (54)
- Round 25: (7 sc, dec) x 6 (48)
- Round 26: (6 sc, dec) x 6 (42)
- Round 27: 24 dec (24)
Note: Stuff the head with fiberfill to a medium density. Be sure to push extra stuffing into the cheek areas to give the pig its chubby shape. Insert safety eyes between rounds 16 and 17, approximately 8 stitches apart.
The Snout
Ch 7. Start working in the second chain from the hook.
- Round 1: 4 sc, 3 sc in the last chain. Turn to work along the opposite side of the chain: 4 sc, 2 sc in the last chain (13)
- Round 2: 1 inc, 4 sc, 3 inc, 4 sc, 2 inc (20)
- Round 3: 1 inc, 5 sc, 4 inc, 5 sc, 4 inc (28)
- Round 4: 20 sc in BLO (28)
- Rounds 5-6: sc in each st around (28)
The Ears (Make 2)
- Round 1: 6 sc in MR (6)
- Round 2: 6 sc (6)
- Round 3: 6 inc (12)
- Round 4: (1 sc, inc) x 6 (18)
- Round 5: 18 sc (18)
- Round 6: (2 sc, inc) x 6 (24)
- Rounds 7-8: 24 sc (24)
Fold the ear in half and sc across 12 stitches to close the bottom.
The Body
- Round 1: 6 sc in MR (6)
- Round 2: 6 inc (12)
- Round 3: (1 sc, inc) x 6 (18)
- Round 4: (2 sc, inc) x 6 (24)
- Round 5: (3 sc, inc) x 6 (30)
- Round 6: (4 sc, inc) x 6 (36)
- Round 7: (5 sc, inc) x 6 (42)
- Round 8: (6 sc, inc) x 6 (48)
- Round 9: (7 sc, inc) x 6 (54)
- Round 10: (8 sc, inc) x 6 (60)
- Rounds 11-16: sc in each st around (60)
- Round 17: (8 sc, dec) x 6 (54)
- Rounds 18-19: sc in each st around (54)
- Round 20: (7 sc, dec) x 6 (48)
- Rounds 21-22: sc in each st around (48)
- Round 23: (6 sc, dec) x 6 (42)
- Round 24: 42 sc (42)
- Round 25: (5 sc, dec) x 6 (36)
- Round 26: 36 sc (36)
- Round 27: (4 sc, dec) x 6 (30)
- Round 28: 30 sc (30)
- Round 29: (3 sc, dec) x 6 (24)
- Round 30: 24 sc (24)
Stuff the body firmly, adding a bit more stuffing to the belly area to make it plump. Leave a long yarn tail for sewing.
The Arms (Make 2)
- Round 1: 8 sc in MR (8)
- Round 2: 8 inc (16)
- Round 3: (1 sc, inc) x 8 (24)
- Round 4: 24 sc in BLO (24)
- Rounds 5-6: 24 sc (24)
- Round 7: (10 sc, dec) x 2 (22)
- Round 8: (9 sc, dec) x 2 (20)
- Round 9: (8 sc, dec) x 2 (18)
- Round 10: (7 sc, dec) x 2 (16)
- Rounds 11-13: 16 sc (16)
- Round 14: (6 sc, dec) x 2 (14)
- Rounds 15-21: 14 sc (14)
Fold the arm in half and sc across 6 stitches to close. Use pink yarn to embroider a few small stitches at the tip to create the appearance of hooves.
The Legs (Make 2)
- Round 1: 8 sc in MR (8)
- Round 2: 8 inc (16)
- Round 3: (1 sc, inc) x 8 (24)
- Round 4: (2 sc, inc) x 8 (30)
- Round 5: 30 sc in BLO (30)
- Rounds 6-8: 30 sc (30)
- Round 9: (13 sc, dec) x 2 (28)
- Round 10: (12 sc, dec) x 2 (26)
- Round 11: (11 sc, dec) x 2 (24)
- Round 12: (10 sc, dec) x 2 (22)
- Round 13: (9 sc, dec) x 2 (20)
- Rounds 14-22: 20 sc (20)
Fold the leg in half and sc across 10 stitches to close. Embroider hooves at the bottom with pink yarn.
The Daisy Accessory
Center: Using yellow yarn, work 6 sc in MR. Sl st to first st and fasten off.
Petals: Attach white yarn to any stitch of the center. (Ch 4, sl st into the next stitch) x 6. To make the petals fluffy: Ch 3, work 6 double crochets (dc) into the same arc, then sl st into the same arc. Repeat this for all 6 arcs. Fasten off.
Finishing
Now comes the magic part: assembly!
- Face Sculpting: To give your pig a more realistic look, use a long needle and strong thread to do “face sculpting.” Gently pull the thread from the center of the muzzle through to the back of the head and pull tight to create a small indentation.
- Assembly: Use pins to position the ears, snout, arms, and legs before sewing. This ensures everything is symmetrical. Sew the head to the body, then attach the limbs.
- Embroidery: Use white and black thread to embroider the whites of the eyes, eyebrows, and eyelashes. Don’t forget to add two small vertical stitches on the snout for the nostrils!
- The Final Touch: Sew the white daisy on top of the head or slightly to the side for a cute look.
Tips for Success
- Tension: Keep your tension tight so that the fiberfill doesn’t peek through the stitches.
- Invisible Decrease: To keep the surface smooth, use the invisible decrease method (insert hook into front loops only of the next two stitches).
- Pinning: Always pin your limbs in place before sewing. It is much easier to move a pin than to undo a sewn seam!
- Customization: Feel free to change the yarn colors to make a spotted pig or a little blue piggy!