Adorable Amigurumi Elephant Crochet Pattern: A Step-by-Step Tutorial
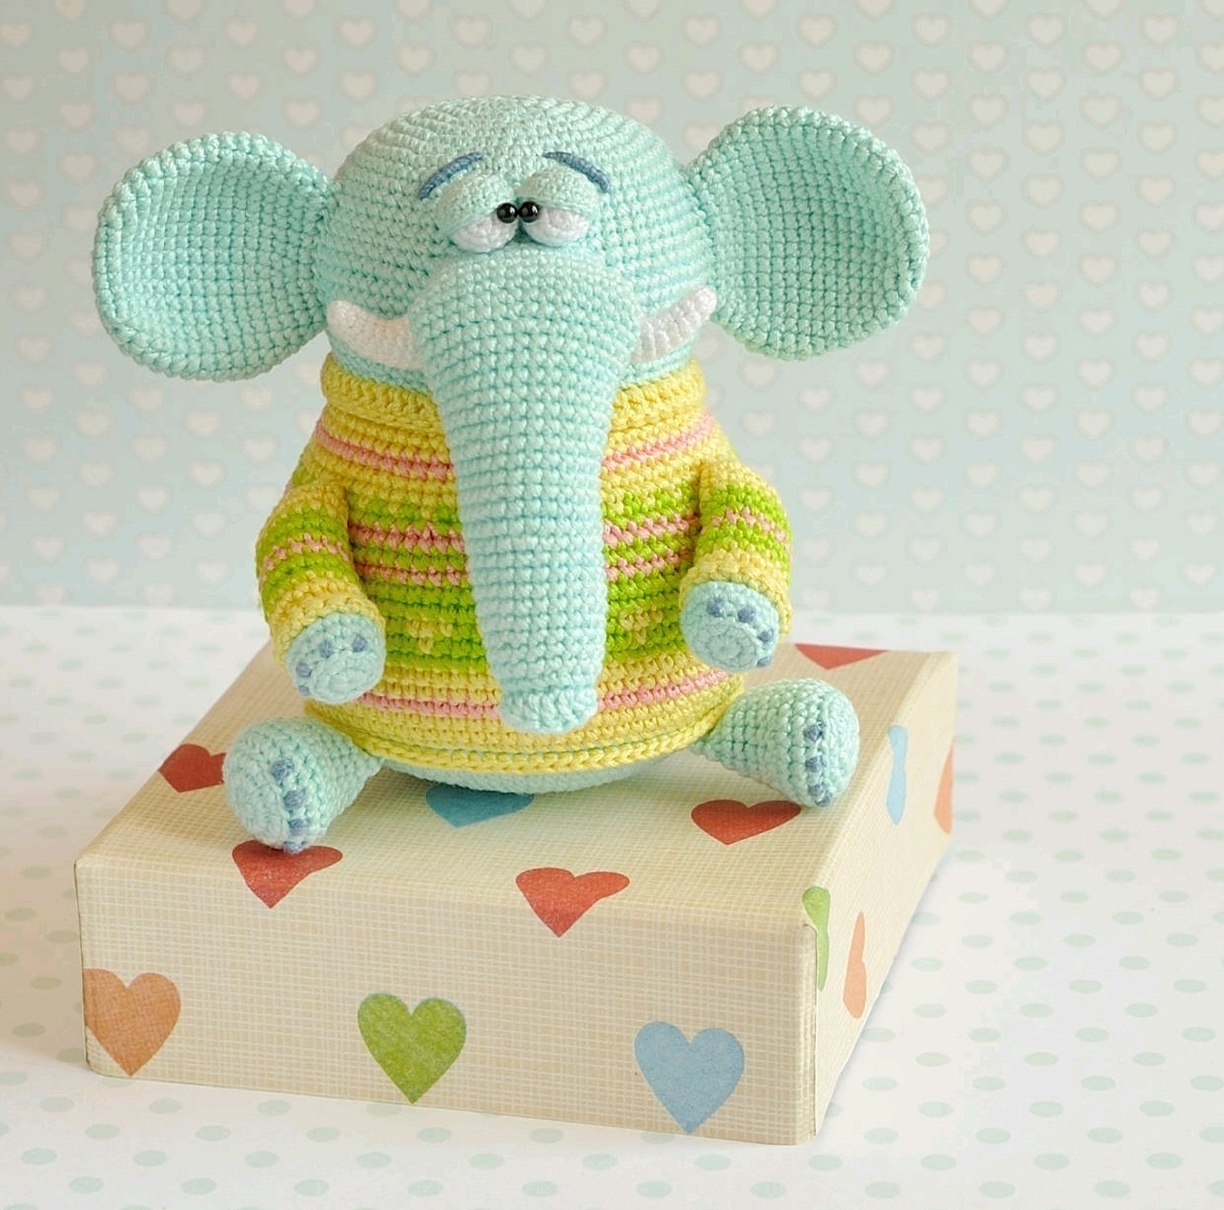
Are you looking for your next heartwarming crochet project? This adorable amigurumi elephant is the perfect addition to your handmade collection! With his oversized ears, cozy striped sweater, and slightly sleepy, charming expression, this little guy is bound to steal hearts. Whether you are looking to decorate a nursery or want to create a tiny, pocket-sized friend, this pattern is designed to be accessible, fun, and incredibly rewarding.
This tutorial is written with beginners in mind. We will walk you through every stage of the process, from creating the initial magic ring to the final assembly of the tiny tusks and expressive eyebrows. By the time you finish, you’ll have a plump, huggable elephant ready for a lifetime of adventures.
Materials & Abbreviations
To ensure your elephant turns out looking just like the photos, I recommend using fine cotton yarn. This provides the stitch definition needed for amigurumi. For the standard size, your elephant will stand approximately 4 inches tall.
Materials Needed
- Cotton Yarn (Fine/Iris weight):
- Light Blue (Main color for head, body, and limbs)
- Yellow (For the sweater)
- Lime Green (For the sweater)
- Pink (For the sweater)
- White (For eyes and tusks)
- Dark Blue (For eyebrows and toe details)
- Crochet Hooks: 1.25mm (for main body) and 0.9mm (for fine details like eyes and eyelids).
- Safety Eyes: 2.5mm diameter.
- Stuffing: High-quality polyester fiberfill.
- Wire:
- 1mm aluminum or copper wire for the arms (use 7.5-inch pieces).
- 1mm aluminum or copper wire for the trunk (use 6.5-inch pieces).
- 12cm (approx. 4.75-inch) wire pieces for the ears.
- 5cm (approx. 2-inch) wire pieces for the tusks.
- Other Tools: Scissors, wire cutters, tapestry needle, pins, stuffing tool (like a chopstick or skewer), and pliers.
Abbreviations (US Terms)
- MR: Magic Ring
- ch: Chain
- sc: Single Crochet
- inc: Increase (2 sc in one stitch)
- dec: Decrease (sc 2 together)
- hdc: Half Double Crochet
- dc: Double Crochet
- sl st: Slip Stitch
- ( … ) * n: Repeat the sequence within the parentheses n times.
- The number in parentheses at the end of a row indicates the total stitch count for that round.
Step-by-Step Instructions
The Head
Using light blue yarn and a 1.25mm hook:
- R1: 8 sc in a MR (8)
- R2: 8 inc (16)
- R3: (1 sc, inc) * 8 (24)
- R4: 1 sc, inc, (2 sc, inc) * 7, 1 sc (32)
- R5: (3 sc, inc) * 8 (40)
- R6: 2 sc, inc, (4 sc, inc) * 7, 2 sc (48)
- R7: (5 sc, inc) * 8 (56)
- R8: 3 sc, inc, (6 sc, inc) * 7, 3 sc (64)
- R9-15: 64 sc (7 rows)
- R16: (7 sc, inc) * 8 (72)
- R17: 4 sc, inc, (8 sc, inc) * 7, 4 sc (80)
- R18-21: 80 sc (4 rows)
- R22: 4 sc, dec, (8 sc, dec) * 7, 4 sc (72)
- R23: (7 sc, dec) * 8 (64)
- R24: 3 sc, dec, (6 sc, dec) * 7, 3 sc (56)
Fasten off, leaving a long tail for sewing. Stuff the head lightly so it holds its round shape.
The Body (Sweater)
The body is worked in rounds with several color changes to create the striped sweater effect. Use the 1.25mm hook.
Blue Section
- R1: 8 sc in a MR (8)
- R2: 8 inc (16)
- R3: (1 sc, inc) * 8 (24)
- R4: 1 sc, inc, (2 sc, inc) * 7, 1 sc (32)
- R5: (3 sc, inc) * 8 (40)
- R6: 2 sc, inc, (4 sc, inc) * 7, 2 sc (48)
- R7: (5 sc, inc) * 8 (56)
- R8: 3 sc, inc, (6 sc, inc) * 7, 3 sc (64)
- R9: (7 sc, inc) * 8 (72)
- R10: 4 sc, inc, (8 sc, inc) * 7, 4 sc (80)
- R11: 80 sc
- R12: (9 sc, inc) * 8 (88)
- R13: 88 sc
Color Changes for Stripes
- R14-16 (Yellow): Work 88 sc. Note: For R14, work in the back loops only to create the sweater edge.
- R17 (Pink): 88 sc.
- R18-19 (Yellow): 88 sc.
- R20 (Lime Green): 88 sc.
- R21-22 (Striped Lime/Yellow):
- R21: (3 sc lime, 1 sc yellow) * 22 (88)
- R22: 1 sc yellow, (1 sc lime, 3 sc yellow) * 21, 1 sc lime, 2 sc yellow (88)
- R23-24 (Lime Green): 88 sc.
- R25 (Pink): (9 sc, dec) * 8 (80)
- R26 (Lime Green): 80 sc.
- R27 (Pink): 80 sc.
- R28 (Lime Green): 4 sc, dec, (8 sc, dec) * 7, 4 sc (72)
- R29 (Striped Lime/Yellow): (1 sc lime, 1 sc yellow) * 36 (72)
- R30 (Yellow): 72 sc.
- R31 (Yellow): (7 sc, dec) * 8 (64)
- R32 (Pink): 64 sc.
- R33 (Yellow): 64 sc.
- R34 (Yellow): 3 sc, dec, (6 sc, dec) * 7, 3 sc (56)
- R35-36 (Yellow): 56 sc.
- R37 (Yellow Edge): Work in the front loops only: ch, 56 dc.
This final round creates the collar. Fold the edge inward and secure it. Stuff the body firmly.
The Limbs
Back Legs (Make 2)
Using light blue yarn and a 1.25mm hook:
- R1: 8 sc in a MR (8)
- R2: 8 inc (16)
- R3: (1 sc, inc) * 8 (24)
- R4: 24 sc (work in back loops only)
- R5-6: 24 sc
- R7: 6 sc, dec, 6 sc (18)
- R8-11: 18 sc
- R12: (1 sc, dec) * 6 (12)
Do not cut the yarn. Stuff the leg, then fold it in half (from heel to toe) and sc through both sides to close. Leave a long tail for sewing.
Front Legs (Make 2)
Using light blue, yellow, lime, and pink yarn as indicated:
- R1: 8 sc in a MR (8)
- R2: 8 inc (16)
- R3: 16 sc (work in back loops only)
- R4-5 (Blue): 16 sc
- R6 (Yellow): 16 sc (work in back loops only)
- R7-8 (Yellow): 16 sc
- R9-10 (Lime): 16 sc
- R11 (Pink): 16 sc
- R12-13 (Lime): 16 sc
- R14-16 (Yellow): 16 sc
- R17: (2 sc, dec) * 4 (12)
Stuff and sew shut as described with the back legs. For the yellow bottom edge, work 16 sc through the front loops of R6.
The Trunk, Face, and Ears
The Trunk
Using light blue yarn and a 1.25mm hook:
- R1: 8 sc in a MR (8)
- R2: 8 inc (16)
- R3: (7 sc, inc) * 2 (18) (work in back loops only)
- R4-6: 18 sc
- R7: (5 sc, inc) * 3 (21)
- R8-11: 21 sc
- R12: 3 sc, inc, (6 sc, inc) * 2, 3 sc (24)
- R13-17: 24 sc
- R18: (7 sc, inc) * 3 (27)
- R19-24: 27 sc
- R25: 4 sc, inc, (8 sc, inc) * 2, 4 sc (30)
- R26-32: 30 sc
Decorative Detail: In R3, work around the front loops: 5 sc, 2 hdc, 2 dc, 2 hdc, 5 sc (16). Stuff and leave a long tail.
Eyes & Eyelids
Eyes (White yarn, 0.9mm hook): MR, 6 inc (12), R3: (3 sc, inc) * 3 (15), R4-5: 15 sc, R6: (3 sc, dec) * 3 (12), R7: 6 dec (6). Stuff and secure.
Eyelids (Light Blue, 2 strands of yarn, 0.9mm hook): MR, 6 inc (12), R3: (1 sc, inc) * 6 (18), R4-5: 18 sc. Fasten off.
Ears (Make 2)
Using light blue yarn and a 1.25mm hook:
- R1: Ch 8. In 2nd ch from hook: 6 sc, 3 sc in the last ch, 5 sc on the other side, 1 inc (16).
- R2: inc, 5 sc, 3 inc, 5 sc, 2 inc (22)
- R3: 1 sc, inc, 5 sc, inc, 1 sc, 2 inc, 1 sc, inc, 5 sc, inc, 1 sc, inc (29)
- R4: inc, 28 sc (30)
- R5: (14 sc, inc) * 2 (32)
- R6: 32 sc
- R7: (15 sc, inc) * 2 (34)
- R8: 34 sc
- R9: (16 sc, inc) * 2 (36)
- R10-12: 36 sc
- R13: (16 sc, dec) * 2 (34)
- R14: (15 sc, dec) * 2 (32)
- R15: (6 sc, dec) * 4 (28)
- R16: (5 sc, dec) * 4 (24)
- R17: (10 sc, dec) * 2 (22)
Do not stuff the ears. Insert 4.75-inch wire pieces into them before sewing.
Tusks (Make 2)
Using white yarn and a 0.9mm hook:
- R1: 6 sc in a MR (6)
- R2: 6 sc
- R3: (5 sc, inc) (7) (back loops)
- R4: 6 sc, inc (8)
- R5: 7 sc, inc (9)
- R6: 8 sc, inc (10)
- R7: 9 sc, inc (11)
- R8: 10 sc, inc (12)
- R9: 11 sc, inc (13)
- R10: 13 sc, sl st (13)
Insert 2-inch wire pieces into the tusks. Stuff lightly.
“`
Finishing & Assembly
Assembly is where the magic happens! Follow these steps carefully to give your elephant his personality.
The Face
- Eyes: Sew the eyelids around the white eyes. Then, sew the eye/eyelid combo to the head just above the trunk. Place them close together for a cute, sleepy look.
- Pupils: Sew or glue small 2.5mm beads or safety eye pupils into the white part of the eyes.
- Eyebrows: Using dark blue yarn, mark the brow positions with pins. Make a long straight stitch, then use backstitches around it to add volume.
- Tusks: Position the tusks just below the middle of the trunk base. Insert the wire into the trunk and sew the tusks securely to the face.
- Trunk: Insert the 6.5-inch wire into the trunk. Attach it to the face, ensuring the top edge meets head round 14 and the bottom edge meets round 22.
The Body & Limbs
- Head to Body: Sew the head onto the body. Add more stuffing as you go to ensure a firm connection.
- Arms: Insert 7.5-inch wire pieces into the arms. Sew them slightly diagonally to the body. The bottom connection point should be between body rounds 26-27, and the top point between rounds 29-30.
- Legs: Sew the back legs to round 13 of the body, spreading them wide but not too far. Position the toes facing each other.
- Ears: Insert the wire into the ears. Sew them to the head, placing the wire ends between head rounds 13-14 and 20-21.
- Tail: Take three 5.5-inch strands of light blue yarn. Thread them through the bottom of the elephant’s back, pull them to the center, and braid them together. Tie the end with dark blue yarn.
- Toes: Using dark blue yarn, embroider four vertical stitches on each foot to create toes. On the back legs, do this on round 4; on the front legs, on round 3.
Pro Tips for Success
- Tension Matters: Since we are using very fine yarn and small hooks, keep your tension consistent to ensure the stuffing doesn’t show through the stitches.
- Wire Safety: Always ensure the ends of your wires are tucked deep into the stuffing or bent over so they don’t poke through the fabric.
- The “Oval” Trunk: When attaching the trunk, pull the base slightly wider so it forms an oval rather than a circle. This looks much more natural when the trunk is bent.
- Pin Everything First: Before you start sewing, use pins to test the placement of the ears, limbs, and eyes. It is much easier to move a pin than a permanent seam!