How to Crochet a Spooky and Cute Halloween Mummy Amigurumi
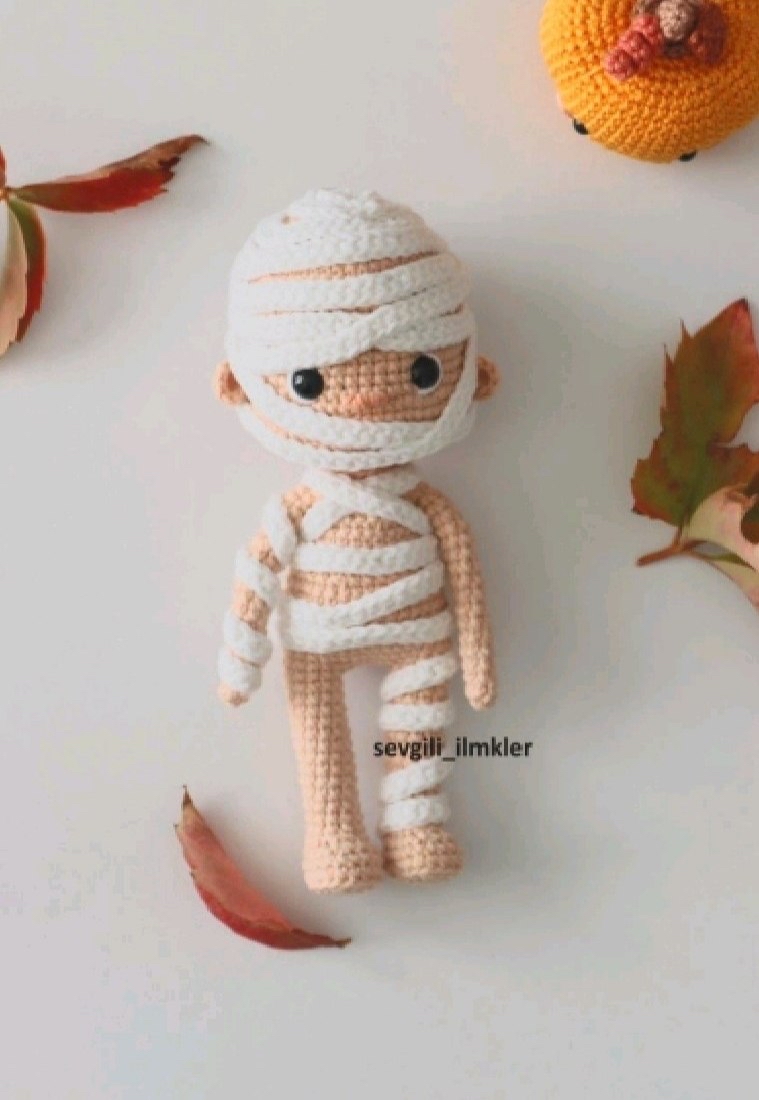
Halloween is just around the corner, and if you are looking for the perfect seasonal project, look no further! This adorable Crochet Halloween Mummy is the ultimate mix of spooky and sweet. Whether you want to decorate your mantel, create a unique gift for a friend, or add some handmade charm to your spooky displays, this amigurumi mummy is a fantastic project for intermediate beginners.
Unlike traditional scary decorations, this mummy has a “kawaii” aesthetic that makes it perfect for all ages. The secret to its character lies in the clever way we apply the “bandages” and the expressive little eyes. Grab your crochet hook and some skin-toned yarn, and let’s get started on this festive little friend!
Materials & Abbreviations
Before we dive into the stitches, let’s make sure you have everything you need on your craft table. To achieve the smooth, professional look seen in the photos, I recommend using a fine weight cotton yarn.
Materials Needed
- Skin-toned Yarn: A cotton yarn works best for amigurumi. You can use Etrofil Baby Cotton or YarnArt Jeans (Color 07) as a great alternative.
- White Yarn: This is for the mummy bandages. YarnArt Jeans (Color 01) is perfect for this.
- Safety Eyes: 8 mm black safety eyes.
- Crochet Hook: 1.60 mm (or the size needed to achieve tight stitches).
- Stuffing: High-quality fiberfill or polyester stuffing.
- Silicone Glue: To secure the plastic bases in the legs.
- Plastic Inserts: Small plastic bases for the legs to provide stability.
- Wire: A thin, bendable wire for the neck and arms to allow for posing.
Abbreviations (US Terms)
Please ensure you are using US terminology to follow this pattern accurately:
- MR: Magic Ring
- sc: Single crochet
- inc: Increase (2 sc in one stitch)
- dec: Decrease (sc two stitches together)
- ch: Chain
- sl st: Slip stitch
- hdc: Half double crochet
- BLO: Back loop only
- FLO: Front loop only
- 3 sc in one stitch: To create a sudden expansion
Step-by-Step Instructions
The Head
The head is worked in continuous spirals. Do not join rounds unless specified.
- MR, 6 sc (6)
- 6 inc (12)
- (1 sc, inc) x 6 (18)
- (2 sc, inc) x 6 (24)
- (3 sc, inc) x 6 (30)
- (4 sc, inc) x 6 (36)
- (5 sc, inc) x 6 (42)
- (6 sc, inc) x 6 (48)
- (15 sc, inc) x 6 (51)
- Rounds 10–17: 51 sc (8 rounds total)
- Creating Eye Indentations: 20 sc, 1 ch, skip 1 stitch, 8 sc, 1 ch, skip 1 stitch, 21 sc (51)
- 17 sc, (inc, 2 sc) x 6, 16 sc (57)
- Rounds 20–22: 57 sc (3 rounds)
Note: Place your 8mm safety eyes in the indentations created in Round 18 before continuing.
- 17 sc, (dec, 2 sc) x 6, 16 sc (51)
- (15 sc, dec) x 3 (48)
- 3 sc, dec, (6 sc, dec) x 5, 3 sc (42)
- (5 sc, dec) x 6 (36)
- 2 sc, dec, (4 sc, dec) x 5, 2 sc (30). Stuff the head firmly with fiberfill.
- (3 sc, dec) x 6 (24)
- 1 sc, dec, (2 sc, dec) x 5, 1 sc (18)
Fasten off and join with a slip stitch to close the hole.
The Face & Ears
Once the eyes are in, you can add small details around them with your skin-toned yarn to give the mummy a more expressive face. For the ears, work as follows:
- In a Magic Ring: 2 ch, 4 sc, 2 ch, sl st. Fasten off, leaving a long tail for sewing.
The Arms
The arms are simple, slender tubes. You will make two of these.
- MR, 7 sc (7)
- Rounds 2–16: 7 sc (15 rounds total)
Fasten off, leaving a long tail for sewing.
The Legs
The legs require a bit of structural work to ensure the mummy can stand or sit properly. Use the skin-toned yarn.
First Leg
Note: Begin by making a foundation chain of 4 ch. Start working into the 2nd chain from the hook.
- 2 sc, inc, 2 sc, inc (10)
- 2 sc, inc, inc, inc, 2 sc, inc, inc, inc (16)
- 3 sc, inc, sc, inc, sc, inc, 2 sc, inc, sc, inc (21)
- 21 sc in BLO (Back Loop Only)
- 21 sc (FLO/both loops)
At this point, glue the plastic stability base to the bottom of the leg using silicone glue.
- 3 sc, (inc, sc) x 5, 3 sc (16)
- 3 sc, 4 inc, 5 sc (12)
Stuff the leg periodically as you work. Continue for rounds 8–19 with 12 sc per round. Round 20: 10 sc. Fasten off and weave in ends.
Second Leg
Repeat the exact same process as the first leg up to Round 19. For Round 20, work 12 sc. For Round 21, 4 sc, then join the two legs together using 3 ch.
The Body
Use the skin-toned yarn to create the torso.
- 12 sc, 3 dec, 12 sc, 3 dec, 1 sc (36)
- Rounds 2–9: 36 sc (8 rounds)
- (4 sc, inc) x 6 (30)
- Rounds 11–13: 30 sc (3 rounds)
- Attaching Arms: 5 sc, (join 1st arm with 1 sc), 13 sc, (join 2nd arm with 1 sc), 10 sc (40)
- (7 sc, inc) x 2, (8 sc, inc) x 2, 2 sc (36)
- 2 sc, inc, (4 sc, inc) x 5, 2 sc (30)
- (3 sc, inc) x 6 (24)
- 1 sc, inc, (2 sc, inc) x 5 (18)
- 18 sc
Leave a small tail for sewing the head to the body. Before closing, insert the wire for the arms and the neck to allow for posing.
Finishing
The Mummy Bandages
This is the most important part of the transformation! Instead of crocheting separate pieces, we will create long, thin chains that wrap around the body, mimicking real bandages.
- Head Bandages: Ch 360. Work 1 sc in each chain.
- Body Bandages: Ch 220. Work 1 sc in each chain.
- Arm Bandages: Ch 41. Work 1 sc in each chain.
Final Assembly
- Sew the head onto the body.
- Take your long white chains (the bandages) and wrap them around the head, body, and arms. Position them slightly haphazardly to give that authentic “unraveled mummy” look.
- Secure the ends of the bandages by sewing them into the body or using tiny dabs of silicone glue.
- Attach the ears to the sides of the head.
- Adjust the pose of the arms and head using the internal wire.
Tips for Success
- Tight Tension is Key: When making amigurumi, you want your stitches to be very tight so that the stuffing doesn’t peek through the gaps.
- Safety First: If you are making this for a child, ensure the safety eyes are extremely secure or consider embroidering the eyes with black yarn instead.
- Staging your Bandages: Don’t make the bandages too perfect! A little messiness in the wrapping makes the mummy look much more realistic and charming.
- Wire Management: When inserting wire, make sure the ends are tucked deep into the stuffing so they don’t poke through the crochet fabric.