Adorable Amigurumi Panda Crochet Pattern: A Step-by-Step Tutorial
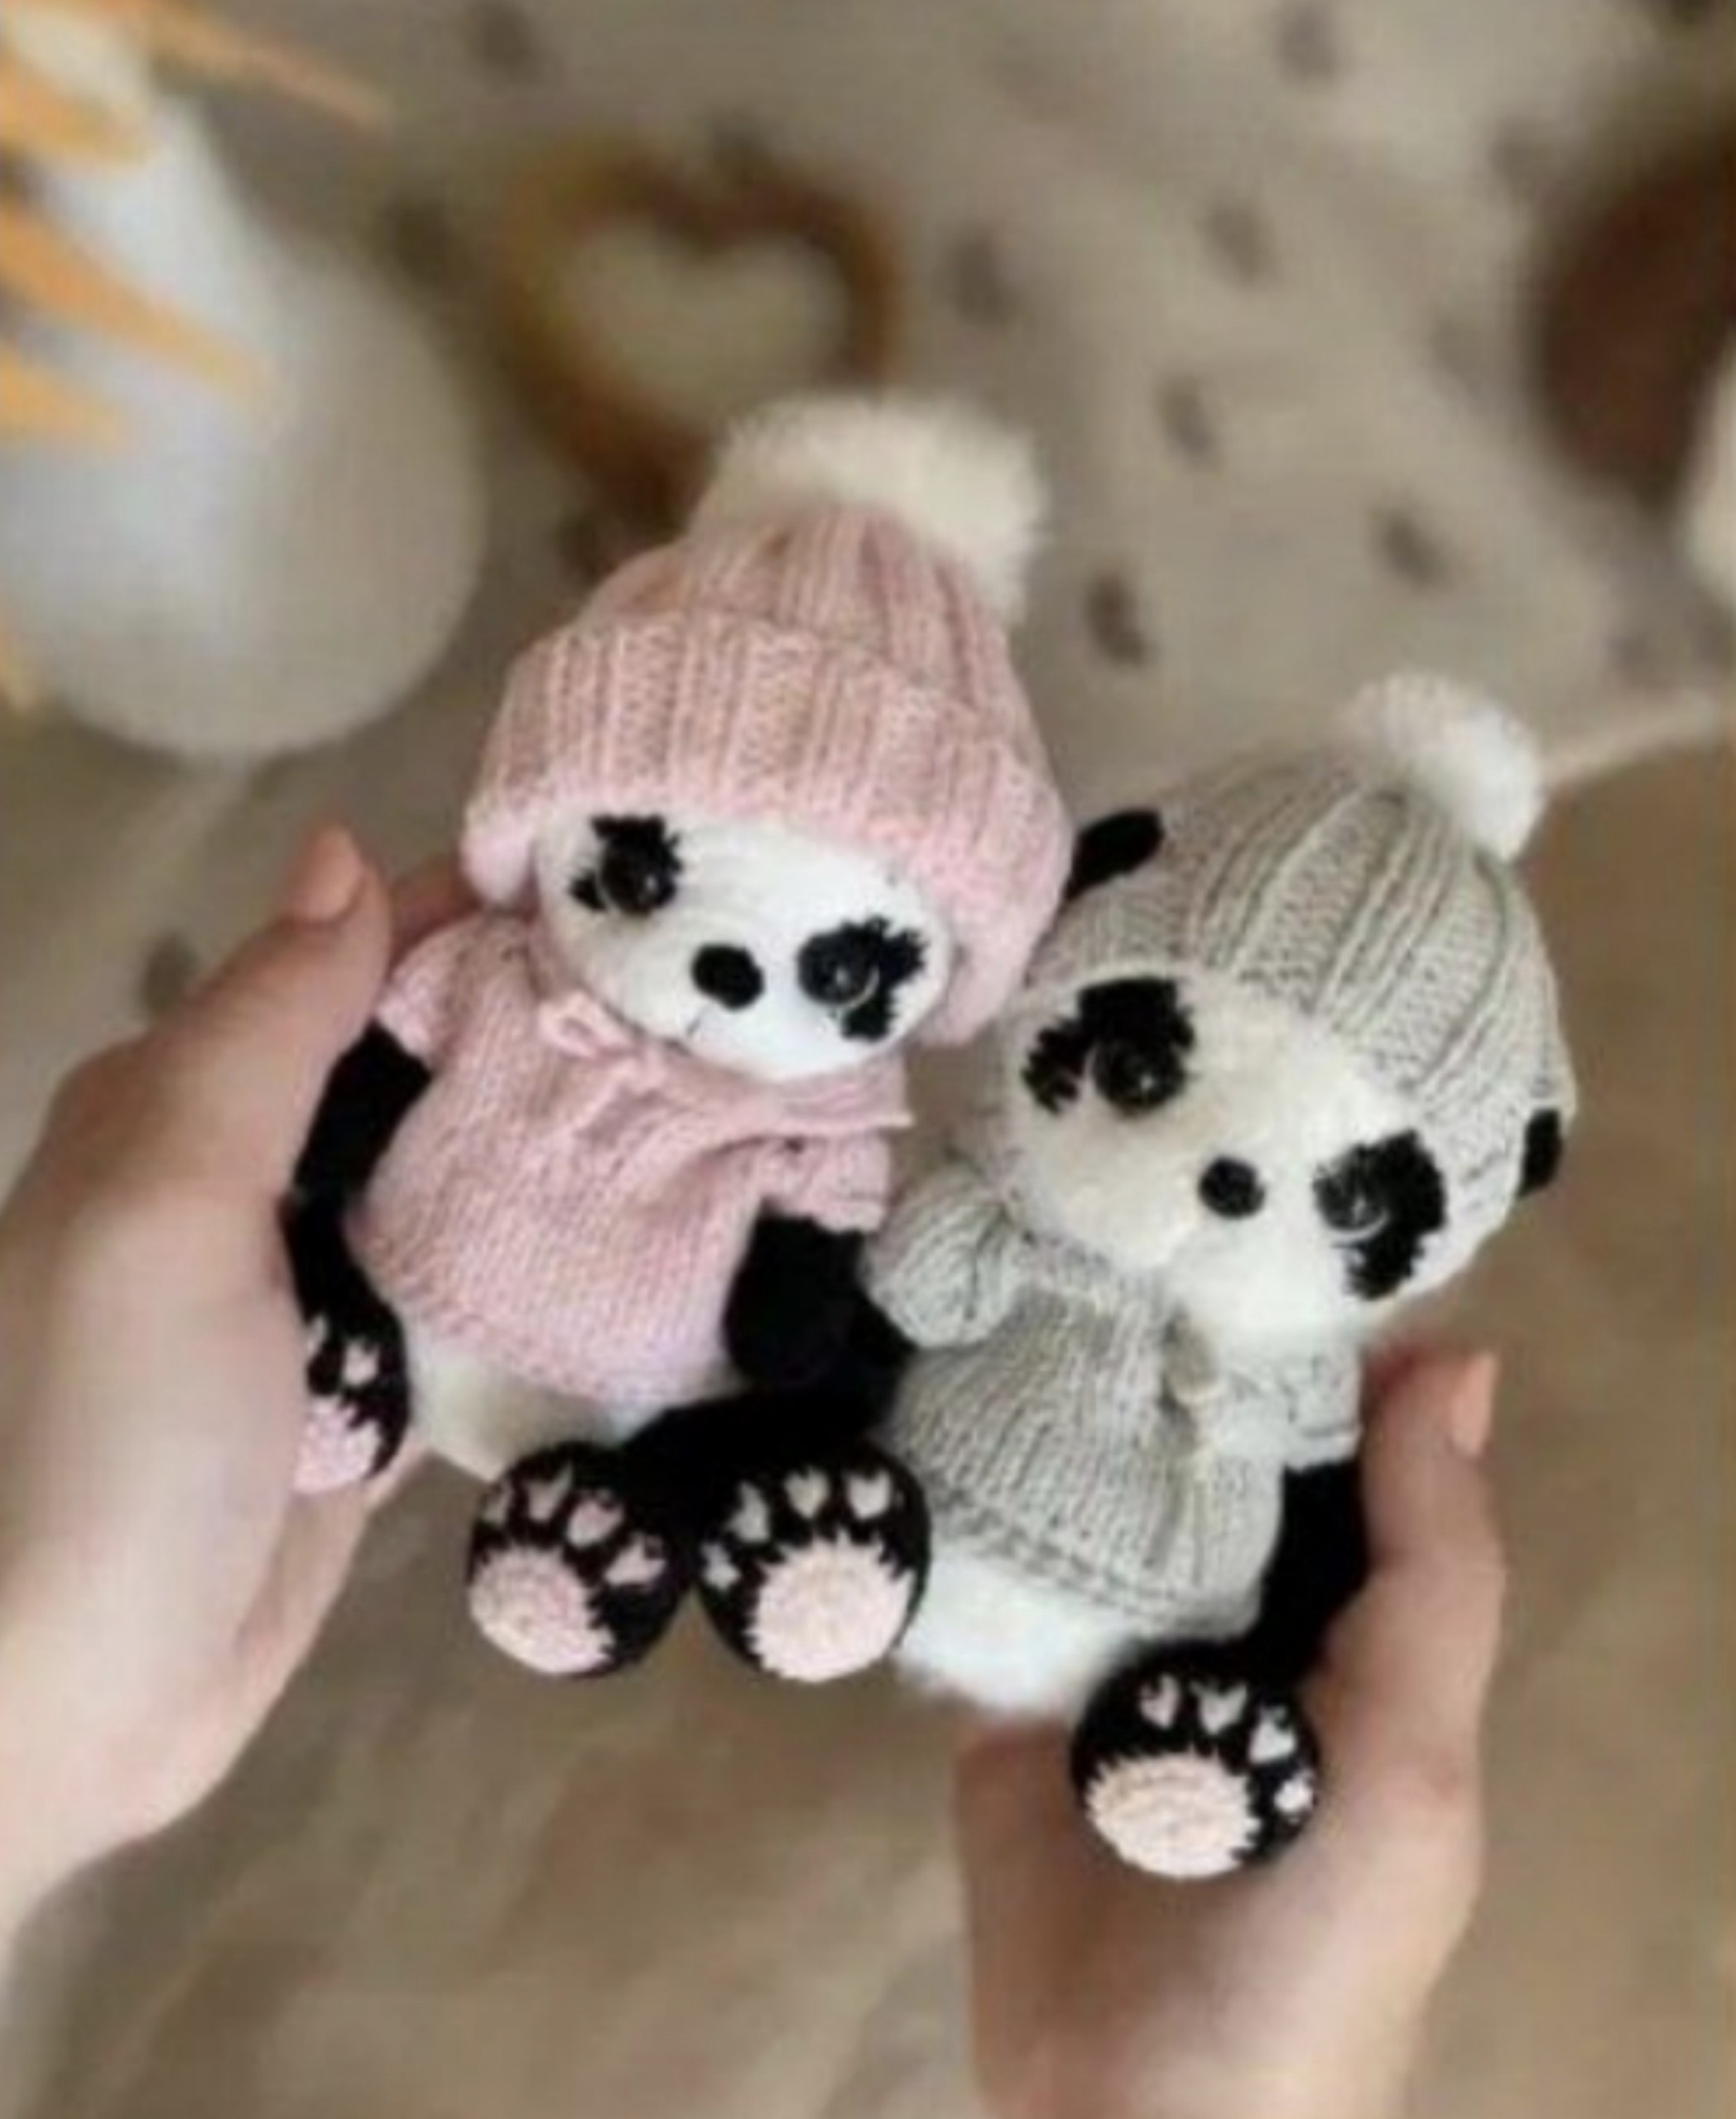
There is nothing quite as heartwarming as a handmade plushie, and if you are looking for your next crochet project, look no further! This adorable Amigurumi Panda is a must-make. With its chubby body, expressive eyes, and tiny little paws, this panda is perfect as a nursery decoration, a gift for a little one, or a charming addition to your own crochet collection.
In this comprehensive tutorial, I will walk you through every single step, from crafting the tiny head to assembling the jointed legs and even making the miniature clothing. Whether you want to use soft microvelvet for a huggable feel or classic cotton for a more structured look, this pattern is versatile and fun!
Materials & Abbreviations
Depending on the size you want to achieve, you can choose from several yarn options. This pattern offers variations for a small 5.5-inch panda, a medium 6-inch panda, or a larger 8-inch plushie.
Yarn & Size Options
- Option 1 (Soft Plush – approx. 6 inches): Use 2mm microvelvet yarn (Black, White, and Pink). For the limbs, you may prefer a slightly thicker 3mm black velvet.
- Option 2 (Classic Cotton – approx. 6.7 inches): Use YarnArt Jeans or a similar weight cotton yarn (Colors: White, Black, and Pink/Grey).
- Option 3 (Extra Soft/Velvet – approx. 8.3 inches): Use Alize Baby Softy yarn (White and Black) for a very large, squishy version.
Required Tools
- Crochet Hooks: 1.5mm, 1.75mm, or 2mm (depending on your chosen yarn).
- Knitting Needles: Sizes US 0 to US 3 (for the accessories).
- Safety Eyes: 0.4-inch (10mm) or 0.55-inch (14mm) safety eyes.
- Stuffing: High-quality fiberfill (polyester stuffing).
- Joints: T-shaped split pins (approx. 0.5 to 0.75 inches) for the movable limbs.
- Other: Embroidery needle, sharp scissors, pliers, and a stitch marker.
US Crochet Abbreviations
- MR: Magic Ring
- sc: Single Crochet
- inc: Increase (2 sc in one stitch)
- dec: Decrease (sc 2 together)
- hdc: Half Double Crochet
- ch: Chain
- st(s): Stitch(es)
- [ ] x 6: Repeat the instructions within the brackets six times
Step-by-Step Instructions
The Head
We begin by working with white yarn. Use a stitch marker to keep track of your rounds.
- R1: 8 sc in MR (8)
- R2: (2 sc, 2 inc) x 2 (12)
- R3: (3 sc, 3 inc) x 2 (18)
- R4: 5 sc, 3 inc, 6 sc, 3 inc, 1 sc (24)
- R5: 6 sc, (1 inc, 1 sc) x 3, 6 sc, (1 inc, 1 sc) x 3 (30)
Note: From this point forward, switch to black yarn to create the eye patches.
- R6: 7 sc, 1 inc, 4 sc, 1 sc, 1 inc, 1 sc, 6 sc, 1 sc, 1 inc, 1 sc, 4 sc, 1 inc, 1 sc (34)
- R7: 10 sc, 3 inc, 1 inc, 3 sc, 6 inc, 3 sc, 1 inc, 3 inc, 4 sc (48)
- R8: 4 sc, place marker at the center. Continue: 10 sc, 8 sc, (1 inc, 1 sc) x 5, 1 sc. In this same stitch, work 1 sc using black yarn to create a blended transition. Then, continue with 7 sc in black, and 12 sc in black (54).
- R9: 10 sc, 8 sc, 16 sc, 8 sc, 12 sc (54)
- R10: 13 sc, 1 inc, 3 sc, 1 sc, (1 inc, 4 sc) x 3, 1 inc, 1 sc, 3 sc, 1 inc, 15 sc (60)
Fasten off the black yarn. Eye Placement: Insert safety eyes between Rounds 7 and 8. Locate the first increase in the center, go 2 stitches back for the right eye. Locate the sixth increase, go 1 stitch forward for the left eye.
- R11-20: 60 sc for 10 rounds.
- R21: 15 sc, (1 dec, 8 sc) x 4, 5 sc (56)
- R22: 56 sc
- R23: (5 sc, 1 dec) x 8 (48)
- R24: (4 sc, 1 dec) x 8 (40)
- R25: (3 sc, 1 dec) x 8 (32)
- R26: (2 sc, 1 dec) x 8 (24)
- R27: (1 sc, 1 dec) x 8 (16)
- R28: 8 dec (8)
Fasten off, leaving a long tail for sewing.
The Ears
- R1: 7 sc in MR (7)
- R2: 7 inc (14)
- R3-4: 14 sc (2 rounds)
Do not stuff the ears. Fold them in half and crochet 6 sc through both layers. Leave a long tail for sewing. Attach the ears between Rounds 16 and 17 on the head, leaving 5-6 stitches of space between them.
The Arms and Paws
Start with black yarn.
- R1: 7 sc in MR (7)
- R2: 7 inc (14)
- R3: 14 sc. Note: From the next round, introduce pink yarn for the paw details.
- R4: 1 sc (black), 2 sc (pink), 1 sc (black), 2 sc (pink), 8 sc (black) (14)
- R5: 1 sc, 5 sc, 8 sc (14)
- R6: 2 sc, 4 sc, 8 sc (14)
- R7: 3 sc, 2 sc, 9 sc (14)
- R8: 3 sc, 1 dec, (2 sc, 1 dec) x 2, 1 sc (11)
Fasten off the pink yarn. Continue with black yarn for Rounds 9-10 (11 sc each). Stuff the limb firmly. Continue the pattern to Round 18. Between Rounds 18 and 19, insert your split pin (T-pin) to create the jointed arm. Complete the assembly as per the pattern instructions for the remaining rounds.
The Tail
- R1: 6 sc in MR (6)
- R2: 6 inc (12)
- R3: 12 sc
- R4: (1 dec, 1 sc) x 3 (9)
Fasten off, leaving a tail for sewing.
The Legs (Jointed)
Start with pink yarn, then switch to black for the feet.
- R1: 8 sc in MR (8)
- R2: (2 inc, 2 sc) x 2 (12)
- R3: 1 sc, 3 inc, 3 sc, 3 inc, 2 sc (18)
- R4: 3 sc, (1 inc, 1 sc) x 2, 2 sc. Switch to black yarn: 2 sc, (1 inc, 1 sc) x 3, 1 sc (23)
- R5: 4 sc, (1 inc, 2 sc) x 2, 4 sc, 1 hdc, 1 hdc, 1 inc (from hdc), 1 hdc, 1 inc (from hdc), 1 hdc, 1 inc (from hdc), 1 hdc, 1 inc (from hdc), 2 sc (27)
Continue following the pattern rounds for shaping. Between Rounds 20 and 21, insert the split pin to make the legs movable. Stuff firmly.
The Body
Work in white yarn.
- R1: 7 sc in MR (7)
- R2: 7 inc (14)
- R3: (1 inc, 1 sc) x 7 (21)
- R4: (1 inc, 2 sc) x 7 (28)
- R5: (1 inc, 3 sc) x 7 (35)
- R6: (1 inc, 4 sc) x 7 (42)
- R7: (1 inc, 5 sc) x 7 (49)
- R8: (1 inc, 6 sc) x 7 (56)
- R9-16: 56 sc (8 rounds)
Attaching Limbs: In Round 12, incorporate the legs by working 11 sc, 8 sc together with the leg, 18 sc, 8 sc together with the second leg, and 11 sc (56). In Round 29, incorporate the arms: 5 sc, 6 sc together with the arm, 9 sc, 6 sc together with the second arm, and 4 sc (30).
Continue with shaping decreases until you reach 26 stitches, then finish as directed.
Finishing
Assembly
Carefully sew the head to the body between Rounds 10 and 16. The tail should be sewn between Rounds 11 and 13. Ensure all limbs are aligned and securely attached via the split pins.
Face Sculpting & Detailing
To give your panda that professional, “lifelike” look, you must sculpt the muzzle:
- Muzzle: Insert your needle between Rounds 8 and 9 at the center. Pull the thread through to the bottom of the eyes, circling the area to create a slight indentation. Tighten the thread to pull the “snout” forward.
- Nose: Embroider a small nose in Round 3. Use a single entry point and work stitches to the left and right of the center to create a rounded shape.
- Eyebrows: Embroider two small lines (2 sc in length) between Rounds 10 and 11, positioned about 4 stitches away from the black eye patches.
Bonus: Hand-Knitted Accessories
To complete the look, you can add a tiny knitted hat and sweater!
The Pom-Pom Hat
Cast on 56 stitches. Work in a 2×2 ribbing pattern for about 3 inches. For the top of the hat, decrease by alternating decreases (e.g., knit 2 together where there are 2 knit stitches) until only 14 stitches remain. Sew the sides together. Pom-Pom Tip: Wrap yarn tightly around two cardboard cutouts, tie a string through the middle, cut the loops, and trim into a perfect sphere!
The Hooded Sweater
This is worked using a raglan construction. Cast on 30 stitches. Work raglan increases for 8 rounds. In Round 9, divide the work into sleeves and body by casting off the stitches for the armholes. Continue working in the round to create the body. For the hood, cast on 30 stitches at the neckline, work 3-4 inches in stockinette stitch, and sew the pieces together using a seamless method.
Pro Tips for a Professional Finish
- Tension Matters: For amigurumi, keep your tension tight to ensure the stuffing doesn’t peek through the stitches.
- Invisible Joins: When switching colors, try to “carry” the yarn or weave in ends very carefully to avoid bumps.
- Sculpting is Key: Don’t skip the muzzle sculpting! It is the difference between a “ball with eyes” and a character with personality.
- Use Pliers: When working with split pins and joints, use pliers to crimp the ends tightly so the limbs don’t become loose over time.