Easy Crochet Tulip Pattern: A Cute Spring Amigurumi Tutorial
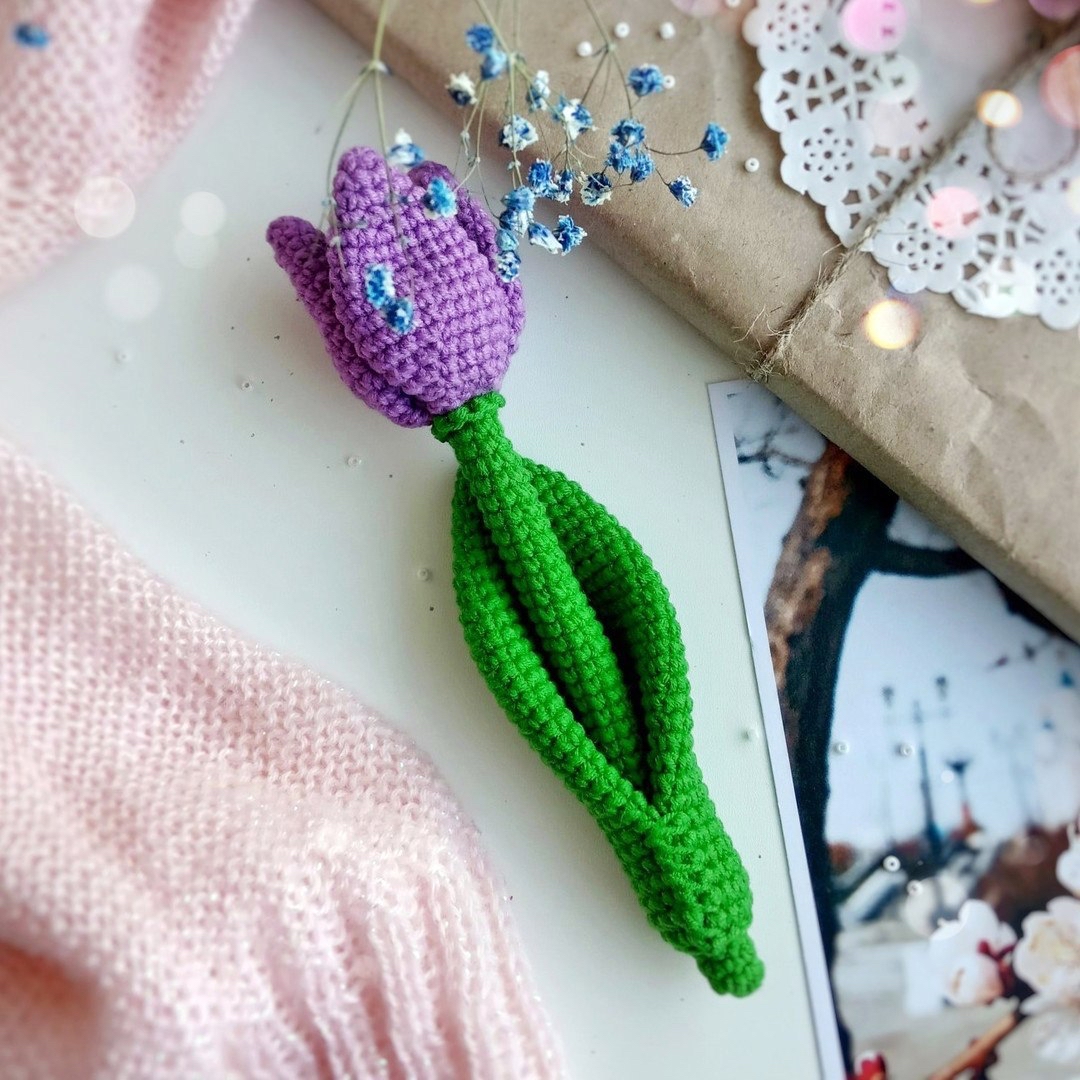
Spring is just around the corner, and there is no better way to celebrate the blooming season than by creating your own everlasting garden! This crochet tulip is a wonderful project for anyone looking to add a pop of color to their home decor, create a sweet gift for a loved one, or even build a colorful bouquet of amigurumi flowers. This pattern is designed to be beginner-friendly, resulting in a charming little tulip that stands approximately 6.5 to 7 inches tall.
Whether you are a seasoned maker or just picking up a hook for the first time, this tutorial will guide you through every step of the process. We will work on three main components: the petals, the leaf, and the stem. By the end, you will have a beautiful, sturdy little flower that looks just as fresh as a real one!
Materials & Abbreviations
Before we dive into the stitches, let’s make sure you have everything you need on your crafting table. To achieve the best results and the look seen in the photos, I recommend using a smooth cotton or cotton-blend yarn.
What You Will Need:
- Yarn: A main color (Green for the stem and leaf) and a secondary color of your choice (such as Pink, Purple, or Yellow for the petals).
- Crochet Hook: 2.5mm (or a size that produces tight, even stitches).
- Stuffing: Polyfill or polyester fiberfill.
- Wire: 1 piece of fuzzy chenille stem (pipe cleaner) to provide structure.
- Needle: A large-eye tapestry needle for sewing and weaving in ends.
- Tools: Stitch markers, scissors, sewing pins, pliers (to shape the wire), and a stuffing tool or chopstick to help pack the fiberfill.
Abbreviations (US Terms):
- MR: Magic Ring
- sc: single crochet
- inc: increase (2 sc in one stitch)
- dec: decrease (sc 2 together)
- st(s): stitch(es)
- BLO: back loop only
- FLO: front loop only
- sl st: slip stitch
- (pattern) * n: repeat the instructions inside the parentheses n times
Note: This pattern is worked in a continuous spiral. Do not join rounds with a slip stitch unless specifically instructed. Using a stitch marker is highly recommended so you don’t lose your place!
Step-by-Step Instructions
The Petals (Make 3)
The petals are worked as flat pieces. Please note: do not stuff the petals.
Start with your chosen petal color.
- Round 1: 6 sc in MR (6)
- Round 2: (1 sc, inc) * 3 = 9 sc
- Round 3: (2 sc, inc) * 3 = 12 sc
- Round 4: (3 sc, inc) * 3 = 15 sc
- Round 5: (4 sc, inc) * 3 = 18 sc
- Round 6-7: 18 sc (2 rounds)
- Round 8: (5 sc, inc) * 3 = 21 sc
- Round 9-11: 21 sc (3 rounds)
- Round 12: (5 sc, dec) * 3 = 18 sc
- Round 13: (4 sc, dec) * 3 = 15 sc
- Round 14: (3 sc, dec) * 3 = 12 sc
- Round 15: (2 sc, dec) * 3 = 9 sc
- Round 16: 1 sc
Fasten off, leaving a long tail for sewing. Fold the petal piece in half so the edges meet. Using your main color, crochet 5 sc through both layers to join the edges together. Fasten off and leave a long tail for assembly.
The Leaf (Make 1)
The leaf is also a flat piece and should not be stuffed.
Use your green yarn.
- Round 1: 6 sc in MR (6)
- Round 2: (1 sc, inc) * 3 = 9 sc
- Round 3: (2 sc, inc) * 3 = 12 sc
- Round 4: (3 sc, inc) * 3 = 15 sc
- Round 5: (4 sc, inc) * 3 = 18 sc
- Round 6-7: 18 sc (2 rounds)
- Round 8: (2 sc, inc) * 6 = 24 sc
- Round 9-10: 24 sc (2 rounds)
- Round 11: (3 sc, inc) * 6 = 30 sc
- Round 12-31: 30 sc (20 rounds)
Fasten off, leaving a long tail. Fold the leaf in half to join the edges and crochet 14 sc through both layers. Fasten off and leave a long tail.
The Stem and Pistil (Make 1)
The stem is worked from the bottom up. This piece will contain the wire and the stuffing.
Start with your green yarn.
- Round 1: 6 sc in MR (6)
- Round 2: (1 sc, inc) * 3 = 9 sc
- Round 3-37: 9 sc (35 rounds)
Important: Stop here. Take your fuzzy chenille stem (pipe cleaner), fold it in half, and insert it into the center of the stem. Use your pliers to slightly twist the ends if needed to ensure it stays secure.
Now, switch to your petal color. To create the transition to the flower head, work in the BLO (back loop only) for the next rounds:
- Round 38: (2 sc, inc) * 3 = 12 sc
- Round 39: (3 sc, inc) * 3 = 15 sc
- Round 40: (4 sc, inc) * 3 = 18 sc
- Round 41-45: 18 sc (5 rounds)
Switch back to working in both loops (standard crochet) for the tapering part:
- Round 46: (4 sc, dec) * 3 = 15 sc
- Round 47-48: 15 sc (2 rounds)
- Round 49: (3 sc, dec) * 3 = 12 sc
- Round 50: 12 sc (1 round)
Now, begin stuffing the pink “pistil” part of the stem firmly with your fiberfill. Once stuffed, continue decreasing to close the piece:
- Round 51: (2 sc, dec) * 3 = 9 sc
- Round 52: (1 sc, dec) * 3 = 6 sc
Fasten off, pull the thread tight to close the hole, and weave in your ends securely inside the stem.
Finishing
Assembling the Tulip
This is the part where your hard work comes together! Follow these steps carefully for a professional look.
Attaching the Petals
- Take your three petals and use sewing pins to arrange them evenly around the pink “pistil” top.
- Using a needle and your petal color yarn, sew the base of each petal to the pistil. You should sew them between rounds 1 and 2 of the pink section.
- To keep the petals from drooping, add one single stitch through the center of each petal to secure it to the head.
- Do not pull too tightly; you want the petals to have a natural, slightly open look. Fasten off and hide the ends inside the flower.
Seamless Stem Transition
To hide the seam between the green stem and the pink head, take your green yarn. Locate the junction where the two colors meet and work 9 sc through the FLO (front loops only). Finish this round with a slip stitch. This creates a beautiful, textured transition.
Adding the Leaf
- Take your finished leaf and wrap it around the green stem.
- Align the edges of the leaf and sew them together. You only need to sew about 7 rows of the leaf to keep it secure.
- Secure the leaf to the stem by sewing it at a height of about 4 rows up from the bottom of the leaf.
- Fasten off and hide all remaining yarn tails.
Tips
To make your crochet tulip look its absolute best, keep these professional tips in mind:
- Tension is Key: Since amigurumi is meant to be stuffed, try to keep your tension even and tight. This prevents the stuffing from peeking through your stitches.
- Use Your Pins: Never skip the pinning stage! It is much easier to move a pin than it is to unpick stitches once you’ve already sewn a petal in the wrong place.
- Wire Safety: When working with chenille stems, ensure the ends are tucked away or bent over so they don’t poke through your crochet work.
- Color Choices: While pink is classic, don’t be afraid to experiment! A bright yellow tulip or a deep purple one can look stunning depending on your yarn choice.
Happy crocheting! I hope you enjoy making this little piece of spring!