Adorable Crochet Flip Flop Keychain Pattern: A Step-by-Step Tutorial
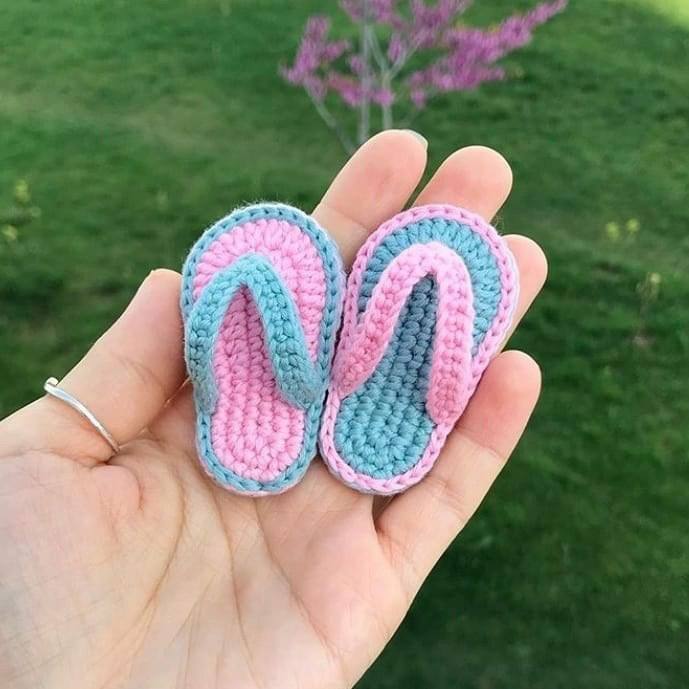
Looking for a quick, cute, and colorful project to brighten up your keys or bag? These mini crochet flip flops are the perfect summer accessory! Whether you are looking for a thoughtful handmade gift or a fun project to keep your hands busy during a beach trip, this pattern is a fantastic choice. These tiny sandals are not only charming but also a great way to practice your shaping skills using different stitch heights.
This tutorial is designed with beginners in mind. We will walk through the process of creating the sole and the strap, then assemble them into a miniature shoe that looks just like the real thing. Let’s grab our hooks and get started!
Materials & Abbreviations
To create these mini flip flops, you will need a few basic supplies. Since these are keychains, I highly recommend using a cotton yarn, as it provides a cleaner stitch definition and holds its shape better than acrylic.
Materials Needed
- Yarn: Small amounts of cotton yarn in two contrasting colors (e.g., pink and light blue). You will need approximately 20-30 yards of each color.
- Crochet Hook: A 3.25mm (D) or 3.5mm (E) hook, depending on your tension.
- Tapestry Needle: For weaving in ends and sewing the strap to the sole.
- Keychain Ring: A standard 1-inch metal jump ring or lobster clasp.
- Scissors: To trim your yarn.
Abbreviations (US Terms)
- ch: chain
- sc: single crochet
- hdc: half double crochet
- dc: double crochet
- sl st: slip stitch
- inc: increase (two stitches in the same stitch)
- st(s): stitch(es)
Step-by-Step Instructions
We will begin by making the strap, followed by the sole of the shoe. To make a pair, you will repeat these steps twice, swapping the colors for a fun, mismatched look!
The Strap
The strap is worked in a narrow strip that curves to fit the foot. Start with your first chosen color.
Row 1: Chain 24. Starting in the 2nd chain from the hook, work 11 sc. In the 12th chain, work 3 sc into the same stitch (this creates the curve for the toe). Continue working 11 sc down the remainder of the chain. Turn your work.
Row 2: Work 11 sl st. Chain 3. Working back down the opposite side, starting in the 2nd chain from the hook, work 2 sc. Continue the row by working 12 sl st until you reach the end. Fasten off, leaving a long tail for sewing.
The Sole
The sole is worked in rounds to create an oval shape. You will make two identical soles—one in each color.
Round 1
Chain 13. Starting in the 2nd chain from the hook, work 11 sc. In the last chain, work 4 sc into the same stitch to turn the corner. Now, working along the bottom (underside) of the foundation chain, work 10 sc. End the round with 1 inc in the final stitch. (27 stitches total)
Round 2
Chain 1. Work 1 inc, then 5 sc. Now, transition to half double crochets: work 4 hdc, then 6 hdc-inc (two hdc in each of the next 6 stitches), followed by 4 hdc. Switch back to single crochet: work 5 sc and end the round with 2 inc. (36 stitches total)
Round 3
Chain 1. Work 1 inc (make sure to place this increase into a single crochet from the previous row), followed by 4 sc. Now, transition to hdc: work 5 hdc, then 3 dc. Create 7 dc-inc (two dc in each of the next 7 stitches), then 3 dc. Switch back to hdc: work 5 hdc, followed by 4 sc. End the round with 1 inc, chain 1, and one final inc. (46 stitches total). Finish the round with a sl st to join.
Finishing
Now that you have your sole and your strap, it is time to put the flip flop together.
Attaching the Strap: Position the strap on top of the sole. The “bump” created by the 3 sc in the strap should sit right at the toe of the sole. Using your tapestry needle and the tail from the strap, sew the ends of the strap securely to the sole.
Adding Detail: To give the flip flop a professional look, you can join your yarn (using the strap color) and work a row of hdc around the edge of the sole where the strap connects, or simply use the hdc to stitch the strap down firmly to the base. This ensures the strap won’t wiggle or pull away during use.
Adding the Keychain: Thread your keychain ring through the back heel of the sole or through the center of the strap. Secure it with a tight knot or a few small stitches of yarn to ensure it stays in place.
Tips for Success
To make your crochet flip flops look their best, keep these helpful tips in mind:
- Tension is Key: Because this is a very small project, tight tension is your friend. If your stitches are too loose, the sole may curl. If you find your stitches are too loose, try dropping down a hook size.
- Yarn Choice: If you don’t have cotton yarn, a mercerized cotton is the best option as it has a slight sheen and is very durable for items that will be handled frequently, like keychains.
- The “Turning” Stitch: In Round 1 of the sole, putting 4 sc into the last chain is what allows the project to wrap around and form an oval. Make sure these stitches are snug so there aren’t any gaps.
- Customization: Feel free to experiment with colors! You can make a “beach” theme with sandy beige and ocean blue, or a “candy” theme with bright pinks and greens. You can even add a tiny bead to the center of the strap for a “jeweled” flip flop look.