DIY Crochet Doll Pattern: Step-by-Step Guide to Making a Cute Amigurumi Girl
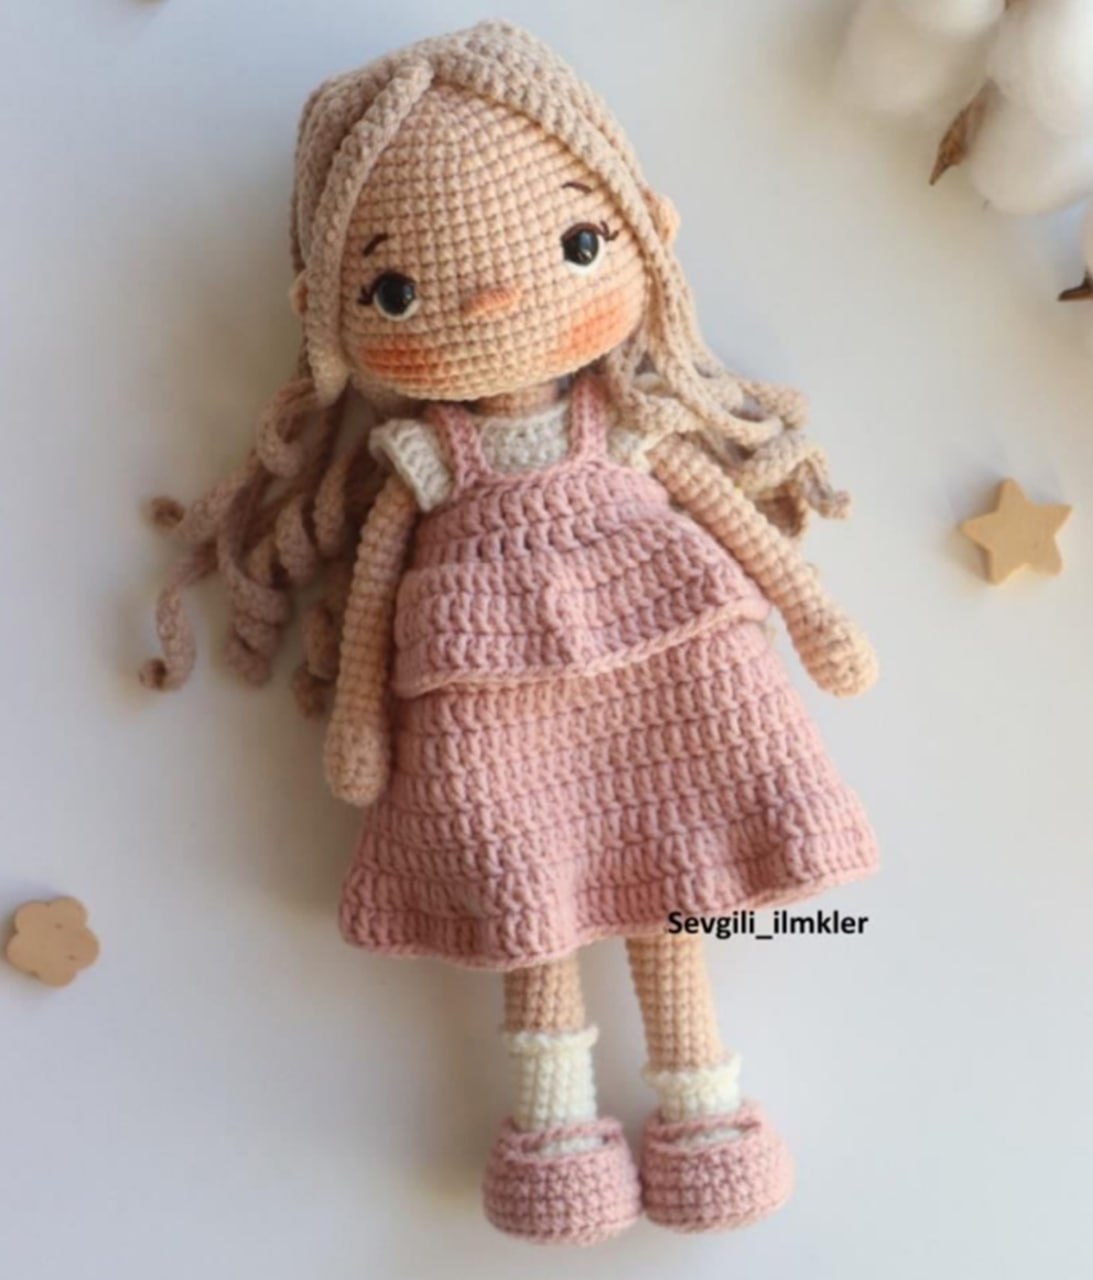
There is something incredibly rewarding about creating your own handmade dolls. Whether you are looking to make a unique gift for a child or adding a charming new character to your amigurumi collection, a custom crochet doll is a wonderful project. This detailed tutorial will walk you through every stitch required to create a beautiful, poseable little girl doll with lovely braided hair, a cute outfit, and even tiny socks!
This pattern is perfect for intermediate crocheters or ambitious beginners who are comfortable with basic amigurumi techniques like working in a magic ring and increasing/decreasing. By following this guide, you will create a doll that stands approximately 6 to 8 inches tall, depending on your tension and yarn choice.
Materials & Abbreviations
Before you pick up your hook, ensure you have all the necessary supplies ready. Using high-quality cotton yarn will give your doll a polished, professional look.
Required Materials
- Skin-colored yarn: For the head, arms, and legs.
- Hair yarn: A soft color of your choice for the hair.
- Dress yarn: A pretty color for the main dress.
- T-shirt yarn: A contrasting color for the top.
- Sock yarn: For the tiny textured socks.
- Safety eyes: 8mm size.
- Embroidery thread: To detail the eyes.
- Stuffing: High-quality polyester fiberfill.
- Hooks: 1.75mm and 2mm hooks.
- Structure materials: Plastic inserts (for the legs) and wire (for poseability).
- Other: Glue and a tapestry needle.
Abbreviations (US Terms)
Please ensure you are using US crochet terms to follow this pattern accurately:
- MR: Magic Ring
- ch: Chain
- sc: Single crochet
- inc: Increase (2 sc in one stitch)
- dec: Decrease (sc 2 together)
- hdc: Half double crochet
- dc: Double crochet
- sl st: Slip stitch
- BLO: Back loop only
- FLO: Front loop only
- W: 3 sc in one stitch
Step-by-Step Instructions
The Head
Start with your skin-colored yarn using a 2mm hook.
- MR, 6 sc (6)
- (inc) * 6 (12)
- (sc, inc) * 6 (18)
- (2 sc, inc) * 6 (24)
- (3 sc, inc) * 6 (30)
- (4 sc, inc) * 6 (36)
- (5 sc, inc) * 6 (42)
- (6 sc, inc) * 6 (48)
- 48 sc (48)
- (7 sc, inc) * 6 (54)
- Rounds 11-17: 54 sc (54)
- 20 sc, ch 1, skip 1 stitch, 10 sc, ch 1, skip 1 stitch, 22 sc (54) — This creates the eye gaps.
- 54 sc (54)
- 17 sc, (dec, 3 sc) * 5, 17 sc (54)
- Insert 8mm safety eyes into the gaps created in round 18.
- (7 sc, dec) * 6 (48)
- 3 sc, dec, (6 sc, dec) * 5, 3 sc (42)
- (5 sc, dec) * 6 (36)
- Stuff the head firmly with fiberfill.
- 2 sc, dec, (4 sc, dec) * 5, 2 sc (30)
- (3 sc, dec) * 6 (24)
- sc, dec, (2 sc, dec) * 5, sc (18)
- 18 sc (18)
Eye Embroidery: Using your embroidery thread, carefully detail the eyes to give the doll a sweet expression.
The Ears
- In a MR: *ch 2, 4 hdc, ch 2, sl st.
- Fasten off and pull the ring tight.
- Sew the ears to the sides of the head as shown in your reference photos.
The Hair
The hair consists of a base and 19 individual curly locks.
Hair Base (Use 2mm hook)
- MR, 6 sc (6)
- (inc) * 6 (12)
- inc, inc, (sc, inc) * 5 (19)
Hair Locks (Use 1.75mm hook)
- Ch 50. Starting from the 2nd chain from the hook: 49 sc.
- Make 19 of these locks.
- Attach the base to the head and sew the locks in place.
The Arms
Use skin-colored yarn with a 2mm hook.
- MR, 5 sc (5)
- (inc) * 5 (10)
- Rounds 3-4: 10 sc (10)
- 3 sc, (4 inc in one stitch), 6 sc (13)
- 3 sc, 4 dec, 6 sc (10)
- 3 sc, dec, 3 sc, dec (8)
- Rounds 8-24: 8 sc (8)
The Legs & Socks
Follow these steps for each leg. You will need a plastic insert for the foot area to help the doll stand.
Leg Construction
- Ch 4. Starting from the 2nd chain from the hook:
- 2 sc, W, 2 sc, W (10)
- 2 sc, 3 inc, 2 sc, 3 inc (16)
- 3 sc, inc, sc, inc, sc, inc, 3 sc, inc, sc, inc, sc, inc (22)
- 4 sc, inc, sc, inc (24)
- BLO 24 sc
- 24 sc — Insert the plastic base here.
- 2 sc, (dec, sc) * 6, 4 sc (18)
- 2 sc, (dec, sc) * 4, 4 sc (14)
- 4 sc, dec, 8 sc (13)
- Rounds 10-15: 13 sc (13)
- Change to skin-colored yarn.
- Stuff the foot area.
- BLO 13 sc
- Rounds 17-18: 13 sc (13)
- Round 19: 12 sc (12)
The Sock Detail
Working in the half loops (FLO/BLO) to create texture:
- Use your sock yarn. In the half loops, work a pattern of: sl st, ch, sl st, ch…
- Repeat this for 15 rounds (Rounds 19-33).
- Round 34: 12 sc (12)
The Body
Join the legs together to start the body.
- 13 sc, 3 inc, 13 sc, 3 inc, sc (38)
- Rounds 2-10: 38 sc (38)
- 7 sc, dec, 8 sc, dec, 7 sc, dec, 8 sc, dec (34)
- Rounds 12-13: 34 sc (34)
- 6 sc, dec, 7 sc, dec, 6 sc, dec, 7 sc, dec (30)
- Rounds 15-18: 30 sc (30)
- 4 sc, (attach 1st arm here: 1 sc), 14 sc, (attach 2nd arm here: 1 sc), 10 sc (42)
- (5 sc, dec) * 6 (36)
- 2 sc, dec, (4 sc, dec) * 5, 2 sc (30)
- (3 sc, dec) * 6 (24)
- sc, dec, (2 sc, dec) * 5, sc (18)
- Rounds 24-26: 18 sc (18)
Stuff the body firmly. Leave a long tail for sewing.
The Outfit
The T-Shirt
- Ch 25. Starting from the 2nd chain from the hook:
- (3 sc, inc) * 6 (18)
- (4 sc, inc) * 6 (24)
- (8 sc, inc) * 4 (32)
- 5 sc, ch 5, skip 9 sts, 11 sc, ch 5, skip 9 sts, 6 sc (32)
- Rounds 5-11: 32 sc (32)
- For the collar: Turn, 3 sl st, ch 6 (loop), 3 sc, ch 6 (loop), 3 sc, 24 sl st, 10 sc.
- Sleeves: Ch 2, (hdc, inc) * 4, 7 hdc. Make two.
- Sew buttons to the back of the shirt.
The Dress
- Ch 34. Starting from the 3rd chain from the hook:
- 32 dc (32)
- 32 dc (32)
- BLO (dc, inc) * 16 (48)
- Rounds 4-5: 48 dc (48)
- (7 dc, inc) * 6 (54)
- Rounds 7-10: 54 dc (54)
- (inc, inc, dc) * 18 (72)
- 72 dc (72)
- In the half loops: (inc) * 32 (64 dc)
- Straps: 12 sl st, ch 24, skip 6 sts, 18 sc, 5 sl st, ch 24, skip 6 sts, 18 sc, 15 sl st.
- Sew a button to the back to secure the straps.
The Shoes
- Ch 4. Starting from the 2nd chain from the hook:
- 2 sc, W, 2 sc, W (10)
- 2 sc, 3 inc, 2 sc, 3 inc (16)
- 3 sc, inc, sc, inc, sc, inc, 3 sc, inc, sc, inc, sc, inc (22)
- 4 sc, inc, 2 sc, inc, 2 sc, inc, 3 sc, inc, 2 sc, inc, 2 sc, inc, 9 sc (28)
- BLO 28 sc
- Rounds 6-7: 28 sc (28)
- 9 sc, (dec, sc) * 5, 4 sc (23)
- 8 sc, ch 7, skip 9 sts, 5 sc, sl st (23)
Finishing
Assembly is the most important part of making your doll look lifelike! Use a tapestry needle to sew the head to the body, and attach the arms to the sides of the torso as instructed in the body section. Carefully sew the hair onto the head, ensuring the curls fall naturally. Finally, sew the shoes onto the feet and add any decorative elements like buttons or small embroidery to the clothes.
Tips for Success
- Tension Control: Amigurumi should be worked with tight tension to ensure the stuffing doesn’t show through the stitches.
- Use Stitch Markers: When working in continuous rounds, always use a stitch marker to keep track of your starting point.
- Safety First: If you are making this doll for a very young child, consider embroidering the eyes instead of using plastic safety eyes to prevent choking hazards.
- Poseability: When using wire for poseability, ensure the ends of the wire are tucked deeply into the stuffing and secured with glue so they don’t poke through the crochet fabric.