Cute Amigurumi Polar Bear Crochet Pattern: A Beginner-Friendly Tutorial
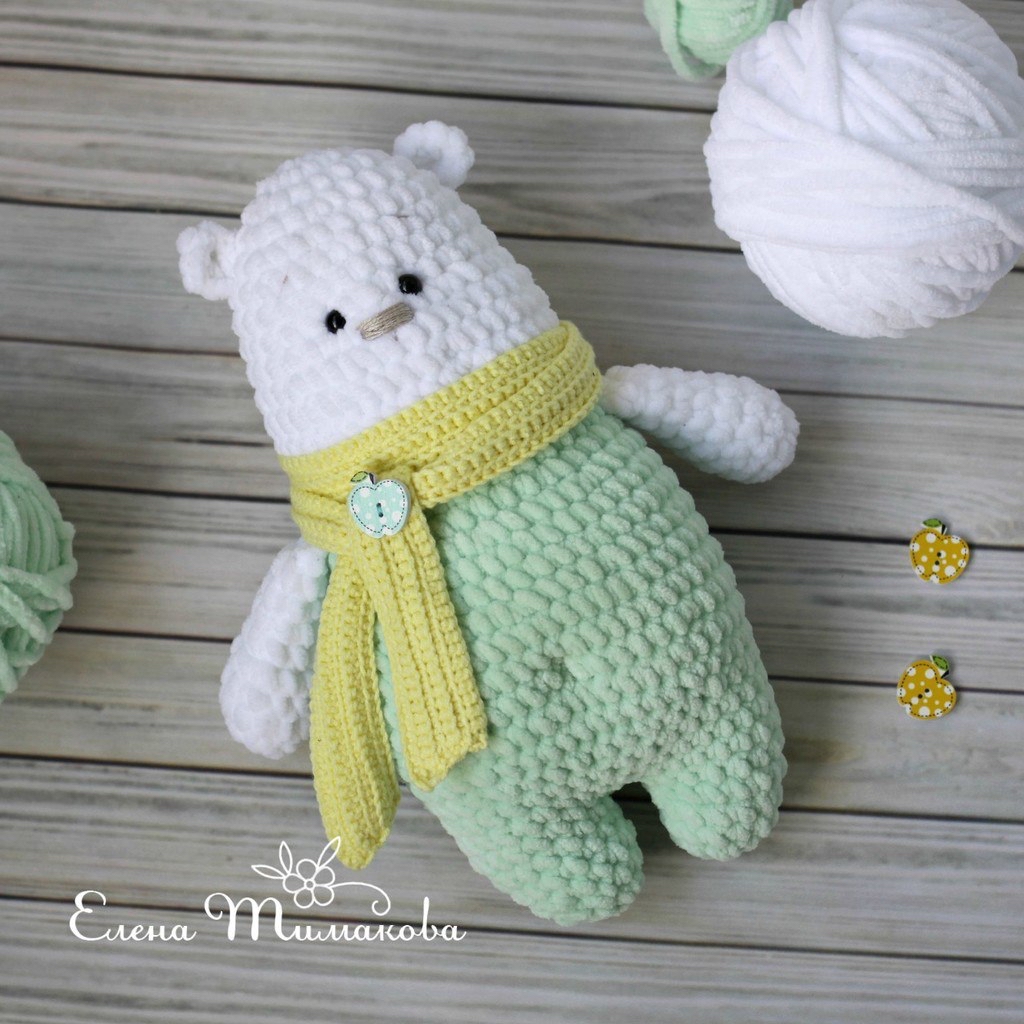
There is nothing quite as heartwarming as a handmade plushie. If you are looking for your next crochet project, this adorable amigurumi polar bear is the perfect choice. With its soft, mint-colored body and cozy little scarf, this bear is not only a wonderful companion for a nursery but also a delightful gift for anyone who loves cuddly creatures.
This pattern is designed with beginners in mind. We will be using plush, chenille-style yarn, which makes the working process much faster and results in a super-soft toy that is perfect for snuggling. Follow this detailed guide to create your very own lovable polar bear companion!
Materials and Abbreviations
Before we dive into the stitches, let’s make sure you have everything you need on your crochet hook. Working with plush yarn requires a bit of a different touch than standard cotton, so having the right supplies is key to a professional-looking finish.
Supplies Needed
- Plush/Chenille Yarn: You will need two colors. One White and one Mint (or a very light seafoam green). Look for a weight where 100 meters is approximately 100-120 grams (often labeled as bulky or jumbo plush yarn).
- Crochet Hook: A 3.5mm (E) hook works best for this yarn weight to ensure your stitches are tight enough to hide the stuffing.
- Safety Eyes: A pair of plastic sew-in safety eyes.
- Embroidery Supplies: An embroidery needle, some black embroidery floss for the nose, and a decorative button for the scarf.
- Stuffing: High-quality polyester fiberfill.
- Extras: Scissors and a stitch marker.
- Scarf Yarn: A small amount of thinner yarn in a contrasting color (like yellow or cream) and a matching small crochet hook.
US Crochet Terms to Know
This pattern uses standard US crochet terminology. Please ensure you are using US terms to avoid confusion with UK measurements.
- ch: chain
- sc: single crochet
- inc: increase (work two single crochets into the same stitch)
- dec: decrease (join two stitches together into one)
- sl st: slip stitch
- BLO: back loop only
- FLO: front loop only
Step-by-Step Instructions
Creating the Arms (Make 2)
Start with your White plush yarn.
Round 1: Make 2 chains. In the second chain from your hook, work 6 sc. (6 stitches)
Round 2: 6 inc. (12 stitches)
Rounds 3-4: 12 sc. (12 stitches)
Round 5: 5 sc, 1 dec, 5 sc. (11 stitches)
Round 6: 9 sc, 1 dec. (10 stitches)
Rounds 7-8: 10 sc. (10 stitches)
Round 9: 9 sc, 1 sl st. (10 stitches)
Lightly stuff the arms with fiberfill.
Round 10: Fold the arm in half so the open end meets the working side. Working in the front loops only (FLO), crochet 5 sc through both layers to close the arm. Fasten off and leave a tail for sewing.
The Head and Body
This bear is worked in one continuous piece, starting from the top of the head and moving down through the body. Use White yarn for the first section.
Round 1: Start with a magic ring (or ch 2 and work into the 2nd ch from hook) and work 6 sc. (6 stitches)
Round 2: 6 inc. (12 stitches)
Round 3: (1 sc, 1 inc) repeat 6 times. (18 stitches)
Round 4: (2 sc, 1 inc) repeat 6 times. (24 stitches)
Round 5: (7 sc, 1 inc) repeat 3 times. (27 stitches)
Round 6: 3 sc, 1 inc, 8 sc, 1 inc, 8 sc, 1 inc, 5 sc. (30 stitches)
Rounds 7-8: 30 sc. (30 stitches)
Round 9: 8 sc, 1 inc, 3 sc, 1 inc, 5 sc, 1 inc, 3 sc, 1 inc, 7 sc. (34 stitches)
Round 10: 8 sc, 1 inc, 2 sc, 1 inc, 11 sc, 1 inc, 2 sc, 1 inc, 7 sc. (38 stitches)
Rounds 11-12: 38 sc. (38 stitches)
Round 13: 8 sc, 1 dec, (2 sc, 1 dec) repeat 2 times, 3 sc, 1 dec, (2 sc, 1 dec) repeat 2 times, 7 sc. (32 stitches)
Round 14: 32 sc. (32 stitches)
Switch to Mint yarn now.
Round 15: (7 sc, 1 inc) repeat 4 times. (36 stitches)
Round 16 (Attaching Arms): This round is used to join the arms to the body. You will work around the body and the arms together: 7 sc, then work 5 sc through both the arm and the body (this attaches the arm), 12 sc, then work 5 sc through both the other arm and the body, 7 sc. (36 stitches)
Round 17: (4 sc, 1 inc) repeat 3 times, 6 sc, (1 inc, 4 sc) repeat 3 times. (42 stitches)
Round 18: 16 sc, (1 inc, 4 sc) repeat 2 times, 1 inc, 15 sc. (45 stitches)
Rounds 19-20: 45 sc. (45 stitches)
Round 21: 18 sc, (1 inc, 3 sc) repeat 2 times, 1 inc, 18 sc. (48 stitches)
Rounds 22-25: 48 sc. (48 stitches)
Round 26: (10 sc, 1 dec, 5 sc, 1 dec) repeat 2 times, 10 sc. (44 stitches)
Round 27: 3 sc, 1 dec, 10 sc, (1 dec, 2 sc) repeat 3 times, 1 dec, 10 sc, 1 dec, 3 sc. (38 stitches)
Rounds 28-30: 38 sc. In Round 30, use a stitch marker to identify the 21st stitch. This will help you divide the stitches for the legs.
Stuff the head and the majority of the body firmly with fiberfill.
Making the Legs
To create a seamless look, do not cut your yarn at the end of Round 30. Instead, we will divide the 38 stitches of the current round into four sections: 16 stitches for the right leg, 3 stitches for the belly, 16 stitches for the left leg, and 3 stitches for the back.
The Left Leg
Round 1: Work 17 sc, connecting back to the 2 stitches next to your marker. (17 stitches)
Round 2: 4 sc, 1 dec, 4 sc, 1 dec, 4 sc. (14 stitches)
Round 3: 14 sc. (14 stitches)
Round 4: 4 sc, 1 dec, 2 sc, 1 dec, 4 sc. (12 stitches)
Round 5: 6 dec. (6 stitches). Fasten off, leaving a tail for sewing.
The Right Leg
Round 1: Join your yarn at the 21st stitch of the body (marked in Round 30). Work 16 sc around, connecting back to the marker. (17 stitches)
Round 2: 4 sc, 1 dec, 4 sc, 1 dec, 4 sc. (14 stitches)
Round 3: 14 sc. (14 stitches)
Round 4: 4 sc, 1 dec, 2 sc, 1 dec, 4 sc. (12 stitches)
Round 5: 6 dec. (6 stitches). Fasten off, leaving a tail for sewing.
Stuff the legs firmly. Use the remaining yarn tails to sew the opening between the legs shut.
Small Ears (Make 2)
Using White yarn:
Round 1: Make 2 chains. In the second chain from your hook, work 8 sc. (8 stitches). Fasten off.
The Cozy Ribbed Scarf
Use your thinner yarn and appropriate hook.
Foundation: Chain a length that is roughly twice the circumference of the bear’s neck, plus about 8 inches.
Round 1: Sc in the 2nd ch from hook and in each ch across.
Round 2: Ch 1, sc in the front loops only (FLO) across.
Round 3: Ch 1, sc in the back loops only (BLO) across.
Repeat Rounds 2 and 3 for three more rows to create a ribbed texture.
Finishing
Now comes the fun part—bringing your bear to life!
- Ears: Sew the ears onto the head at the level of Rounds 4 and 5.
- Eyes: Place the safety eyes at the level of Round 8. Ensure they are spaced 4 single crochet stitches apart.
- Nose: Using black embroidery floss, embroider a small nose at the level of Round 9. It looks best if you catch 2 or 3 stitches for the nose shape.
- Belly Button: For a cute realistic touch, use your needle and white yarn to create a slight indentation (tension) at Round 23.
- Scarf: Wrap the scarf around the bear’s neck. Tie it securely and sew it to the body. Finally, sew your decorative button onto the front of the scarf to complete the look.
Tips for Success
- Tension is everything: When working with plush yarn, it is very easy to accidentally skip stitches because they “hide” in the fluff. Always count your stitches at the end of every round!
- Hide the stuffing: If you can see the white stuffing peeking through your mint stitches, try using a smaller hook or tightening your tension.
- The “Magic” of the Legs: When dividing the body into legs, work slowly. This part can be a bit tricky the first time, but it creates a much more professional, seamless look than sewing legs on later.
- Safety First: If you are making this for a very young child, consider embroidering the eyes instead of using plastic safety eyes to prevent any choking hazards.