Cute Crochet Frog-Hooded Amigurumi Tutorial: A Beginner-Friendly Pattern
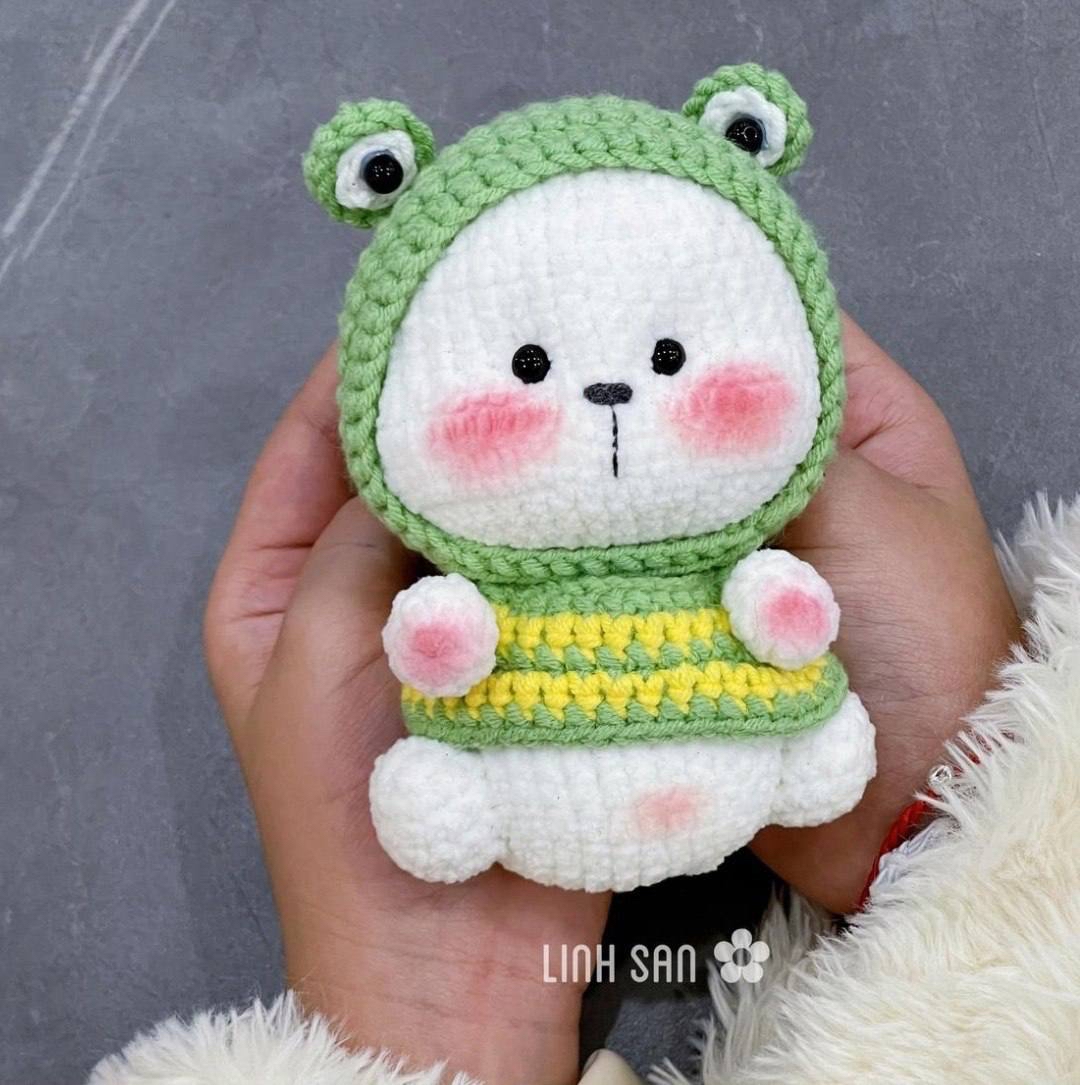
There is nothing quite as heartwarming as a tiny, round creature wearing a cozy costume! If you are looking for your next crochet project, this adorable frog-hooded amigurumi is the perfect choice. This little character features a soft, plush body tucked inside a bright green frog hat, complete with a charming striped shirt. Whether you want to make a desk buddy, a keychain, or a gift for a friend, this pattern is designed to be easy to follow and incredibly fun to stitch.
This tutorial is written with beginners in mind, using clear instructions and a step-by-step approach. By the end of this project, you will have a finished toy approximately 4 inches tall—the perfect size for palm-sized cuteness!
Materials & Abbreviations
To ensure your amigurumi turns out looking just like the photos, I recommend using high-quality yarns and a consistent tension. Because this is a small project, the choice of yarn significantly impacts the “squishiness” of the final result.
What You Will Need
- Yarn (White): A thin, velvet-style plush yarn for the main body and head.
- Yarn (Green, Yellow, White, Black): A semi-cotton weight yarn for the hat, shirt, and facial details.
- Crochet Hook: 2.2mm (or a size that provides tight stitches to prevent stuffing from showing through).
- Safety Eyes: 6mm.
- Half-Beads: 6mm (for the eye detail).
- Stuffing: Poly-fill or similar polyester fiberfill.
- Notions: Sewing needle, stitch markers (highly recommended), pins, scissors, fabric blush (for rosy cheeks), a small button, and glue.
US Crochet Abbreviations
This pattern uses standard US crochet terminology. Please ensure you are following the US terms to avoid confusion with stitch heights.
- MR: Magic Ring
- ch: Chain
- sl st: Slip stitch
- sc: Single crochet
- inc: Increase (2 sc in the same stitch)
- dec: Decrease (sc 2 together)
- hdc: Half double crochet
- dc: Double crochet
- BLO: Back loop only
- FLO: Front loop only
- st(s): Stitch(es)
Step-by-Step Instructions
The Head
Use white velvet plush yarn.
Start with a Magic Ring and work in continuous rounds. Do not join each round with a slip stitch unless specified.
- Round 1: 6 sc in MR (6)
- Round 2: 6 inc (12)
- Round 3: (1 sc, inc) repeat 6 times (18)
- Round 4: (2 sc, inc) repeat 6 times (24)
- Round 5: (3 sc, inc) repeat 6 times (30)
- Round 6: (2 sc, inc, 2 sc) repeat 6 times (36)
- Round 7: (5 sc, inc) repeat 6 times (42)
- Rounds 8-11: 42 sc (4 rounds total)
- Round 12: 12 sc, 6 inc, 6 sc, 6 inc, 12 sc (54)
- Rounds 13-14: 54 sc (2 rounds total)
- Round 15: 12 sc, 1 dec, 6 sc, 1 dec, 12 sc (42)
- Round 16: (5 sc, dec) repeat 6 times (36)
- Round 17: (2 sc, dec, 2 sc) repeat 6 times (30)
- Round 18: (3 sc, dec) repeat 6 times (24)
- Round 19: (1 sc, dec) repeat 8 times (16)
Fasten off, leaving a long tail for sewing. Stuff the head firmly with fiberfill.
Eye Placement: Between rounds 11 and 12, mark your eye spots. The eyes should be 6 stitches apart and positioned between the increases in round 12. Embroider a small nose, pull the stitches slightly between the eyes to create an “eye indentation” (eye socket look), and then insert your safety eyes.
The Body
Use white velvet plush yarn.
This part is worked in an oval shape to create a sturdy base.
- Round 1: Ch 7. Starting from the 2nd ch from the hook: inc, 4 sc, 4 sc in the very last ch. Working on the opposite side of the foundation chain: 4 sc, inc (16)
- Round 2: 2 inc, 4 sc, 4 inc, 4 sc, 2 inc (24)
- Round 3: (1 sc, inc) repeat 2 times, 4 sc, (1 sc, inc) repeat 4 times, 4 sc, (1 sc, inc) repeat 2 times (32)
- Rounds 4-6: 32 sc (3 rounds total)
- Round 7: 1 dec, 14 sc, 1 dec, 14 sc (30)
- Round 8: 30 sc
- Round 9: (3 sc, dec) repeat 6 times (24)
- Rounds 10-11: 24 sc (2 rounds total)
- Round 12: (1 sc, dec) repeat 8 times (16)
- Round 13: 16 sc
Fasten off and stuff the body firmly.
The Arms (Make 2)
Use white velvet plush yarn.
- Round 1: 9 sc in MR (9)
- Round 2: 9 sc (9)
- Round 3: 7 sc, 1 dec (8)
- Round 4: 6 sc, 1 dec (7)
- Rounds 5-7: 7 sc (3 rounds total)
Fasten off, leaving a long tail. Note: Do not stuff the arms. You will sew them to the body between rounds 8 and 11 of the body.
The Legs (Make 2)
Use white velvet plush yarn.
- Round 1: 6 sc in MR (6)
- Round 2: 6 inc (12)
- Rounds 3-5: 12 sc (3 rounds total)
Fasten off, leaving a long tail. Stuff the legs and sew them to the body between rounds 3 and 6.
The Frog Hat
Use green semi-cotton yarn.
- Round 1: 8 sc in MR (8)
- Round 2: 8 inc (16)
- Round 3: (1 sc, inc) repeat 8 times (24)
- Round 4: (inc, 2 sc) repeat 8 times (32)
- Round 5: (3 sc, inc) repeat 8 times (40)
- Round 6: 40 sc (40)
- Rounds 7-15: 36 sc, ch, turn (9 rounds total)
- Round 16 (The Brim): 36 sc, ch 8, sl st into the first ch. Working along the bottom side of the brim: 10 sc, 4 sc across the remaining stitches from round 6, 8 sc on the other side, 8 sc along the foundation chain, sl st to finish.
The Eyes and Eye Details
Green yarn for the outer eyes; White yarn for the centers.
Outer Green Eyes (Make 2):
- Round 1: 8 sc in MR, sl st to first st.
- Round 2: ch, (1 sc, inc) repeat 4 times, sl st to first st (12).
White Eye Centers (Make 2):
- Round 1: 6 sc in MR, sl st to first st. Fasten off.
Assembly: Glue the white centers onto the green eyes, then glue the half-beads on top of the white center for a bright, shiny look. Sew these eyes onto the hat between rounds 8 and 9. The distance between eyes should be 8 stitches.
The Striped Shirt
Uses Green and Yellow semi-cotton yarn.
- Row 1 (Green): Ch 34. Starting from the 7th ch from hook: 28 sc, ch, turn (28)
- Row 2 (Switch to Yellow): 5 sc, 8 ch, skip 4 stitches, 10 sc, 8 ch, skip 4 stitches, 5 sc, ch, turn (36)
- Row 3 (Switch to Green): 5 sc, 8 sc along the chain, 10 sc, 8 sc along the chain, 5 sc, ch, turn (36)
- Row 4 (Switch to Yellow): 36 sc, ch, turn
- Row 5 (Switch to Green): 36 sc, sl st.
Fasten off and sew a small button to the back of the shirt to act as a fastener.
Finishing
Assembly is the secret to a professional-looking amigurumi! Follow this order for the best results:
- Complete the Face: Finish the eyes and the nose as described in the head section. Use blush on the cheeks for an extra dose of cuteness.
- Prepare the Hat: Attach the finished eyes to the green hat.
- Combine Head and Hat: Place the hat onto the head.
- Final Assembly: Sew the head to the body, then attach the arms and legs in their designated spots. Finally, wrap the striped shirt around the body and sew it in place.
Tips for Success
Watch Your Tension: When working with velvet yarn, it is easy to lose track of your stitches. I recommend using stitch markers at the beginning of every round to ensure you don’t accidentally skip a stitch.
Stuffing Technique: When stuffing the head and body, push the fiberfill into the corners and crevices using your crochet hook. This ensures a smooth, round shape without any lumps.
Using Pins: Before you start sewing pieces together, use sewing pins to hold the arms, legs, and hat in place. This allows you to check the proportions and ensures everything looks symmetrical before you commit with a needle and thread.
Customization: Don’t be afraid to get creative! You can change the colors of the shirt or even the hat to create different animals, like a bunny or a bear.