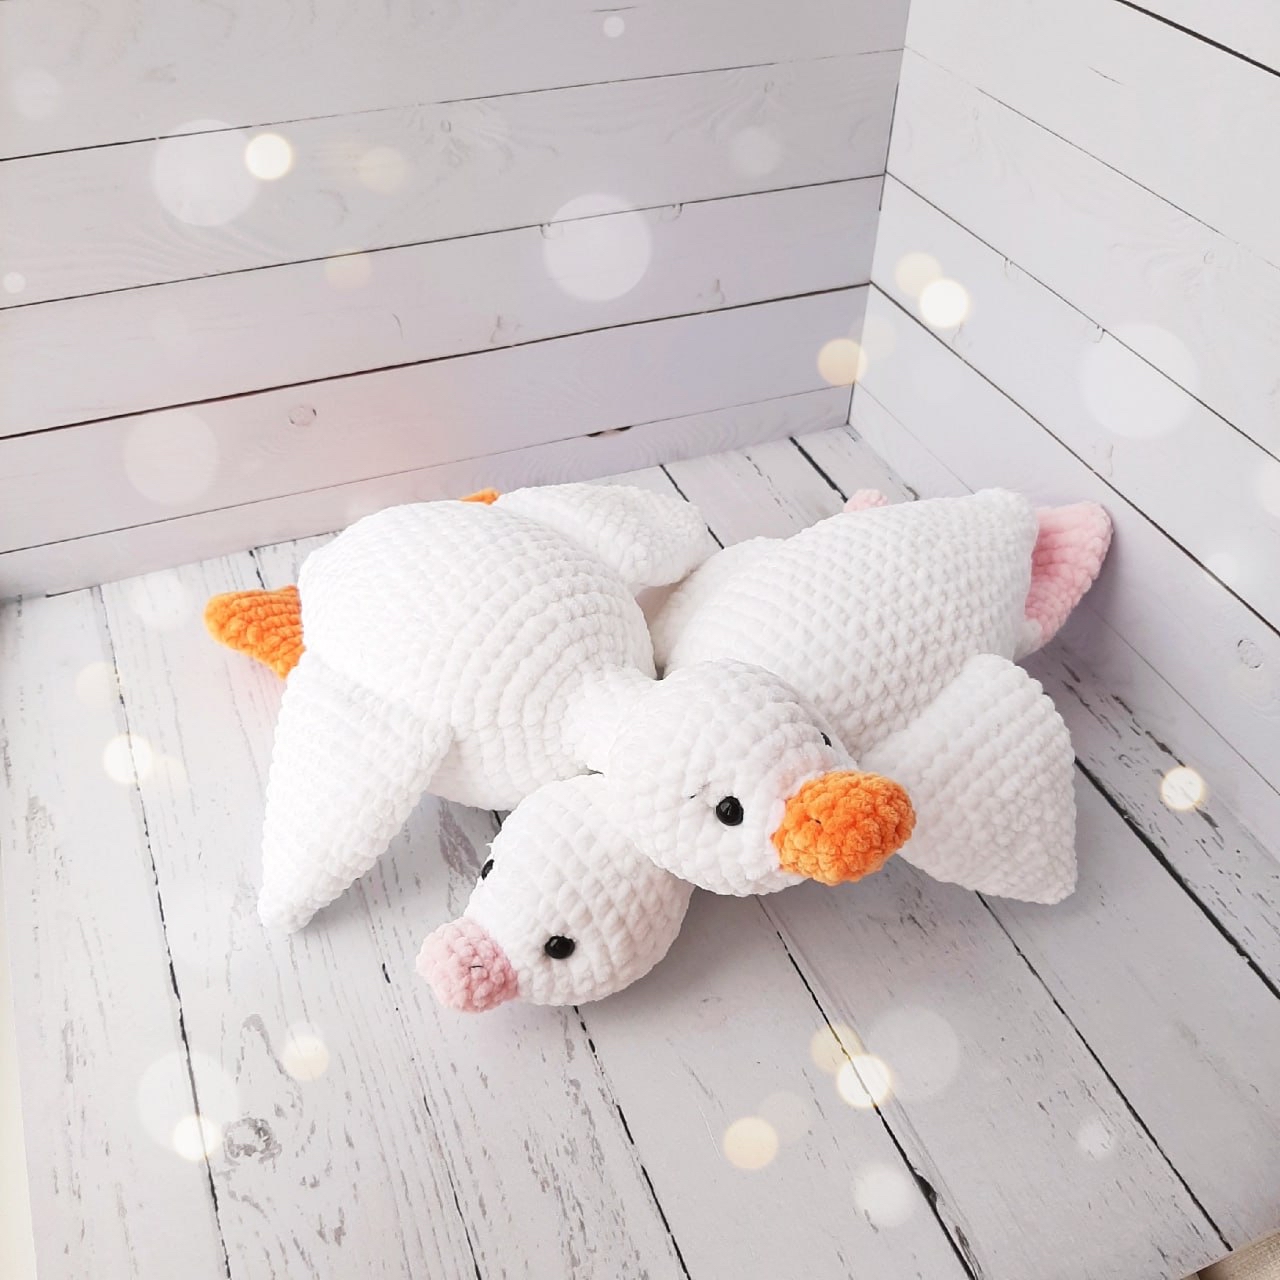
Crochet Plush Goose Pattern: A Beginner-Friendly Amigurumi Tutorial
Are you looking for your next cozy crochet project? This adorable plush goose is the perfect addition to your handmade collection. Made with ultra-soft chenille or velvet yarn, this amigurumi goose is not only incredibly cute but also features a squishy texture that makes it a wonderful companion for kids and adults alike. Whether you are looking to make a unique nursery decoration or a soft gift for a friend, this beginner-friendly pattern is designed to guide you through every stitch.
This project results in a charming goose measuring approximately 13 inches long. Because we are using plush yarn, the project works up quickly, making it a very satisfying project for those who love seeing fast results!
Materials & Abbreviations
Before you begin, gather all your supplies. Working with plush yarn can be a bit different than standard cotton, so having the right tools will make your experience much smoother.
What You Will Need
- Plush Yarn: You will need two colors. Choose a primary color (white is classic for a goose) and a secondary accent color (bright orange works best for the beak and feet). You will need approximately 3 ounces of the main color and about 0.6 ounces of the accent color.
- Crochet Hook: A 4 mm (approx. G/6) crochet hook. Note that because plush yarn is thick, your tension might vary; feel free to adjust your hook size to ensure your stitches are tight enough to prevent stuffing from showing.
- Safety Eyes: 10 mm black safety eyes.
- Stuffing: High-quality polyester fiberfill.
- Stitch Marker: Essential for keeping track of your rounds in amigurumi.
- Hot Glue: To secure the safety eyes in place.
- Tapestry Needle: A large-eye needle is required to work through the thick plush stitches.
Abbreviations (US Terms)
This pattern uses standard US crochet terminology. Please ensure you are using US terms to avoid confusion with stitch heights.
- MR: Magic Ring (or Magic Circle)
- ch: Chain
- sc: Single crochet
- inc: Increase (2 sc in one stitch)
- dec: Decrease (sc 2 stitches together)
- st(s): Stitch(es)
Step-by-Step Instructions
The Wings (Make 2)
We will start with the wings. These are worked in a flat manner and then joined to create a tapered shape.
- MR, 6 sc (6)
- 6 sc (6)
- (1 sc, inc) repeat 3 times (9)
- 1 sc, inc, (2 sc, inc) repeat 2 times, 1 sc (12)
- (3 sc, inc) repeat 3 times (15)
- 2 sc, inc, (4 sc, inc) repeat 2 times, 2 sc (18)
- 18 sc (18)
- (5 sc, inc) repeat 3 times (21)
- Rows 9-10: 21 sc (21)
- 3 sc, inc, (6 sc, inc) repeat 2 times, 3 sc (24)
- Rows 12-15: 24 sc (24)
Finishing the wings: Fold the wing in half so the open edges meet. Using your main color, crochet 12 sc through both layers (the front and back walls) to close the wing. Leave a tail of about 8 inches (20 cm) for sewing later.
The Feet (Make 2)
Start using your accent color (orange) for the feet.
- Chain 9. In the 2nd chain from the hook, work: 1 inc, 6 sc, 3 sc in the very last stitch, then 7 sc along the remaining sides of the chain (18)
- Rows 2-3: 18 sc (18)
- (dec, 7 sc) repeat 2 times (16)
- (dec, 6 sc) repeat 2 times (14)
- (dec, 5 sc) repeat 2 times (12)
- (dec, 4 sc) repeat 2 times (10)
- Rows 8-11: 10 sc (10)
Color Change: Switch to your main color (white) for the next step.
- Rows 12-13: 10 sc (10)
Finishing the feet: Fold the foot in half and crochet 5 sc through both layers. Do not cut the yarn; leave a tail of about 8 inches (20 cm) for assembly.
The Beak, Head, and Body
This section is worked in one continuous piece, transitioning from the orange beak to the white body.
Part 1: The Beak
Start with your accent color (orange).
- Chain 4. In the 2nd chain from the hook, work: 1 inc, 1 sc, 3 sc in the last stitch, 2 sc (8)
- (inc, 3 sc) repeat 2 times (10)
- Rows 3-5: 10 sc (10)
Part 2: The Head and Body
Color Change: Switch to your main color (white) at the beginning of Row 6.
- Row 6: inc in every stitch around (20)
- Row 7: 6 sc, inc, 8 sc, inc, 4 sc (22)
- Row 8: 6 sc, inc, 4 sc, inc, 6 sc, inc, 3 sc (25)
- Row 9: 25 sc (25)
- (7 sc, inc) repeat 2 times, 8 sc, inc (28)
- Rows 11-13: 28 sc (28)
- (5 sc, dec) repeat 4 times (24)
- 2 sc, dec, (4 sc, dec) repeat 3 times, 2 sc (20)
- 1 sc, dec, (2 sc, dec) repeat 4 times, 1 sc (15)
- (3 sc, dec) repeat 3 times (12)
- Rows 18-22: 12 sc (12)
- Row 23: inc in every stitch around (24)
- (3 sc, inc) repeat 6 times (30)
- 2 sc, inc, (4 sc, inc) repeat 5 times, 2 sc (36)
- (5 sc, inc) repeat 6 times (42)
- Rows 27-39: 42 sc (42)
- (5 sc, dec) repeat 6 times (36)
- Row 41: 36 sc (36)
- 2 sc, dec, (4 sc, dec) repeat 5 times, 2 sc (30)
- Row 43: 30 sc (30)
- (3 sc, dec) repeat 6 times (24)
- Rows 45-46: 24 sc (24)
- 1 sc, dec, (2 sc, dec) repeat 5 times, 1 sc (18)
- (1 sc, dec) repeat 6 times (12)
- Rows 49-51: 12 sc (12)
- Row 52: 6 dec (0)
Fasten off and weave in your ends. Remember to stuff the head and body firmly as you work to ensure a smooth shape.
Finishing
Assembly Guide
Now it is time to bring your goose to life! Careful placement is key to making your amigurumi look professional.
Attaching the Wings
Sew the wings to the sides of the body between rows 28 and 39. Ensure there is a gap of approximately 14 stitches between the two wings so the goose looks natural.
Attaching the Feet
Sew the feet to the bottom of the body between rows 41 and 42. Position them so there is a gap of about 4 stitches between the feet.
Setting the Eyes
Using hot glue, secure the 10 mm safety eyes between rows 8 and 9. For a balanced look, place them approximately 7 stitches apart. You can leave them as they are or follow the “sculpting” step below for more character.
Sculpting the Face (Optional)
To give your goose a more defined “face” look, you can perform a contouring stitch using your main color yarn and a tapestry needle:
- Insert the needle into the center of the beak where the colors change (around rows 5-6).
- Pull the needle through to the bottom corner of the right eye.
- Insert the needle into the top corner of the right eye and pull through to the top corner of the left eye.
- Insert the needle into the bottom corner of the left eye.
- Pull the needle back to the original starting point at the beak.
- Pull the yarn tight to create the facial indentations and secure with a knot.
Tips
Working with Plush Yarn: Plush yarn can be tricky because it is hard to see your stitches. I highly recommend using a stitch marker in the first stitch of every round. If you find it difficult to see, try using a slightly smaller hook to keep your tension even.
Smooth Stuffing: To avoid lumps in your goose, stuff the head and the body separately before joining them. Use small pieces of stuffing at a time and push them into the corners of the head to ensure a perfectly round shape.
Extra Details: For a truly personalized touch, you can use a fine cotton thread or 4-ply embroidery floss to sew small nostrils onto the beak or tiny eyebrows above the eyes. This adds a lovely, hand-crafted level of detail to your project.