DIY Crochet Female Body Pincushion: A Fun and Free Lingerie Amigurumi Pattern
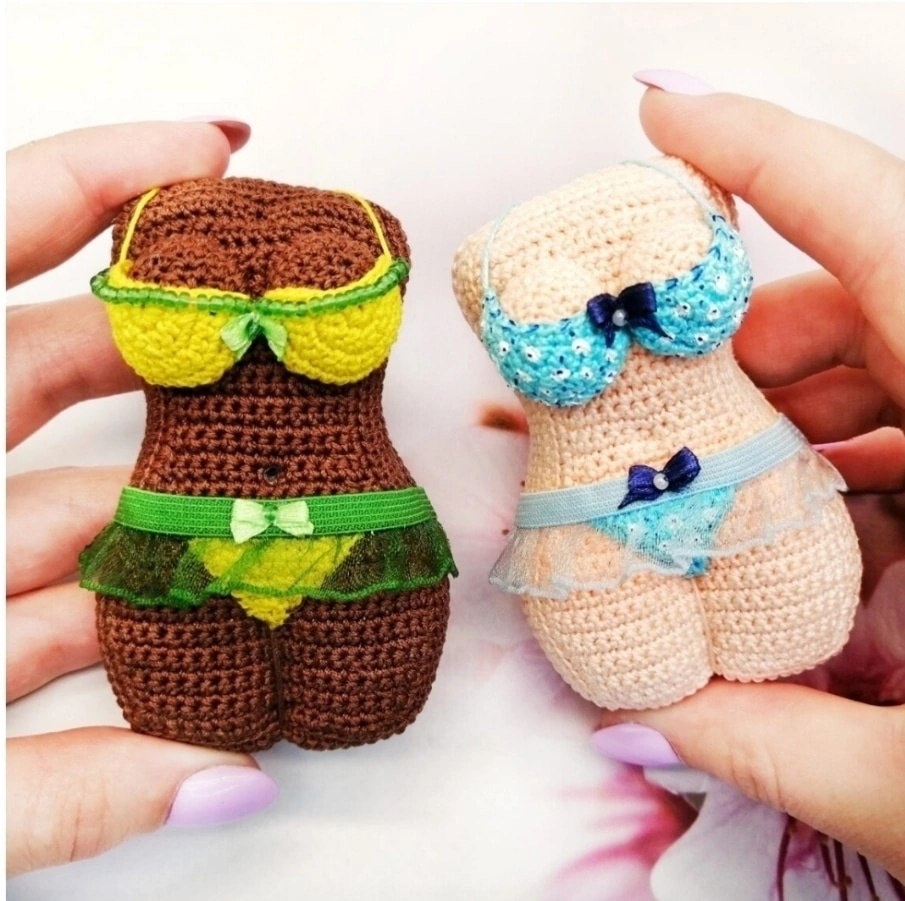
Looking for a cheeky, body-positive project to add some personality to your sewing room? This gorgeous crochet female body pincushion is both a highly functional craft organizer and a delightful piece of handmade decor! With its classic hourglass silhouette, delicate lace trim, and custom lingerie detailing, this amigurumi pincushion makes a wonderful gift for sewists, quilters, or anyone who loves unique crochet art.
This beginner-friendly pattern is worked flat in two main panels that are later joined together and stuffed. The cardboard insert in the back provides a sturdy base, ensuring your pins stay exactly where they belong. Grab your finest cotton thread and let’s get crocheting!
Materials & Abbreviations
Required Materials
- Yarn: Fine cotton crochet thread (Size 10 or equivalent lace-weight yarn, approx. 360 yards per 1.76 oz) in two colors: Skin Tone and Lingerie Color.
- Crochet Hook: 0.9 mm steel crochet hook (US Size 14).
- Stiffener: Thick cardboard or plastic sheet (to cut the body silhouette template).
- Adhesive: Clear fabric glue or strong craft glue.
- Stuffing: High-quality polyester fiberfill.
- Trims & Notions: Thin lace ribbon, thin satin ribbon (for tiny decorative bows), sewing needle, and sharp scissors.
US Crochet Abbreviations
- ch: Chain
- sc: Single crochet
- hdc: Half double crochet
- dc: Double crochet
- inc: Increase (work 2 single crochet stitches into the same stitch)
- 3-sc inc: Work 3 single crochet stitches into the same stitch
- dec: Decrease (single crochet two stitches together)
- sl st: Slip stitch
- FLO: Front loop only
- BLO: Back loop only
- st(s): Stitch(es)
Step-by-Step Instructions
Front Panel (with Border Wall)
This piece forms the front of the body pincushion and features a raised side wall to give the cushion its 3D depth.
Rows 1 through 40 are worked in rows. At the end of each row, you will chain 1 and turn your work unless specified otherwise. Start your rows in the second chain from the hook.
- Row 1: Ch 20. Starting in the 3rd ch from hook, sc in each chain across. (18 sts)
- Row 2: Ch 1, turn. Sc in next 17 sts, inc in the last st. (20 sts)
- Row 3: Ch 1, turn. Sc in next 19 sts. (19 sts)
- Row 4: Ch 1, turn. Sc in next 19 sts, inc in the last st. (22 sts)
- Row 5: Ch 1, turn. Sc in next 21 sts. (21 sts)
- Row 6: Ch 1, turn. Sc in next 21 sts, inc in the last st. (24 sts)
- Rows 7–12: Ch 1, turn. Sc in each of the next 23 sts. (23 sts)
- Row 13: Ch 1, turn. Dec, sc in next 19 sts, dec. (22 sts)
- Row 14: Ch 1, turn. Sc in next 21 sts. (21 sts)
- Row 15: Ch 1, turn. Dec, sc in next 17 sts, dec. (20 sts)
- Row 16: Ch 1, turn. Sc in next 19 sts. (19 sts)
- Row 17: Ch 1, turn. Dec, sc in next 15 sts, dec. (18 sts)
- Row 18: Ch 1, turn. Sc in next 17 sts. (17 sts)
- Row 19: Ch 1, turn. Dec, sc in next 13 sts, dec. (16 sts)
- Row 20: Ch 1, turn. Dec, sc in next 11 sts, dec. (14 sts)
- Row 21: Ch 1, turn. Sc in next 13 sts. (13 sts)
- Row 22: Ch 1, turn. Dec, sc in next 9 sts, dec. (12 sts)
- Rows 23–26: Ch 1, turn. Sc in next 11 sts. (11 sts)
- Row 27: Ch 1, turn. Sc in next 11 sts, inc in the last st. (14 sts)
- Row 28: Ch 1, turn. Sc in next 13 sts. (13 sts)
- Row 29: Ch 1, turn. Sc in next 13 sts, inc in the last st. (16 sts)
- Rows 30–31: Ch 1, turn. Sc in next 15 sts. (15 sts)
- Row 32: Ch 1, turn. Sc in next 15 sts, inc in the last st. (18 sts)
- Rows 33–34: Ch 1, turn. Sc in next 17 sts. (17 sts)
- Row 35: Ch 1, turn. Sc in next 17 sts, inc in the last st. (20 sts)
- Rows 36–38: Ch 1, turn. Sc in next 19 sts. (19 sts)
- Row 39: Ch 1, turn. Dec, sc in next 15 sts, dec. (18 sts)
- Row 40 (Edging Row): In this row, you will crochet all the way around the outer edge of the panel to clean up the edges and set up the foundation for the side walls.
- Across the top edge: Ch 1, 16 sc, 3-sc inc in the corner.
- Down the first side edge: 37 sc, 3-sc inc in the bottom corner.
- Across the bottom edge: 16 sc, 3-sc inc in the corner.
- Up the second side edge: 37 sc, inc in the final corner. Sl st to the first st to join. (118 sts total)
- Row 41 (Wall Foundation): Turn your work. Ch 1, working in FLO (Front Loops Only) to create a sharp corner crease, sc in each of the next 117 sts. Join with a sl st.
- Rows 42–47: Ch 1, sc in each of the 117 sts. Join with a sl st. Fasten off and weave in ends.
Back Panel (Flat)
The back panel acts as the flat back cover of your pincushion.
- Rows 1–40: Repeat Rows 1 through 40 exactly as written for the Front Panel.
- Do NOT cut the yarn at the end of Row 40. Keep it attached for final assembly.
Cardboard Base & Body Assembly
To keep the pincushion stable and protect your furniture from pin tips, we will add a rigid cardboard lining.
- Trace the flat silhouette of the completed Back Panel onto a piece of thick, sturdy cardboard.
- Cut out the cardboard shape, making it slightly smaller than the crochet piece so it fits snugly inside.
- Apply a thin layer of craft glue to the wrong side of the Back Panel and press the cardboard cut-out firmly onto it. Let dry completely.
- Locate the 17th stitch on the Front Panel’s top edge (counting from the final slip stitch). This is your starting alignment point.
- Align the Back Panel with the Front Panel. Using the working yarn from the Back Panel, slip stitch the two pieces together around the entire perimeter (118 sl sts). Insert your hook through the BLO of the Back Panel and both loops of the Front Panel’s rim.
- Stuff the body firmly with polyester fiberfill as you join. Keep stuffing until the body is smooth and taut. Complete the slip stitches and fasten off.
Belly Button & Leg Definition (Needle Sculpting)
To give your amigurumi pincushion realistic definition, you can use a simple needle-sculpting technique:
- Belly Button: Thread a long needle with skin-tone yarn. Insert it through the back of the torso, bring it out at the center of the abdomen (the navel position), take a tiny stitch, and push the needle back out through the rear. Pull the thread firmly to create a deep indentation, then secure and knot the thread at the back.
- Leg Division: Wrap a double strand of skin-tone yarn from the bottom center seam up to the lower abdomen. Pull tightly to create the definition of two legs and hips, then tie off securely.
Underwear (Panties)
Using your lingerie color yarn, work in rows:
- Row 1: Ch 13. Starting in the 3rd ch from hook, sc in each ch across. (11 sts)
- Row 2: Ch 1, turn. Dec, 6 sc, dec. (9 sts)
- Row 3: Ch 1, turn. Dec, 4 sc, dec. (7 sts)
- Row 4: Ch 1, turn. Dec, 2 sc, dec. (5 sts)
- Row 5: Ch 1, turn. Sc in next 4 sts. (4 sts)
- Row 6: Ch 1, turn. Work 2 dec. (3 sts)
- Row 7: Ch 1, turn. Sc in next 2 sts. (2 sts)
- Row 8: Ch 1, turn. Dec. (1 st)
- Fasten off, leaving a long tail. Sew the triangular panties onto the lower hip section of the body.
Breasts (Make 2)
Using skin-tone yarn, worked in rounds:
- Round 1: In a magic ring, work: 1 sc, 1 hdc, 2 dc, 1 hdc, 1 sc. (6 sts)
- Round 2: Work 2 inc, [2 hdc in next st] twice, 2 inc. (12 sts)
- Round 3: [1 sc, inc] twice, 1 sc, [2 hdc in next st] twice, 1 sc, [inc, 1 sc] twice. (18 sts)
- Round 4: [2 sc, inc] 3 times, [inc, 2 sc] 3 times. (24 sts)
- Round 5: Sc in each of the 24 sts. (24 sts)
- Round 6: [3 sc, inc] 6 times. (30 sts)
- Fasten off, leaving a long tail. Stuff lightly and sew both breasts symmetrically onto the upper chest area of the torso.
Bikini Top / Bra Cups (Make 2)
Using your lingerie color yarn, worked in flat rows starting from a magic ring:
- Row 1: Work 6 sc into a magic ring. Pull the ring tight, but do not join. (6 sts)
- Row 2: Ch 1, turn. Inc, [sc, inc] twice. (9 sts)
- Row 3: Ch 1, turn. Inc, sc, [sc, inc, sc] twice. (12 sts)
- Row 4: Ch 1, turn. 2 sc, inc, [3 sc, inc] twice. (15 sts)
- Row 5: Ch 1, turn. Sc, inc, 2 sc, [2 sc, inc, 2 sc] twice. (18 sts)
- Row 6: Ch 1, turn. Sc in next 17 sts. (17 sts)
- Row 7: Ch 1, turn. Sc in next 16 sts, 3-sc inc in the corner. Along the straight top edge of the cup, work: 11 sc, inc, sl st.
- Fasten off, leaving a long tail. Sew the cups directly over the breasts. Use matching yarn or embroidery thread to sew delicate straps over the shoulders and around the back.
Finishing & Embellishments
This is where your creativity truly shines! To give your pincushion that luxurious, detailed lingerie look:
- Lace Trim: Use clear fabric glue or a needle and thread to attach a delicate layer of ruffled lace along the waistband of the panties or the bottom edge of the bra cups.
- Satin Bows: Tie or buy tiny satin ribbon bows in a coordinating color. Sew or glue one to the center of the bikini top and another to the center-front of the underwear.
- Optional Details: You can embroider tiny floral patterns onto the underwear, stitch on tiny seed beads to look like pearls, or use diluted acrylic fabric paint to add soft shading or delicate lace textures directly onto the crochet fabric.
Top Tips for Success
- Keep Your Tension Tight: Because this is a pincushion, you want to make sure your stitches are tight so that the polyester stuffing doesn’t peek through when pins are inserted. If your stitches look loose, try dropping down a hook size.
- Stuff Firmly: Do not be afraid to pack the fiberfill tightly! A firmly stuffed amigurumi will hold its shape much better over time and provide a more satisfying surface for holding pins.
- Choose Waterproof Stiffener: If you plan on occasionally washing or spot-cleaning your pincushion, use a thin plastic sheet (such as an old plastic folder) instead of cardboard so it won’t degrade when wet.