How to Crochet a Cute Cat Butt Keychain: Free Amigurumi Pattern
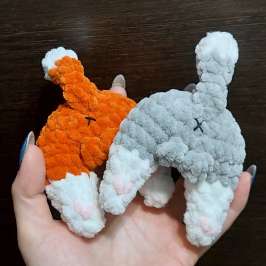
If you are looking for a quick, quirky, and absolutely adorable project, look no further than this “Cat Butt” amigurumi keychain. There is something inherently funny and sweet about a tiny, plush cat backside, and this pattern captures that charm perfectly. Whether you are making these as gifts for cat lovers, selling them at a craft fair, or just wanting a “desk pet” to keep you company, this project is a wonderful way to use up scrap plush yarn.
This pattern is designed for beginners and intermediate crocheters alike. Because we are using plush (chenille) yarn, the project works up incredibly quickly, and the finished result is soft, squishy, and irresistible. In this tutorial, we will walk you through every step to create your own miniature feline friend.
Materials & Abbreviations
To get started, gather the following supplies. To achieve the look in the photos, you will need two colors of yarn: a primary color for the body and a contrasting color for the paws and the tip of the tail.
Materials Needed
- Plush/Chenille Yarn: Approximately 100g (about 131 yards) of plush yarn in two colors (e.g., orange and white, or grey and white).
- Crochet Hook: 3.75mm hook. (If your tension is looser or tighter, feel free to adjust the hook size so your stuffing doesn’t show through).
- Stuffing: Polyester fiberfill or any similar craft stuffing.
- Stitch Marker: Essential for keeping track of your rounds in amigurumi.
- Yarn Needle: For sewing parts together and weaving in ends.
- Scissors: For cutting yarn.
- Embroidery Thread: A small amount of pink yarn or thread for the paw pads.
Abbreviations (US Terms)
- MR: Magic Ring
- sc: Single Crochet
- inc: Increase (2 sc in the same stitch)
- dec: Decrease (sc 2 together)
- ch: Chain
- Bobble: A bobble stitch consisting of 4 double crochets worked into one stitch, joined at the top.
- (…) : The number of stitches at the end of the round.
- *n: Repeat the sequence indicated inside the parentheses n times.
Step-by-Step Instructions
This pattern is worked in continuous rounds. Do not join the rounds with a slip stitch unless otherwise specified; instead, use your stitch marker to track the beginning of each round.
The Tail
We begin with the tail using the contrasting color (e.g., white).
- Round 1: Create a MR and work 6 sc into the ring. (6)
- Round 2: 6 sc. At the end of this round, change your yarn color to the primary color. (6)
- Round 3: 6 sc. (6)
- Round 4: (1 sc, dec) * 2. (4)
- Rounds 5-6: 4 sc per round. (4)
- Round 7: Flatten the end of the tail and work 2 sc across both sides to close the hole. Fasten off and weave in the ends. Note: Do not stuff the tail; it should remain flat.
The Paws and Body
The paws and the body are worked as one piece to minimize sewing. Start again with the contrasting color (e.g., white).
Creating the First Paw
- Round 1: Create a MR and work 4 sc into the ring. (4)
- Round 2: (1 sc, inc) * 2. (6)
- Round 3: 6 sc. (6)
- Round 4: (1 sc, inc) * 3. (9)
- Round 5: 9 sc. At the end of this round, change your yarn color to the primary color. (9)
- Round 6: (2 sc, inc) * 3. (12)
Fasten off the yarn for the first paw, but do not weave in the ends yet.
Creating the Second Paw and Joining
Now, we will create the second paw and immediately connect it to the first one to form the base of the body.
- Round 6 (continued): Repeat the instructions for the first paw (starting from Round 1 through Round 6). However, when you reach the end of Round 6 for the second paw, do not fasten off.
- Joining: Chain 3 (ch 3) and join to the first paw with a sc.
- Round 7: This round connects the two paws together. Work 12 sc around the first paw, 3 sc into the joining chains, 12 sc around the second paw, and then work (Bobble, sc, Bobble) into the remaining joining chains. (30)
Building the Body
Now that the paws are joined, we will work in rounds to create the round “butt” shape.
- Round 8: 30 sc around. (30)
- Round 9: (3 sc, dec) * 6. (24)
- Round 10: (2 sc, dec) * 6. (18). Important: In this round, you will attach the tail. The tail should be positioned exactly in the center. Depending on your tension, this usually happens during the final two stitches (the decrease) of the round. Simply sc through both the body and the base of the tail to secure it. (18)
- Round 11: (1 sc, dec) * 6. (12)
- Round 12: 6 dec. (6)
Finishing Touches
Once you have finished the final round, cut the yarn, leaving a long tail for sewing. Use your yarn needle to weave the tail through the front loops of the remaining 6 stitches and pull tight to close the hole completely.
Stuffing: Before closing the body completely, stuff the paws and the body firmly with fiberfill. Make sure the paws are well-stuffed so they maintain their shape, but avoid overstuffing the body to the point where it becomes misshapen.
Details: To add that extra bit of cuteness, use your pink yarn or embroidery thread to sew small hearts or tiny circles onto the bottom of the paws to represent the paw pads.
Keychain Attachment: Attach a jewelry jump ring or a lobster claw clasp to the top center of the body (between the tail and the top of the curve). Now your cat butt is ready to go on an adventure!
Tips for Success
Choosing Your Yarn
For the best results, use a “super bulky” or “chenille” weight yarn. This gives the amigurumi its characteristic plush look and makes the stitches denser, which prevents the stuffing from leaking out. If you use a thinner yarn, the project will be much smaller, and you may need to adjust your hook size.
Managing Plush Yarn
Plush yarn can sometimes be “fuzzy,” making it hard to see your stitches. If you struggle to find the gaps, try using your fingers to feel for the top of the post of the stitch. Using a stitch marker is non-negotiable for this pattern, as it is very easy to lose your place in the rounds.
Perfecting the Bobble Stitch
The bobble stitches in Round 7 are what create the little “bumps” of the backside. To make them pop, ensure you pull the final loop tight. If the bobble looks too flat, you can gently massage it from the inside with your stuffing to push it outward.
Customizing Your Cat
Don’t feel limited to just two colors! You can create a calico cat by mixing three different colors, or a Siamese cat by using a cream body and a dark brown for the paw tips and tail tip. The possibilities are endless!