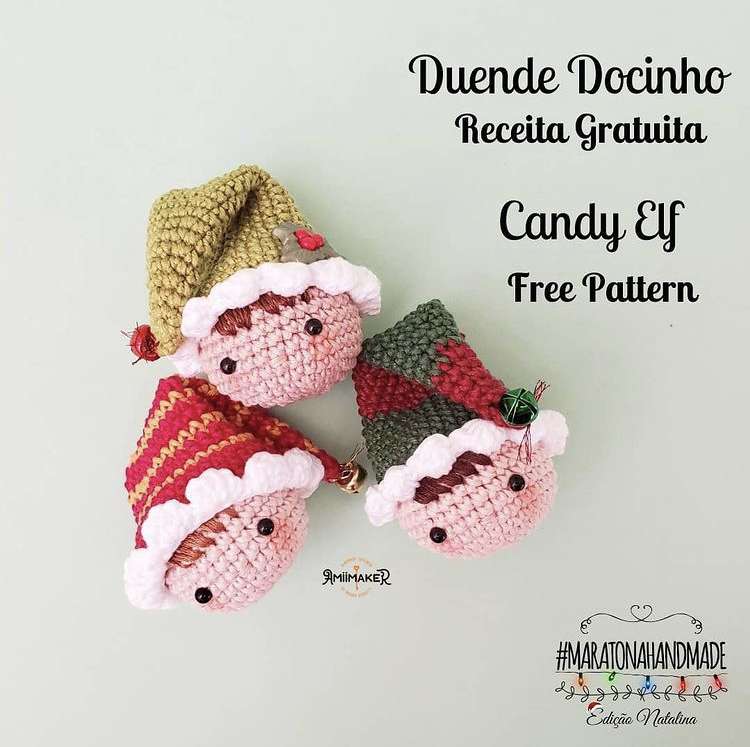
Adorable Candy Elf Amigurumi Crochet Pattern: A Festive Holiday Tutorial
Add a touch of holiday magic to your home with these precious Candy Elves! Whether you are looking to create a unique Christmas tree ornament, a cute stocking stuffer, or just a whimsical little companion for your desk, these mini elves are the perfect project. This amigurumi pattern is designed to be beginner-friendly, using basic stitches to create a professional, high-quality look.
The best part about this project is its versatility. You can experiment with different colors—traditional red and green, wintry blue and silver, or even pastel “candy” tones—to match your specific holiday decor. Let’s dive into the materials and steps needed to bring your own little elf to life!
Materials & Abbreviations
To get started, gather the following supplies. Using a smaller hook than the yarn suggests helps create a tight fabric so that the fiber fill doesn’t peek through.
Supplies Needed
- Yarn: 100% cotton yarn in your choice of colors (skin tone, green, red, gold, white, etc.).
- Crochet Hook: 2.75mm crochet hook.
- Eyes: 6mm safety eyes.
- Embroidery Thread: Shades of brown (for hair) and pink (for the nose).
- Stuffing: High-quality polyester fiber fill.
- Tools: Tapestry needle, stitch marker, and a makeup brush with a little bit of pink blush.
- Decorations: Mini pompoms, jingle bells, and tiny buttons.
- Adhesive: Hot glue or a strong fabric glue.
Abbreviations (US Terms)
- MR: Magic Ring
- sc: Single crochet
- inc: Increase (2 sc in one stitch)
- dec: Decrease (sc 2 together)
- sl st: Slip stitch
- dc: Double crochet
- FLO: Front Loop Only
- st(s): Stitch(es)
Step-by-Step Instructions
This pattern is worked in continuous rounds. I highly recommend using a stitch marker to keep track of the beginning of each round.
The Elf Head
Note: The head is crocheted from the bottom up. Start stuffing the head after round 13 and continue until it is firm and round.
- Round 1: 8 sc in the MR (8)
- Round 2: 8 inc (16)
- Round 3: (1 sc, 1 inc) repeat 8 times (24)
- Round 4: (2 sc, 1 inc) repeat 8 times (32)
- Rounds 5-12: sc around (32)
- Eyes: Place the safety eyes between rounds 7 and 8, approximately 6 stitches apart.
- Round 13: (2 sc, 1 dec) repeat 8 times (24)
- Round 14: (1 sc, 1 dec) repeat 8 times (16)
- Round 15: 8 dec (8)
Fasten off, weave the yarn tail through the last few stitches to close the hole securely, and hide the end inside the head.
Adding Facial Details
Now it is time to give your elf some personality! Use your tapestry needle and embroidery thread for these steps:
- The Nose: Using pink thread, embroider a small nose between rounds 6 and 7.
- The Hair: Using brown thread, embroider a few strands of hair between rounds 10 and 13. You can make a little tuft or a side-sweep depending on the look you want.
- The Cheeks: Use a makeup brush to lightly apply a small amount of pink blush just below the eyes for a cute, rosy glow.
The Elf Hat
The hat is crocheted from the top down. Feel free to change colors every few rounds to create a festive striped effect!
- Round 1: 4 sc in the MR (4)
- Round 2: sc around (4)
- Round 3: (1 sc, 1 inc) repeat 2 times (6)
- Round 4: sc around (6)
- Round 5: (2 sc, 1 inc) repeat 2 times (8)
- Round 6: sc around (8)
- Round 7: (3 sc, 1 inc) repeat 2 times (10)
- Round 8: sc around (10)
- Round 9: (4 sc, 1 inc) repeat 2 times (12)
- Round 10: sc around (12)
- Round 11: (5 sc, 1 inc) repeat 2 times (14)
- Round 12: sc around (14)
- Round 13: (6 sc, 1 inc) repeat 2 times (16)
- Round 14: sc around (16)
- Round 15: (7 sc, 1 inc) repeat 2 times (18)
- Round 16: sc around (18)
- Round 17: (8 sc, 1 inc) repeat 2 times (20)
- Round 18: sc around (20)
- Round 19: (9 sc, 1 inc) repeat 2 times (22)
- Round 20: sc around (22)
- Round 21: (10 sc, 1 inc) repeat 2 times (24)
- Round 22: sc around (24)
- Round 23: (3 sc, 1 inc) repeat 6 times (30)
- Round 24: sc around (30)
- Round 25: (4 sc, 1 inc) repeat 6 times (36)
- Rounds 26-28: sc around (36)
- Round 29: Change color to your brim color (usually white). sc around (36)
The Hat Brim Detail
Choose one of the following options for the bottom edge of the hat. Both are worked in the FLO (Front Loop Only).
Option 1: The Bubble Edge
Round 30: (1 bubble stitch, 1 sl st, 1 sc) repeat all around.
How to make the Bubble Stitch: Work 4 double crochets into the same stitch, but do not finish them. Leave the last loop of each dc on your hook (you will have 5 loops total). Close all 4 stitches together with one final yarn over and pull through all loops, then finish the sequence with a single crochet.
Option 2: The Ruffled Edge
Round 30: (1 sl st, 4 dc in the same stitch, 1 sl st, 1 sc) repeat all around.
Finishing
Once your pieces are complete, it is time for assembly!
- Fasten off the hat and weave in all ends.
- Assembly: Use fabric glue or hot glue to attach the hat to the elf’s head. You can position the hat straight or tilt it to the side for a more playful look.
- Decoration: Glue a mini pompom or a small jingle bell to the tip of the hat. You can also add tiny buttons to the brim for extra detail.
- Hanging Loop: If you are using this as an ornament, tie a piece of embroidery thread or ribbon to the back of the hat so it can be hung on a Christmas tree.
Tips for Success
- Tight Stitches: If you notice the stuffing showing through the head, try dropping down a hook size (e.g., to 2.5mm).
- Symmetry: When embroidering the hair and nose, use a stitch marker to find the center of the face so the features stay balanced.
- Customization: Try using a variegated yarn for the hat to get a “candy cane” effect without having to change colors every few rounds.
- Safety: If you are making these for small children, replace the safety eyes with embroidered eyes using black yarn or thread to avoid choking hazards.