Adorable Crochet Kitten Amigurumi Pattern: Step-by-Step Tutorial
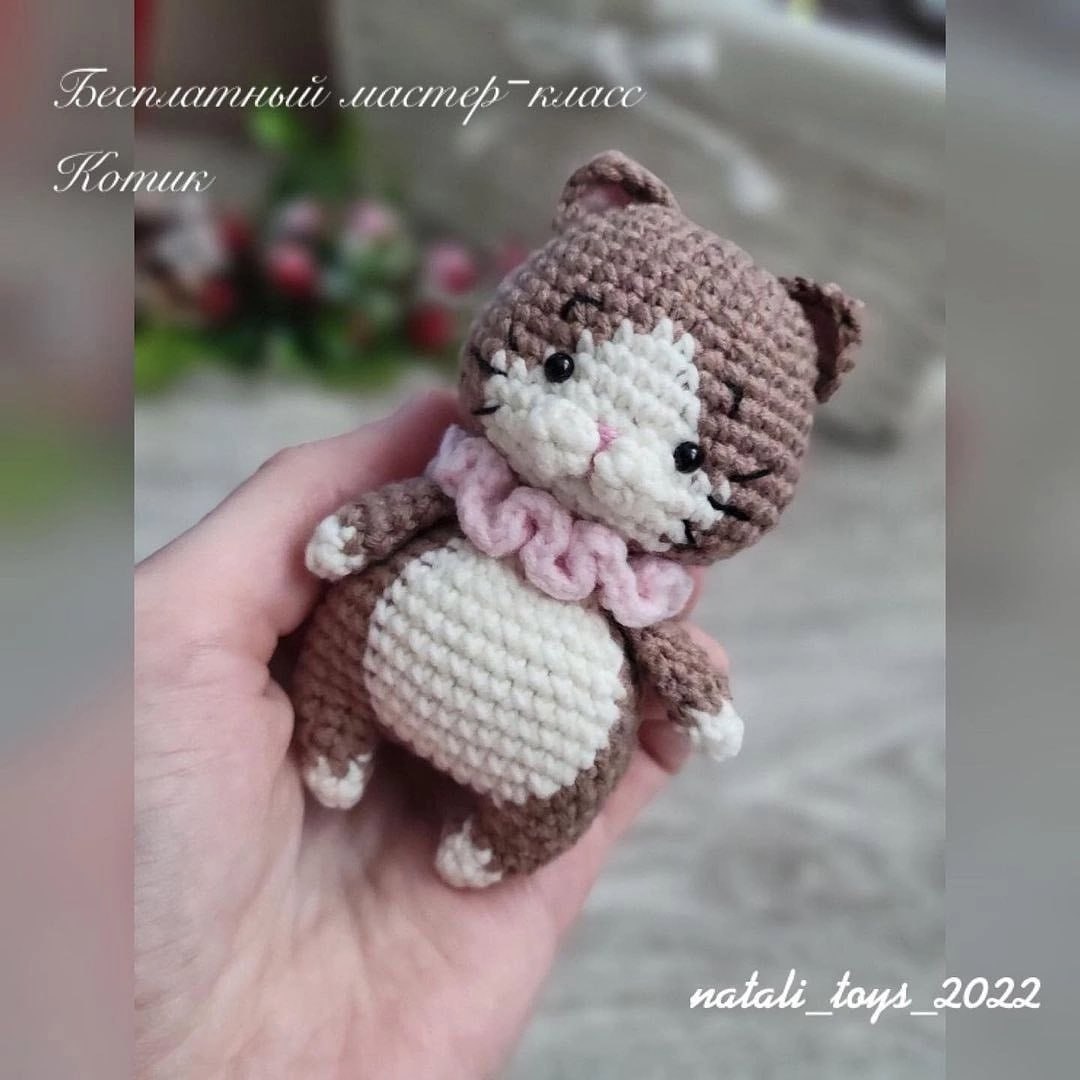
Looking for a sweet and simple project to add to your amigurumi collection? This adorable little crochet kitten is the perfect companion for beginners and experienced crocheters alike. With its chubby cheeks, dainty pink collar, and cozy brown and white coat, this kitten is sure to bring a smile to anyone’s face. Standing at approximately 4 inches tall, it makes a wonderful gift, a cute desk accessory, or a lovely addition to a nursery.
In this tutorial, we will walk you through every step of creating your own little kitty. We use standard US crochet terms and imperial measurements to make it easy for everyone to follow along. Let’s grab our hooks and some yarn and get started!
Materials & Abbreviations
To create this kitten, you will need a few basic supplies. We recommend using a cotton-blend yarn for a clean, defined stitch, but any medium-weight yarn will work.
Materials Needed
- Crochet Hook: 2.0mm (or a size that keeps your stitches tight so the stuffing doesn’t show).
- Yarn: A cotton-blend yarn (like YarnArt Jeans) in the following colors:
- Coffee Brown (Main Color)
- Milk White (For the face, belly, paws, and tail tip)
- Light Pink (For the collar and nose embroidery)
- Black (For the whiskers and eyebrows)
- Eyes: Small safety eyes or black embroidery thread.
- Stuffing: Polyester fiberfill.
- Tools: Yarn needle, scissors, and stitch markers.
Abbreviations (US Terms)
- MR: Magic Ring
- sc: Single crochet
- inc: Increase (2 sc in the same stitch)
- dec: Decrease (sc 2 stitches together)
- ch: Chain
- dc: Double crochet
- hdc: Half double crochet
- sl st: Slip stitch
- BLO: Back loop only
- FLO: Front loop only
Step-by-Step Instructions
Legs and Body
We begin by crocheting the legs and then continuing directly into the body to minimize sewing.
The First Leg
Using White yarn:
- Round 1: 4 sc in MR (4)
- Round 2: (1 sc, inc) x 2 (6)
Switch to Brown yarn:
- Round 3: (2 sc, inc) x 2 (8)
- Round 4: 8 sc (8). Fasten off and weave in the end.
The Second Leg and Body Join
Repeat the instructions for the first leg, but do not fasten off after Round 4. Instead, continue as follows:
- Join: Chain 6, then slip stitch into the first leg to join them together.
The Body
Now we will work around both legs to create the body. Pay close attention to the color changes to create the white belly.
- Round 5: (Brown) 4 sc, inc, (White) 13 sc, inc, (Brown) 9 sc (30)
- Round 6: (Brown) 8 sc, (White) 7 sc, (Brown) 15 sc (30)
- Round 7: (Brown) 8 sc, inc, (White) 5 sc, inc, (Brown) 8 sc, inc, (White) 5 sc, inc (34)
- Round 8: (Brown) 8 sc, inc, (White) 7 sc, inc, (Brown) 17 sc (36)
- Round 9: (Brown) 8 sc, (White) 11 sc, (Brown) 17 sc (36)
- Round 10: (Brown) 8 sc, (White) 10 sc, inc, (Brown) 17 sc (37)
- Round 11: (Brown) 8 sc, (White) 12 sc, (Brown) 17 sc (37)
- Round 12: (Brown) 8 sc, dec, (White) 10 sc, (Brown) 17 sc (36)
- Round 13: (Brown) 8 sc, (White) 11 sc, (Brown) 17 sc (36)
- Round 14: (Brown) 8 sc, dec, (White) 7 sc, dec, (Brown) 8 sc, dec, (White) 5 sc, dec (32)
- Round 15: (Brown) 8 sc, dec, (White) 5 sc, dec, (Brown) (3 sc, dec) x 3 (27)
- Round 16: (Brown) 3 sc, dec, 3 sc, dec, 3 sc, dec, (3 sc, dec) x 2, dec (21)
- Round 17: (2 sc, dec) x 5, 1 sc (16)
- Round 18: BLO 16 sc (16). Do not fasten off; we will return here for the collar.
Stuff the legs and body firmly with fiberfill.
The Head
Using Brown yarn, start with a foundation chain of 6.
- Round 1: inc, 3 sc, 4 sc in the last chain, 3 sc, inc (14)
- Round 2: 2 inc, 3 sc, 4 inc, 3 sc, 2 inc (22)
- Round 3: 1 sc, inc, 7 sc, inc, 2 sc, inc, 7 sc, inc, 1 sc (26)
- Round 4: 26 sc (26)
- Round 5: 2 sc, inc, 7 sc, inc, 4 sc, inc, 7 sc, inc, 2 sc (30)
- Round 6: 30 sc (30)
- Round 7: (4 sc, inc) x 6 (36)
- Round 8: (Brown) 9 sc, (White) 2 sc, (Brown) 25 sc (36)
- Round 9: (Brown) 5 sc, inc, (White) 2 sc, 4 sc, inc, 4 sc, inc, (Brown) (5 sc, inc) x 3 (42)
- Round 10: (Brown) 8 sc, (White) 6 sc, (Brown) 28 sc (42)
- Round 11: (Brown) 6 sc, inc, 6 sc, inc, 1 sc, (White) 5 sc, inc, (Brown) (6 sc, inc) x 3 (48)
- Round 12-13: (Brown) 7 sc, (White) 13 sc, (Brown) 29 sc (48)
- Round 14: (Brown) 4 sc, dec, (White) 1 sc, 3 sc, dec, (Brown) 4 sc, dec, 2 sc, 2 sc, dec, (4 sc, dec) x 4 (40)
- Round 15: (Brown) 3 sc, dec, (White) 1 sc, 2 sc, dec, (Brown) 3 sc, dec, 2 sc, 1 sc, dec, (3 sc, dec) x 4 (32)
- Round 16: (1 sc, dec) x 2, (1 sc, dec) x 2, 1 sc, dec, (1 sc, dec) x 5, 2 sc (22)
- Round 17: 2 sc, dec, 1 sc, 1 sc, dec, (2 sc, dec) x 3, dec (16)
Stuff the head firmly. Position and attach the safety eyes between Rounds 11 and 12.
The Ears
Using Pink yarn:
- Round 1: 3 sc in MR, ch 1, turn (3)
- Round 2: inc, (hdc, dc, hdc) in the next stitch, inc (7)
Switch to Brown yarn:
- Round 3: 3 sc, dc, 3 sc (7)
Make two ears and sew them to the head between Rounds 1 and 8.
The Muzzle/Cheeks
Using White yarn, make two small circles:
- Step: 6 sc in MR, sl st to join.
Sew these to the lower part of the face to create chubby cheeks.
Upper Paws
Using White yarn:
- Round 1: 4 sc in MR (4)
- Round 2: (1 sc, inc) x 2 (6)
Switch to Brown yarn:
- Round 3: (2 sc, inc) x 2 (8)
- Round 4: 8 sc (8)
- Round 5: dec, 6 sc (7)
- Round 6: 7 sc (7). Do not stuff. Fold the piece in half and sc 3 stitches together to close.
Repeat for the second paw.
The Tail
Using White yarn:
- Round 1: 5 sc in MR (5)
- Round 2: (inc, 1 sc) x 2, inc (8)
- Round 3: 8 sc (8)
Switch to Brown yarn:
- Round 4: 8 sc (8)
- Round 5: dec, 6 sc (7)
- Round 6: 7 sc (7)
- Round 7: dec, 5 sc (6)
- Round 8: 6 sc (6)
- Round 9: dec, 4 sc (5). Do not stuff. Fold in half and sc 3 stitches together to close.
Finishing
Now it is time to put everything together and add the final cute details!
The Ruffled Collar
Attach Pink yarn to the FLO of Round 18 of the body. To create the ruffles, work 5 double crochets (dc) into every single stitch around the body: (5 dc in 1 st) x 16. Fasten off and weave in the end.
Assembly & Embroidery
- Sewing: Attach the head to the body. Sew the upper paws to the sides of the body and the tail to the back.
- Nose: Using light pink yarn, embroider a small triangle or a horizontal line for the nose between the white cheeks.
- Face Details: Using black yarn, embroider small thin lines for the whiskers on each side of the muzzle and two small arched lines above the eyes for eyebrows.
Tips for Success
Perfecting Your Tension
Because amigurumi requires the stuffing to stay hidden, maintain a tight tension. If you see holes in your work, try dropping down half a hook size.
Seamless Color Changes
To get a clean color change, don’t finish the last stitch of the old color. Instead, pull through the final loop with the new color of yarn. This prevents a visible “bump” or knot in your work.
The Magic Ring Trick
If you struggle with the Magic Ring (MR), you can substitute it by chaining 2 and working the first round of stitches into the first chain. Just be sure to pull the ring tight to close the center hole completely.
Stuffing for Shape
Stuff your pieces in small increments. Use a chopstick or a crochet hook to push the fiberfill into the corners of the head and legs to ensure the kitten has a firm, rounded shape.