
How to Crochet a Cute Amigurumi Doll: A Complete Beginner-Friendly Pattern
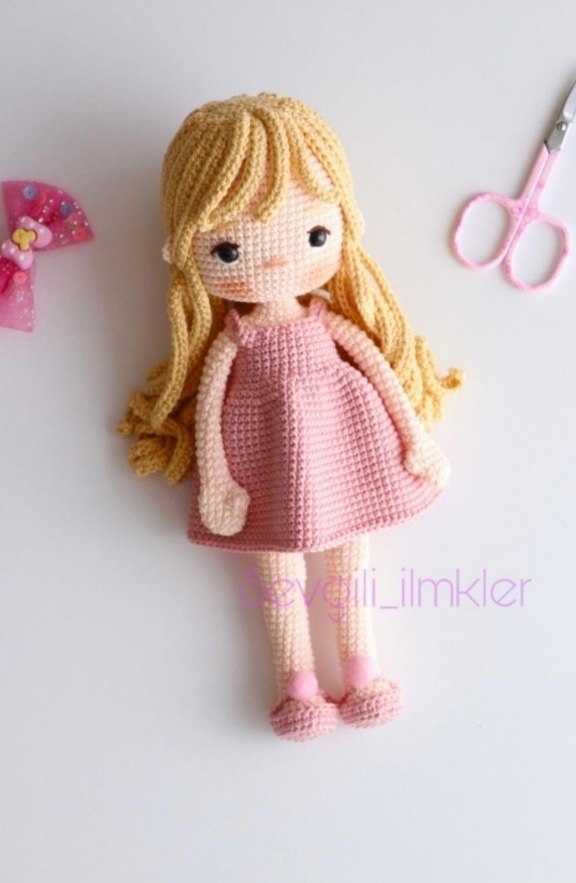
There is nothing quite as rewarding as finishing a handmade doll that looks like it walked straight out of a fairytale! If you are looking for your next crochet project, this adorable amigurumi doll is the perfect choice. With her flowing blonde hair, a lovely pink dress, and sweet facial expressions, she makes a wonderful gift for children or a charming addition to any nursery decor.
This pattern is designed to be beginner-accessible, provided you have mastered the basics of amigurumi, such as working in the round and increasing/decreasing. We will walk through every step, from crafting the tiny shoes to attaching the voluminous hair. Grab your favorite hook and let’s get started!
Materials & Abbreviations
To ensure your doll turns out looking exactly like the photos, I recommend using a fine weight yarn (often called embroidery floss or crochet thread/thin cotton) to achieve that smooth, tight amigurumi stitch.
What You Will Need
- Yarn (Cotton/Catania style):
- Skin tone (for the body, head, arms, and legs)
- Pink (for the dress and shoes)
- Blonde/Yellow (for the hair)
- Crochet Hook: 1.60 mm (or the closest size you have to achieve tight tension).
- Safety Eyes: 8 mm.
- Yarn for Embroidery: Brown and white (to create the facial details).
- Stuffing: Polyfill or silicone fiberfill.
- Small Pink Pom-poms: 2 pieces (for the shoes).
- Additional: A plastic support/base for the legs and some silicone glue (to secure the support).
- Tools: A tapestry needle, scissors, and stitch markers.
US Crochet Abbreviations
- MR: Magic Ring
- sc: Single crochet
- inc: Increase (2 sc in one stitch)
- dec: Decrease (sc 2 together)
- ch: Chain
- dc: Double crochet
- hdc: Half double crochet
- sl st: Slip stitch
- BLO: Back loop only
- FLO: Front loop only
- W: 3 sc in one stitch
- (…)*n: Repeat the instructions inside the parentheses “n” times.
Step-by-Step Instructions
The Head
We start by creating a round shape that will become the doll’s head. Make sure your tension is tight to prevent stuffing from showing through.
- MR, 6 sc (6)
- inc * 6 (12)
- (1 sc, inc) * 6 (18)
- (2 sc, inc) * 6 (24)
- (3 sc, inc) * 6 (30)
- (4 sc, inc) * 6 (36)
- (5 sc, inc) * 6 (42)
- (6 sc, inc) * 6 (48)
- (7 sc, inc) * 6 (54)
- 54 sc (54)
- (8 sc, inc) * 6 (60)
- Rows 12-26: 60 sc (15 rows total)
Eye Placement: Before finishing the head, place your 8 mm safety eyes between rows 21 and 22. Ensure they are exactly 10 sc apart.
- 4 sc, dec, (8 sc, dec) * 5, 4 sc (54)
- (7 sc, dec) * 6 (48)
- 3 sc, dec, (6 sc, dec) * 5, 3 sc (42)
- (5 sc, dec) * 6 (36) – Stuff the head firmly here.
- 2 sc, dec, (4 sc, dec) * 5, 2 sc (30)
- (3 sc, dec) * 6 (24)
- 1 sc, dec, (2 sc, dec) * 5, 1 sc (18)
Finish with a sl st to close the hole.
Ears
Make two ears using the following pattern:
- In an MR: ch 2, 4 dc, ch 2, sl st.
- Close the ring and fasten off.
The Hair
The hair consists of a small cap and several long strands to give her that “Barbie” look.
The Hair Cap
- MR, 8 sc (8)
- inc * 8 (16)
- (1 sc, inc) * 8 (24)
- inc, sc, inc (26)
- (60 ch, starting from the 3rd ch, 58 hdc) * 22 strands
- (ch, starting from the 3rd ch, 16 hdc) * 4 strands
Leave a long tail for sewing. Turn the hair cap inside out, secure it to the head, and sew the strands onto the scalp.
The Arms
Make two arms.
- MR, 6 sc (6)
- inc * 6 (12)
- Rows 3-5: 12 sc (3 rows)
- 2 sc, 4 dc in one stitch, 9 sc (15)
- 2 sc, 4 dc, 4 dc in one stitch, 9 sc (12)
- (1 sc, dec) * 4 (8)
- Rows 9-25: 8 sc (17 rows)
The Legs
Make two legs. We will use a plastic support to help the doll stand.
- Ch 5 (start from the 2nd ch): 3 sc, 3 dc in one st, 3 sc, 3 dc in one st (12)
- 4 sc, inc, inc, inc, 4 sc, inc, inc, inc (18)
- 4 sc, inc, sc, inc, sc, inc, 3 sc, inc, sc, inc (23)
- 23 sc in BLO
- 23 sc
Note: At this stage, secure the plastic support inside the leg using a bit of silicone glue.
- 3 sc, (dec, sc) * 6, 2 sc (17)
- 3 sc, (dec, sc) * 4, 2 sc (13)
- Rows 8-14: 13 sc (7 rows)
Stuff the leg firmly with polyfill.
- inc, 12 sc (14)
- Rows 16-17: 14 sc (2 rows)
- sc, inc, 12 sc (15)
- Rows 19-20: 15 sc (2 rows)
- 13 sc, dec (14)
- sc, dec, sc, dec, 2 sc, inc, inc, inc, 3 sc (15)
- sc, inc, 13 sc (16)
- Rows 24-35: 16 sc (12 rows)
For the second leg, repeat the instructions up to row 35. On row 36, sc 10, ch 3, and join the two legs together.
The Body
The body joins the legs and creates the torso.
- 16 sc, inc, inc, inc, 16 sc, inc, inc, inc, sc (44)
- Rows 2-9: 44 sc (8 rows)
- 8 sc, dec, 20 sc, dec, 12 sc (42)
- Rows 11-12: 42 sc (2 rows)
- (5 sc, dec) * 6 (36)
- Rows 14-18: 36 sc (5 rows)
- 7 sc, (join 1st arm with 1 sc), 17 sc, (join 2nd arm with 1 sc), 10 sc (48)
- 3 sc, dec, (6 sc, dec) * 5, 3 sc (42)
- (5 sc, dec) * 6 (36)
- 2 sc, dec, (4 sc, dec) * 5, 2 sc (30)
- (3 sc, dec) * 6 (24)
- sc, dec, (2 sc, dec) * 5, sc (18)
- Rows 25-26: 18 sc (2 rows)
Leave a tail for sewing. Tip: Dress the doll before attaching the head!
The Dress
- Ch 45 (start from the 2nd ch)
- Join with a sl st to form a circle: 44 sc
- 6 sc, ch 6, skip 10, 12 sc, ch 6, skip 10, 6 sc (36)
- Rows 3-7: 36 sc
- (sc, inc) * 18 (54)
- 54 sc (54)
- (2 sc, inc) * 18 (72)
- Rows 11-16: 72 sc (6 rows)
- (11 sc, inc) * 6 (78)
- Rows 18-20: 78 sc (3 rows)
- (12 sc, inc) * 6 (84)
- Rows 22-24: 84 sc (3 rows)
- (13 sc, inc) * 6 (90)
- Rows 26-29: 90 sc (4 rows)
The Shoes
Make two shoes.
- Ch 6 (start from the 2nd ch)
- 4 sc, 3 dc in one st, 4 sc, 3 dc in one st (14)
- 4 sc, inc, inc, inc, 4 sc, inc, inc, inc (20)
- 5 sc, inc, sc, inc, sc, inc, 5 sc, inc, sc, inc, sc, inc (26)
- 9 sc, place a marker (26)
- 26 sc in BLO
- 26 sc
- 7 sc, ch 9, skip 12 sc, 7 sc
Finish and attach a small pink pom-pom to the top of each shoe for a cute detail.
Finishing
Now comes the magic! To bring your doll to life, you need to focus on the face:
- Eyes: Your safety eyes are already in, but use brown and white yarn to embroider small eyelashes and a little white “highlight” in the eyes to make them sparkle.
- Eyebrows: Use brown yarn to stitch two thin, slightly curved lines above the eyes.
- Mouth/Nose: Use a very fine thread to stitch a small, subtle line for the nose and a sweet little smile.
- Assembly: Sew the ears to the sides of the head, and finally, sew the head onto the body. Make sure the dress is pulled down correctly before you do the final head attachment.
Tips for Success
- Tension is Key: Amigurumi should be worked very tightly so that the stuffing doesn’t peek through the stitches. If you see gaps, try using a smaller hook.
- Use Stitch Markers: Working in rounds can get confusing. Always mark the beginning of your row so you don’t lose count.
- Stuffing Technique: Stuff the head and body firmly, but be careful not to overstuff the arms or legs, or they might become too stiff to sew on easily.
- Eye Placement: Always double-check your eye placement before stuffing the head. It is much harder to move them once the head is full!