
Cute Crochet Husky Amigurumi Pattern: A Step-by-Step Tutorial
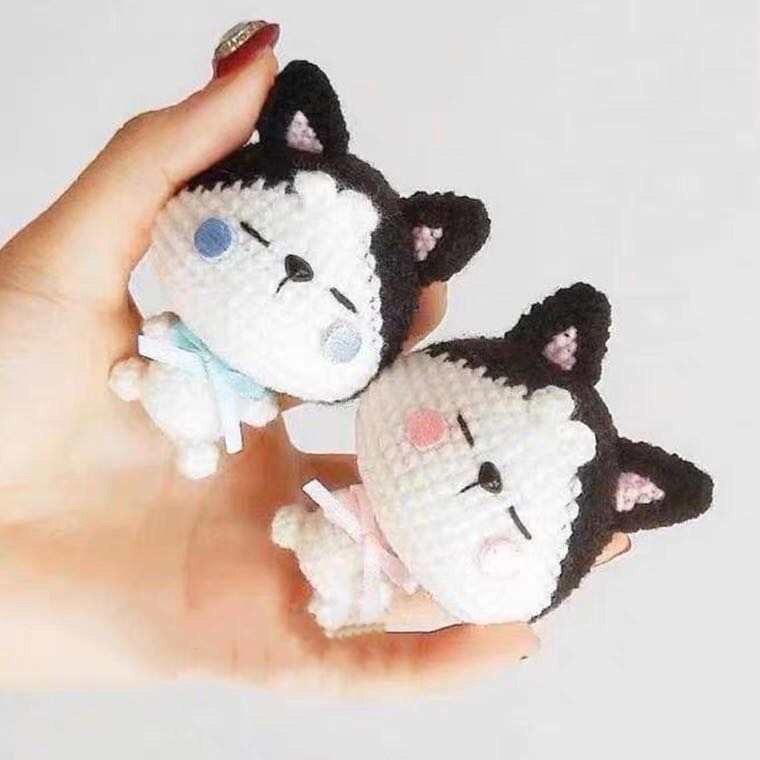
Are you looking for your next adorable crochet project? There is nothing quite as charming as a tiny, wide-eyed puppy, and this Crochet Husky Amigurumi is the ultimate “kawaii” companion! Whether you want to make a gift for a dog lover or add a unique little friend to your own shelf, this husky pattern is designed to be easy, fun, and incredibly rewarding.
This pattern uses a “chibi” style, which means the head is slightly oversized compared to the body, giving it that irresistible, precious look. Because we use simple stitches and basic color changes, this is a perfect project for intermediate beginners or anyone looking to practice their amigurumi shaping. Grab your favorite yarn and let’s get stitching!
Materials & Abbreviations
Before we dive into the stitches, let’s make sure you have everything you need on your crochet hook. For a project of this size, you’ll want to use a tight tension to ensure your stuffing doesn’t peek through the stitches.
What You’ll Need
- Yarn: Medium weight (Size 4) cotton or acrylic yarn in Black, White, and a small amount of Pink (for the ears and cheeks). You may also want a small scrap of Light Blue yarn for a tiny bow.
- Crochet Hook: A 3.5mm (E) or 4.0mm (G) hook works best for amigurumi to keep the stitches dense.
- Safety Eyes: Approximately 10mm to 12mm eyes.
- Stuffing: High-quality polyester fiberfill.
- Tools: A tapestry needle for sewing, scissors, and a stitch marker (essential for working in continuous rounds!).
US Crochet Abbreviations
This pattern is written using standard US terminology. Please ensure you are using US terms to avoid confusion!
- mr: Magic ring
- sc: Single crochet
- inc: Increase (2 sc in the same stitch)
- dec: Decrease (invisible decrease recommended)
- ch: Chain
- sl st: Slip stitch
- hdc: Half double crochet
- dc: Double crochet
- BLO: Back loop only
- FLO: Front loop only
Step-by-Step Instructions
The Head
The head is the most detailed part of the husky, featuring the classic white face markings. We will start with black and transition to white to create the character’s look.
Note: Change colors only where indicated in the pattern.
- Round 1: Using Black, 6 sc in a magic ring (6)
- Round 2: 6 inc (12)
- Round 3: (1 sc, inc) repeat 6 times (18)
- Round 4: (1 sc, inc, 1 sc) repeat 6 times (24)
- Round 5: (3 sc, inc) repeat 6 times (30)
- Round 6: (2 sc, inc, 2 sc) repeat 6 times (36)
- Round 7: (5 sc, inc) repeat 6 times (42)
- Round 8: 18 sc in Black, (switch to White: 6 sc), 18 sc in Black (42)
- Round 9: 17 sc in Black, (switch to White: 8 sc), 17 sc in Black (42)
- Round 10: 16 sc in Black, (switch to White: 10 sc), 16 sc in Black (42)
- Round 11: (6 sc, inc) repeat 2 times, 1 sc, (switch to White: 5 sc, inc, 6 sc), inc, (6 sc, inc) repeat 2 times (48)
- Round 12: 16 sc in Black, (switch to White: 15 sc), 17 sc in Black (48)
- Round 13: 15 sc in Black, (switch to White: 17 sc), 16 sc in Black (48)
- Round 14: 7 sc in Black, inc, 6 sc, (switch to White: 1 sc, inc, (7 sc, inc) repeat 2 times, 1 sc), 6 sc, inc, 7 sc, inc (54)
- Round 15: 14 sc in Black, (switch to White: 24 sc), 16 sc in Black (54)
- Rounds 16-17: 14 sc in Black, (switch to White: 24 sc), 16 sc in Black (54)
- Round 18: 7 sc in Black, dec, 5 sc, (switch to White: 2 sc, dec, (7 sc, dec) repeat 2 times, 2 sc), 5 sc, dec, 7 sc, dec (48)
- Round 19: 6 sc in Black, dec, 6 sc, (switch to White: dec, (6 sc, dec) repeat 2 times, 1 sc), 5 sc, dec, 6 sc, dec (42)
- Round 20: (4 sc, dec) repeat 2 times, 2 sc, (switch to White: 2 sc, dec, 4 sc, dec, 4 sc), dec, (4 sc, dec) repeat 2 times (35)
- Round 21: (3 sc, dec) repeat 2 times, 3 sc, (switch to White: dec, 3 sc, dec, 3 sc), dec, (3 sc, dec) repeat 2 times (28)
- Round 22: (2 sc, dec) repeat 3 times, (switch to White: 2 sc, dec, 2 sc), dec, (2 sc, dec) repeat 2 times (21)
- Round 23: (1 sc, dec) repeat 3 times, 1 sc, (switch to White: dec, 1 sc), dec, (1 sc, dec) repeat 2 times (14)
Fasten off, leaving a long tail for sewing. Note: Add your eyes, nose, and pink cheek details around rounds 14-15 before closing the head.
The Body
The body is worked entirely in White to keep the focus on the head.
- Round 1: 6 sc in a magic ring (6)
- Round 2: 6 inc (12)
- Round 3: (1 sc, inc) repeat 6 times (18)
- Rounds 4-6: 18 sc (18)
- Round 7: (7 sc, dec) repeat 2 times (16)
- Round 8: (6 sc, dec) repeat 2 times (14)
Fasten off, leaving a long tail for sewing. You will also want to sew a small bow to the body later.
The Ears (Make 2)
The ears combine Black and Pink to create a cute, accented look.
- Round 1: Using Black, 4 sc in a magic ring (4)
- Round 2: (1 sc, inc) repeat 2 times (6)
- Round 3: (2 sc, inc) repeat 2 times (8)
- Round 4: 2 sc in Black, (switch to Pink: 1 sc), inc, 3 sc in Black, inc (10)
- Round 5: 2 sc in Black, (switch to Pink: 2 sc), inc, 4 sc in Black, inc (12)
- Round 6: 2 sc in Black, (switch to Pink: 3 sc), inc, 5 sc in Black, inc (14)
Fasten off, leaving a long tail for sewing.
The Paws (Make 4)
- Round 1: 6 sc in a magic ring (6)
- Round 2: 6 sc (6)
Fasten off, leaving a long tail for sewing.
The Bangs/Fringe (Make 2)
This little piece adds a lot of personality to the husky’s forehead!
- Using White yarn, ch 5.
- From the 3rd chain from the hook: work 1 dc, then 1 hdc.
Fasten off, leaving a long tail for sewing.
Finishing
Now comes the best part: bringing your husky to life! Assembly requires a bit of patience, but it is what makes the character truly pop.
Assembly Steps:
- Eyes & Face: Before stuffing the head completely, insert your safety eyes between rounds 14 and 15. Use black embroidery thread to stitch a small nose, and use pink yarn or even a bit of makeup/blush to add soft pink circles for the cheeks.
- Stuffing: Stuff the head and body firmly with fiberfill. Make sure the head is stuffed well enough to hold its round shape.
- Sewing the Body: Use your tapestry needle to sew the head onto the body. A strong seam is important here!
- Attaching Limbs: Sew the four paws to the bottom of the body and the two ears to the top of the head.
- The Details: Sew the bangs/fringe onto the forehead just above the eyes. Finally, sew your little bow onto the body to complete the look.
Tips for Success
To ensure your husky looks professional and polished, keep these tips in mind:
- Use Invisible Decreases: When working on the head and body, try using the “invisible decrease” method (inserting the hook into the front loops only of the next two stitches). This prevents large gaps in your amigurumi.
- Mind Your Tension: Amigurumi should be tight! If you see the white stuffing peeking through your black stitches, try using a smaller hook or pulling your yarn a bit tighter.
- Stitch Markers are Your Best Friend: Since amigurumi is worked in continuous spirals, it is very easy to lose your place. Always use a marker to identify the first stitch of every round.
- Symmetry Matters: When sewing the ears or paws, take a moment to check that they are even on both sides. This gives your husky a much more balanced and cute appearance.
Congratulations! You’ve just completed a custom crochet husky. Whether you display him on your desk or gift him to a friend, this little pup is sure to bring a smile to everyone’s face!