
Crochet Wednesday Addams Doll Outfit Pattern: A Complete DIY Tutorial
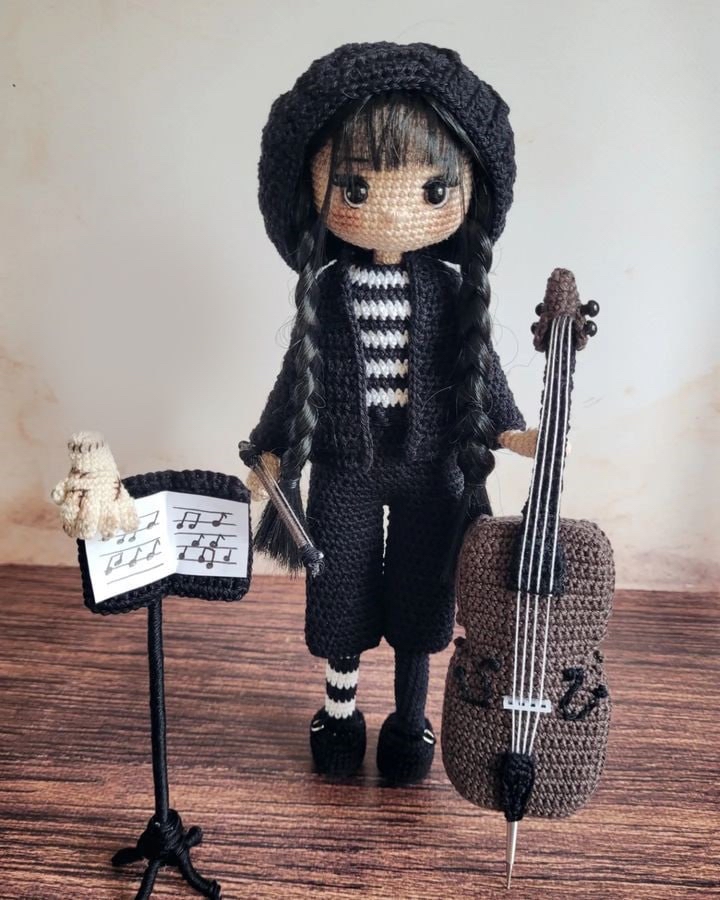
Are you looking to dress up your favorite spooky doll? This detailed crochet tutorial will guide you through creating a complete, miniature “Wednesday-inspired” outfit. This isn’t just a simple dress; we are crafting a full ensemble including a striped sweater, a layered cardigan with a hood, matching pants, tiny black shoes, and even a miniature cello and music stand to complete the look! This project is perfect for amigurumi lovers who want to add a touch of gothic charm to their doll collections.
Materials & Abbreviations
To achieve the best results, I recommend using a fine cotton yarn to ensure the details remain crisp and the miniature scale looks realistic. For this pattern, we are using a combination of black, white, and charcoal gray yarn.
What You Will Need:
- Yarn: Fine cotton yarn in Black, White, and Charcoal Gray (approx. 50-100 yards of each).
- Crochet Hook: 2.20 mm (B-1).
- Wire: About 12 inches of thin, flexible wire (approx. 2.5 mm thickness) for the music stand legs.
- Buttons: 6 tiny black buttons.
- Extras: A toothpick, hot glue, a sewing needle, and white thread for the cello strings.
Abbreviations (US Terms):
- ch: chain
- MR: magic ring
- sc: single crochet
- inc: increase
- dec: decrease
- 3-sc inc: three single crochets in one stitch
- BLO: back loop only
- FLO: front loop only
- sl st: slip stitch
- hdc: half double crochet
- hdc inc: half double crochet increase
- hdc dec: half double crochet decrease
- dc: double crochet
- tr: treble crochet
- bpsc: back post single crochet
Step-by-Step Instructions
The Striped Sweater
This sweater features a classic black and white striped design. Note: This is worked in rows. Make 1 chain at the end of every row to turn.
Color: Black
Row 1: Chain 25. Skip the first 7 chains to create a loop. (2 sc, 1 inc) repeat 6 times (24 sts).
Tip: When changing colors, do not cut the yarn. Change color on the last step of the final stitch of the previous color to ensure a smooth transition.
Color: White
Row 2: 3 sc, 1 inc, 2 sc, 1 inc, 10 sc, 1 inc, 2 sc, 1 inc, 3 sc (28 sts).
Row 3: (3 sc, 1 inc) repeat 7 times (35 sts).
Color: Black
Row 4: (4 sc, 1 inc) repeat 7 times (42 sts).
Row 5: 42 sc (42 sts).
Color: White
Row 6: 42 sc (42 sts).
Row 7: Chain 7 to create a loop, skip these 7 stitches, turn, 42 sc (42 sts).
Color: Black
Row 8: 42 sc (42 sts).
Row 9: 7 sc, 3 ch, skip 7 sts, 14 sc, 3 ch, skip 7 sts, 7 sc.
Color: White
Row 10: 6 sc, 1 inc, 3 sc, 1 inc, 12 sc, 1 inc, 3 sc, 1 inc, 6 sc (38 sts).
Row 11: 6 sc, 1 inc, 5 sc, 1 inc, 12 sc, 1 inc, 5 sc, 1 inc, 6 sc (42 sts).
Color: Black
Row 12: 42 sc (42 sts).
Row 13: Chain 7 to create a loop, skip these 7 stitches, turn, 42 sc (42 sts).
Color: White
Row 14: 42 sc (42 sts).
Row 15: Chain 7 to create a loop, skip these 7 stitches, turn, 42 sc (42 sts).
Color: Black
Row 16-17: 42 sc (42 sts).
Color: White
Row 18: 42 sc (42 sts).
Row 19: Chain 7 to create a loop, skip these 7 stitches, turn, 42 sc (42 sts).
Color: Black
Row 20: 42 hdc (42 sts).
Row 21: 42 hdc in ribbing (42 sts).
The Layered Cardigan & Hood
The cardigan is worked in rows. Make 1 chain at the end of every row to turn.
The Main Body (Black)
Row 1: Chain 25. Starting from the 2nd ch from the hook: (2 hdc, 1 hdc inc) repeat 6 times (24 sts).
Row 2: 3 hdc, 1 hdc inc, 2 hdc, 1 hdc inc, 10 hdc, 1 hdc inc, 2 hdc, 1 hdc inc, 3 hdc (28 sts).
Row 3: (3 hdc, 1 hdc inc) repeat 7 times (35 sts).
Row 4: (4 hdc, 1 hdc inc) repeat 7 times (42 sts).
Row 5-6: 42 hdc (42 sts).
Row 7: (5 hdc, 1 hdc inc) repeat 7 times (49 sts).
Row 8: (6 hdc, 1 hdc inc) repeat 7 times (56 sts).
Row 9: 9 hdc, chain 4, skip 7 sts, 24 hdc, chain 4, skip 7 sts, 9 hdc.
Row 10: 9 hdc, (1 hdc, 1 hdc dec, 1 hdc), 24 hdc, (1 hdc, 1 hdc dec, 1 hdc), 9 hdc (48 sts).
Row 11-19: 48 hdc (48 sts).
Cardigan Finishing:
Do not cut the yarn at the end of row 19. Work a 3-sc inc in the corner. Along the side, work sc until you reach the neckline. Work 1 inc in the corner. Along the neckline, work 18 sl st, then 1 inc in the corner. Continue sc down the side to the bottom corner, work 1 inc, then cut the yarn.
The Sleeves (Black)
Attach yarn to the bottom of the armhole on the back of the cardigan using a sl st. Work in the opposite direction.
Left Sleeve: Row 1: 4 hdc, 1 hdc dec, 6 hdc, 1 hdc dec (12 sts). Rows 2-9: 12 hdc.
Right Sleeve: Row 1: 6 hdc, 1 hdc dec, 4 hdc, 1 hdc dec (12 sts). Rows 2-9: 12 hdc.
The Hood (Black)
Row 1: Leave 2 stitches unworked on each side of the neckline. Work along the edge of the neckline using sl st: (1 hdc, 1 hdc inc) repeat 7 times.
Row 2: 21 hdc.
Row 3: (2 hdc, 1 hdc inc) repeat 7 times (28 sts).
Row 4: 28 hdc.
Row 5: (3 hdc, 1 hdc inc) repeat 7 times (35 sts).
Row 6: 35 hdc.
Row 7: (4 hdc, 1 hdc inc) repeat 7 times (42 sts).
Row 8-15: 42 hdc.
Row 16: (4 hdc, 1 hdc dec) repeat 7 times (35 sts).
Row 17: 35 hdc.
Row 18: (3 hdc, 1 hdc dec) repeat 7 times (28 sts).
Row 19: 28 hdc.
Row 20: (2 hdc, 1 hdc dec) repeat 7 times (21 sts).
Row 21: (1 hdc, 1 hdc dec) repeat 7 times (14 sts). Cut yarn.
Hood Detail:
With 14 stitches remaining, leave 4 stitches on each side. Attach yarn to the right side and work 6 hdc in the center. Row 1: 6 hdc, 1 ch. Rows 2-4: 6 hdc.
The Crocheted Pants
Color: Black
Row 1: Chain 44. Skip 7 chains to create a loop, turn, 37 sc, 1 ch, turn (37 sts).
Row 2: 37 sc, 1 ch, turn.
Row 3: 5 hdc, 1 hdc inc, 4 hdc, 1 hdc inc, 15 hdc, 1 hdc inc, 4 hdc, 1 hdc inc, 5 hdc, 1 ch, turn (41 sts).
Note: From row 4 onwards, you can either cut and rejoin the yarn at the start of each row OR work in rows with 1 ch at the end.
Row 4: 6 hdc, 1 hdc inc, 5 hdc, 1 hdc inc, 15 hdc, 1 hdc inc, 5 hdc, 1 hdc inc, 6 hdc (45 sts).
Row 5: 7 hdc, 1 hdc inc, 6 hdc, 1 hdc inc, 15 hdc, 1 hdc inc, 6 hdc, 1 hdc inc, 7 hdc (49 sts).
Row 6: Chain 7 for a loop, turn, 49 hdc (49 sts).
Row 7-11: 49 hdc.
The Legs:
You have 49 stitches. The 25th stitch is your center connection point. To start the first leg, pull a 1 ch through the 25th stitch. Work 15 rows of 15 hdc, ending each row with a sl st and 1 ch. Repeat for the second leg by attaching to the 25th stitch via a 1 ch loop.
Tiny Black Shoes
These are worked in rounds. End each round with a sl st.
Row 1: Chain 8. From 2nd ch: 6 sc, 1 3-sc inc, 5 sc, 1 inc (16 sts).
Row 2: 1 sc, 1 inc, 4 sc, 1 inc, 1 sc, 1 inc, 6 sc, 1 inc (20 sts).
Row 3: 1 inc, 7 sc, 1 inc, 1 sc, 1 inc, 7 sc, 1 inc, 1 sc (24 sts).
Row 4: 2 sc, 1 inc, 5 sc, (1 inc, 1 sc) repeat 4 times, 5 sc, 1 inc, 1 sc, 1 inc (31 sts).
Row 5: Work in BLO (Back Loop Only) (31 sts).
Row 6-8: 31 sc.
Row 9: 1 dec, 5 sc, (1 dec, 1 sc) repeat 5 times, 1 dec, 5 sc, 1 dec (23 sts).
Strap:
Right Shoe: 7 sl st, chain 8, from 2nd ch: 7 sl st, then 16 sl st.
Left Shoe: 16 sl st, chain 8, from 2nd ch: 7 sl st, then 7 sl st.
Finishing: Sew a tiny oval ring to the strap and then to the shoe.
The Miniature Cello & Music Stand
The Cello Body (Make 2 parts)
Row 1: Chain 15, 14 sc from 2nd ch.
Row 2: 1 inc, 12 sc, 1 inc (16 sts).
Row 3: 1 inc, 14 sc, 1 inc (18 sts).
Row 4: 18 sc.
Row 5: 1 inc, 16 sc, 1 inc (20 sts).
Row 6-18: 20 sc.
Row 19: 1 dec, 16 sc, 1 dec (18 sts).
Row 20: 1 dec, 14 sc, 1 dec (16 sts).
Row 21: 3 sl st, 1 ch, start in the same stitch where the ch was made: 12 sc, 1 ch, turn (leaving 2 sts unworked at start and end).
Row 22: 12 sc.
Row 23: 1 inc, 10 sc, 1 inc (14 sts).
Row 24: 1 inc, 12 sc, 1 inc (16 sts).
Row 25: 1 inc, 14 sc, 1 inc (18 sts).
Row 26-35: 18 sc.
Row 36: 1 dec, 14 sc, 1 dec (16 sts).
Row 37: 1 dec, 12 sc, 1 dec (14 sts).
Row 38: 1 dec, 10 sc, 1 dec (12 sts).
Cello Assembly:
Edge the entire piece with sc. Create decorative notches at the corners. To create the f-hole shape: chain 3, from 2nd ch work 2 sc, then a sl st over the loop. Sew the two body pieces together. Pro Tip: Use a piece of plastic or hard cardboard cut to the cello shape inside the body to help it keep its form. Stuff firmly but not so much that it stretches.
Cello Neck & Scroll:
Make 2 neck pieces: Chain 6, from 2nd ch 5 sc. Rows 2-4: 5 sc. Row 5: 1 dec, 1 sc, 1 dec (3 sts). Rows 6-9: 3 sc. Row 10: 1 sc, 1 dec (2 sts). Rows 11-28: 2 sc. Sew them together. For the scroll, work 6 sc in a magic ring, row 2: (1 sc, 1 inc) repeat 3 times (9 sts), rows 3-5: 9 sc, rows 6-8: 1 ch, turn, 6 sc (leaving 3 sts unworked in the center).
Final Cello Assembly:
Sew the neck to the top. Embroider f-holes with black thread. Sew the sub-f-hole part from the bottom to the area between rows 6 and 7. Use 4 white threads for the strings. Pass them through the bottom (between rows 6 and 7), then through the bridge, anchor them at the bottom of the neck, and pull them up to the top of the scroll.
Music Stand & Legs:
Main Stand: Chain 11, from 2nd ch 10 sc. Rows 2-8: 10 sc. Row 9: 10 bpsc (back post single crochet). Rows 10-16: 10 sc. Edge with sc.
Legs: Wrap 12 inches of wire with black yarn. Cut into small pieces, join them, and wrap more yarn to create the stand structure. Attach the stand to the music sheet.
Finishing
Assembly is key! For the doll, sew the sweater and cardigan together carefully. Attach the sleeves to the cardigan armholes. For the cello, ensure the strings are taut and the bridge is placed roughly 8 rows above the sub-f-hole. Finally, attach the music stand and cello together using the wire legs to create a complete scene.
Tips for Success
- Tension is everything: When making miniature clothes, try to keep your tension even so the garment doesn’t look “gappy.”
- Color Changes: Always change your color on the final pull-through of the last stitch to avoid visible gaps.
- Structure: For items like the cello, using a cardboard or plastic insert is the best way to prevent the amigurumi from looking “squishy.”
- Wire Work: When wrapping wire, use hot glue to secure the ends so the wire doesn’t unravel.