
Adorable Amigurumi Monkey Crochet Pattern: A Step-by-Step Guide
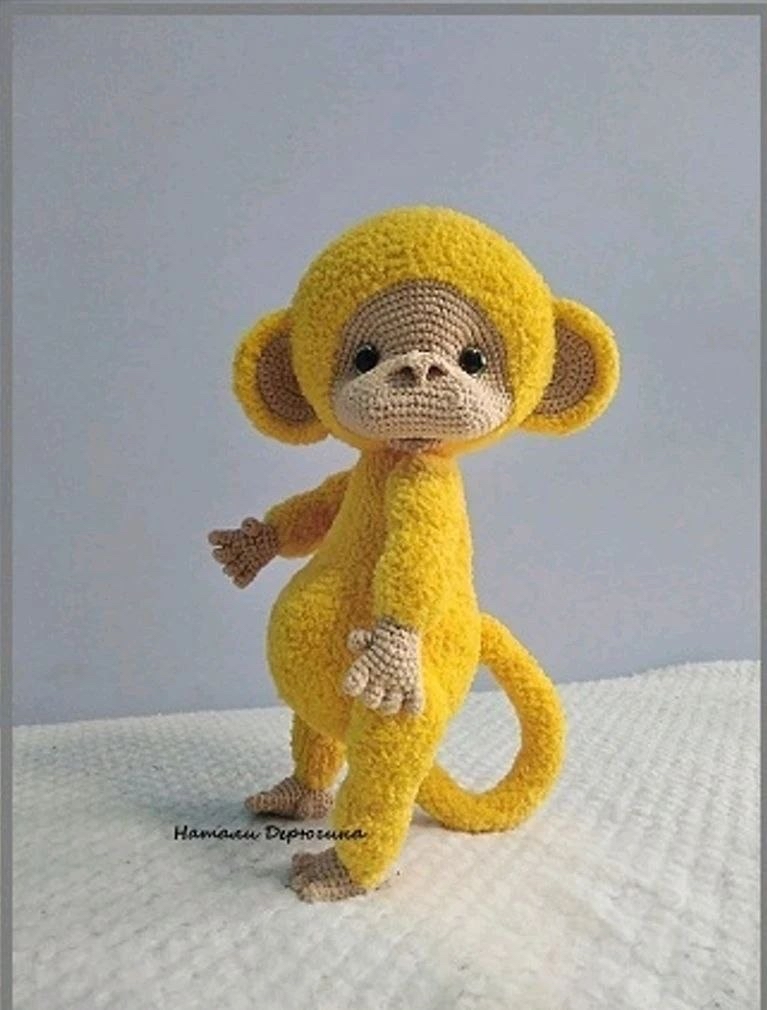
Are you looking for your next irresistible crochet project? These adorable, expressive monkeys are the perfect addition to your amigurumi collection! Whether you want to make a small, cuddly companion or a larger, poseable decorative piece, this pattern is designed to guide you through creating a character full of personality. With their large, soulful eyes and tiny limbs, these monkeys are sure to capture the hearts of children and adult collectors alike.
In this tutorial, we will walk through the entire process of creating a monkey from scratch, including the detailed shaping of the face, the tiny hands and feet, and the specialized assembly techniques that give these toys their lifelike expressions. This pattern is beginner-friendly, provided you are comfortable with basic amigurumi shapes and following stitch counts closely.
Materials & Abbreviations
To achieve the best results, I recommend using a combination of two yarn weights: a thinner yarn for the delicate facial features, palms, and soles, and a thicker, plush yarn for the main body, head, and limbs. This creates a beautiful textural contrast that makes the monkey look professional.
Required Supplies
- Yarn: Plush/velvet chenille yarn (for the body) and a smoother, thinner cotton or acrylic yarn (for the face and extremities).
- Crochet Hooks: 2.0mm (B) and 3.0mm (D) hooks, depending on your yarn choice.
- Safety Eyes: 12mm for a small monkey; 25mm for a large monkey.
- Stuffing: High-quality polyester fiberfill.
- Armature Options: You can use cotter pin joints (shplints) for a classic articulated feel, or wire armature for maximum poseability.
- Tools: Tapestry needle, scissors, pliers (for wire/pins), and a stitch marker.
US Crochet Abbreviations
Please ensure you are using US terms before beginning:
- ch: chain
- sc: single crochet
- inc: increase (2 sc in one stitch)
- dec: decrease (sc 2 stitches together)
- sl st: slip stitch
- st(s): stitch(es)
- ( ) x n: repeat the instructions inside the parentheses n times
Step-by-Step Instructions
Crocheting the Hands
We begin the hands using the thinner yarn to ensure the fingers are dainty. You will make four small fingers first, then connect them to form the palm.
The Fingers
Each finger is worked similarly. Start with a small foundation:
- Index Finger (1): ch 2, work 5 sc into the second ch from hook. Sc in each st (5). Fasten off, leaving a tail for sewing.
- Ring Finger (3): ch 2, work 5 sc into the second ch from hook. Sc in each st (5). Fasten off.
- Pinky Finger (4): ch 2, work 2 sc into the second ch from hook. Sc in each st (2). Fasten off.
- Thumb (5): ch 2, work 5 sc into the second ch from hook. Fasten off.
- Middle Finger (2): ch 2, work 5 sc into the second ch from hook. Do not fasten off. Place a stitch marker at the center of what will become the palm.
Connecting the Palm
Now, we connect the fingers. Attach the next finger by working its first stitch into the third stitch from the end of the previous finger. Pull the yarn tight between fingers to avoid gaps. Once all fingers are connected (excluding the thumb), continue working the palm:
- Rnd 4-5: 16 sc (16)
- Join the thumb to the side of the palm, ensuring your marker remains centered.
- Rnd 6: 1 sc, 2 sc together with the thumb, 13 sc (16)
- Rnd 7: 1 sc, 3 sc along the thumb, 13 sc (17)
- Rnd 8: 6 sc, (3 sc, dec) x 3 (15)
- Rnd 9: 6 sc, dec, 5 sc, dec (13)
- Rnd 10: 11 sc, dec (12)
Stuff the palm firmly. If using wire, insert it now. Switch to your thicker yarn for the forearm. Continue with rounds of 15 sc for several rows, then taper the wrist by decreasing back down to 6 sc. If using cotter pins, insert the pin before finishing the wrist closure.
Crocheting the Feet
The feet follow a similar logic to the hands but are wider to accommodate the “sole” of the foot. Start with the thinner yarn.
- Work the toes following the hand pattern but increase the stitch count to accommodate a wider base.
- After completing the toes and connecting them, stuff the foot.
- Switch to the thicker yarn. Work several rounds of single crochet to form the ankle.
- If you desire poseable legs, insert a wire armature through the foot and up into the leg.
The Tail
The tail can be a simple, floppy piece or a poseable element. For a poseable tail, insert a piece of wire through the center while working.
- Rnd 1: ch 2, 6 sc in the 2nd ch from hook (6)
- Rnd 2: (1 sc, inc) x 3 (9)
- Rnd 3-30: 9 sc (9)
If you want the tail to stand up, ensure the wire is securely tucked into the stuffing. If you prefer a simple tail, simply fold the finished tube in half and sew the end shut.
The Body
The body is worked in a continuous spiral, starting from the bottom and working up. You will create a rounded shape that tapers slightly at the waist to create a “tummy” effect.
- Start with a magic ring and increase steadily (8, 16, 24, 30, 36, 42, 48, 54, 60 stitches).
- Once you reach 60 stitches, work several rows of plain sc.
- For Cotter Pin Attachment: Mark the center of the back. In subsequent rows, create spaces or markers where the legs and tail will be attached.
- For Wire Attachment: Join the legs directly into the body by working sc stitches around the leg and into the body simultaneously.
- Create the belly by decreasing slightly around the midsection, then increasing again to widen the lower torso.
- Continue working up until the body is nearly complete, leaving an opening at the top for the head.
The Head and Expressive Face
The head is the most important part of this pattern. It is worked in two parts: the muzzle (face) and the hood.
The Muzzle (Face)
Using the thinner yarn, start with a foundation chain (approximately 11 ch) and work in rounds to create a flat, rounded shape for the snout. This part requires careful attention to the stitch counts to ensure the face has the correct depth.
Eye Placement: During the rounds of the muzzle, you will need to create “eye holes.” If you are using large safety eyes, skip a few stitches (e.g., ch 2, skip 2 sc) to create a gap for the eye to sit deep within the head. This creates that “hooded” eye look seen in professional amigurumi.
The Hood
Once the muzzle is complete, switch to the thicker yarn. Continue working rounds around the entire head, effectively “growing” the hood from the muzzle. The hood should be worked for approximately 12-15 rows to provide enough coverage.
The Ears
The ears are worked in “rows” (turning the work) rather than continuous rounds to create a flat, petal-like shape.
- Work the inner ear in a contrasting color.
- Work the outer ear in the main body color.
- Place the two pieces together (inner color facing inward) and join them with a round of single crochet around the edge.
Finishing
Assembly is where the magic happens! To get the professional, expressive look, follow these steps:
Eye and Nose Pulling (The “Utyazhka” Technique)
This technique creates the indentation around the eyes and nose that makes the monkey look alive.
- Eyes: Thread a needle with a long tail of yarn. Insert the needle at a point below the eye, bring it up above the eye, and pull tightly. This creates a “socket” for the eye. Repeat this from several angles to deepen the socket.
- Nose/Mouth: Perform a similar pulling motion through the muzzle to create a slight indentation for the nose and a subtle line for the mouth.
Final Assembly
- Attach the Ears: I recommend placing the ears around row 23 of the head, slightly curved to follow the shape of the skull.
- Attach the Nose and Lip: Sew the nose piece into the center of the muzzle. Sew the lower lip just below the nose, ensuring it is centered.
- Attach Limbs: Using your chosen method (pins or wire), secure the arms, legs, and tail to the body. If using pins, ensure the disks are placed firmly so the limbs don’t wobble.
- Final Stuffing: Once everything is attached, give the monkey a final “fluffing” with more fiberfill through the neck opening to ensure it holds its shape.
Tips for Success
- Tension is Key: When working the small fingers and toes, keep your tension tight to prevent the stuffing from showing through the stitches.
- Yarn Ratio: As mentioned in the materials, keep an eye on your yarn usage. If your thicker yarn is too heavy for your thin yarn, the proportions of the monkey’s head might look slightly off.
- Symmetry: When working the face, use a stitch marker religiously. Symmetry is what makes the monkey look “cute” rather than “scary.”
- Safety First: If making this for a very young child, skip the safety eyes and the wire/pins. Instead, embroider the eyes and nose using black yarn for a 100% safe plushie.