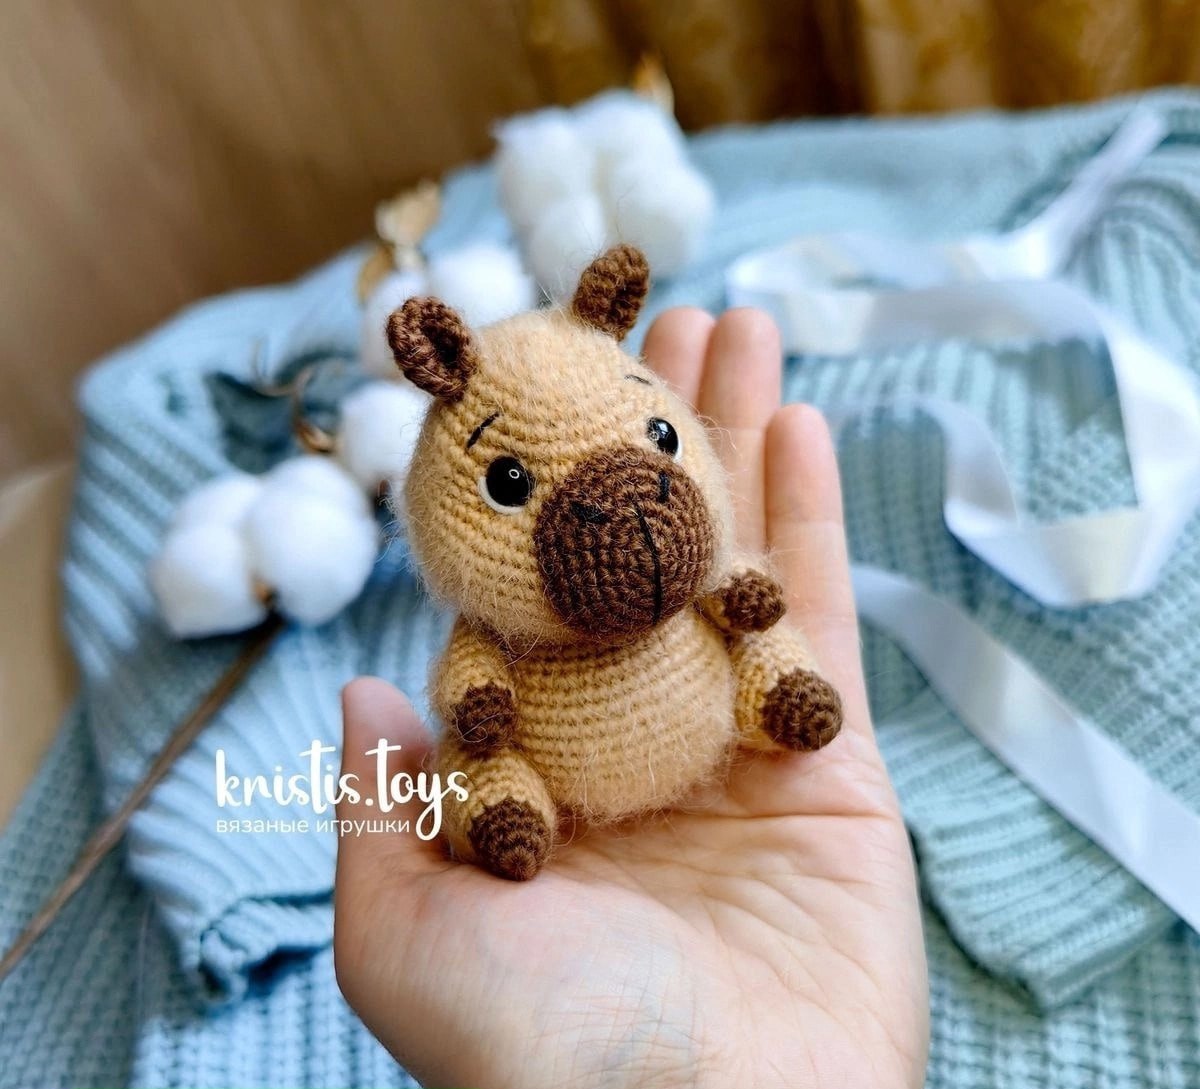
Adorable Crochet Capybara Pattern: An Easy Amigurumi Tutorial
If you are looking for your next cozy crochet project, look no further than the internet’s favorite oversized rodent: the capybara! These gentle giants make for incredibly cute amigurumi plushies, especially when paired with some whimsical accessories. In this tutorial, we will walk you through creating a sweet, squishy capybara complete with a tiny turtle backpack and a little mandarin orange to perch on its head.
This pattern is designed to be beginner-friendly, using basic stitches and a straightforward shaping process. Whether you are making this for a friend or adding to your own collection, this little capybara is sure to bring a smile to anyone’s face.
Materials & Abbreviations
To get started, gather the following materials. We recommend a cotton-blend yarn for a clean, defined look, but feel free to use any yarn that works for amigurumi.
Materials
- Yarn: A medium-weight cotton or cotton-blend yarn in three colors:
- Beige (for the main body)
- Dark Brown (for the muzzle, paws, and ears)
- Orange, Light Green, and Dark Green (for the accessories)
- Crochet Hook: 2.0 mm (or a size that ensures your stitches are tight enough so stuffing doesn’t show through).
- Eyes: 6 mm safety eyes.
- Stuffing: Polyester fiberfill or a similar stuffing material.
- Tools: Yarn needle, scissors, and stitch markers.
- Embroidery Thread: Black thread for facial details and white thread for eye highlights.
Abbreviations (US Terms)
- MR: Magic Ring
- ch: Chain
- sc: Single crochet
- inc: Increase (two sc in one stitch)
- dec: Decrease (sc two stitches together)
- sl st: Slip stitch
- hdc: Half double crochet
- dc: Double crochet
- tr: Treble crochet (stitch with two wraps)
- BLO: Back loop only
- (st, inc) x n: Repeat the sequence inside the parentheses n times.
Finished Size: Approximately 4.7 inches tall.
Step-by-Step Instructions
Head and Body
The head and body are worked as one continuous piece. Use your beige yarn.
R1: 6 sc in MR (6)
R2: 6 inc (12)
R3: (1 sc, inc) x 6 (18)
R4: (2 sc, inc) x 6 (24)
R5: 9 sc, (1 sc, inc) x 3, 9 sc (27)
R6: 9 sc, (2 sc, inc) x 3, 9 sc (30)
R7: (4 sc, inc) x 6 (36)
R8: (5 sc, inc) x 6 (42)
R9: 15 sc, (1 sc, inc) x 6, 15 sc (48)
R10-11: 48 sc (2 rounds)
Note: Insert safety eyes between rounds 9 and 10. Place them on the sides, between the increases of round 9.
R12: (7 sc, inc) x 6 (54)
R13: (8 sc, inc) x 6 (60)
R14-17: 60 sc (4 rounds)
R18: (8 sc, dec) x 6 (54)
R19: (7 sc, dec) x 6 (48)
R20: 15 sc, (1 sc, dec) x 6, 15 sc (42)
R21: (5 sc, dec) x 6 (36)
R22: (4 sc, dec) x 6 (30)
Begin stuffing the head firmly.
The Body:
R23: (1 sc, inc) x 15 (45)
R24-25: 45 sc (2 rounds)
R26: (14 sc, inc) x 3 (48)
R27: To create the belly bulge, work 19 sc, (1 sc, inc) x 6, 17 sc (54)
R28: 54 sc
R29: 19 sc, (2 sc, inc) x 6, 17 sc (60)
R30-34: 60 sc (5 rounds)
R35: (8 sc, dec) x 6 (54)
R36: (7 sc, dec) x 6 (48)
R37: (6 sc, dec) x 6 (42)
R38: (5 sc, dec) x 6 (36)
R39: (4 sc, dec) x 6 (30)
R40: (3 sc, dec) x 6 (24)
Finish stuffing the body, ensuring the belly area is plump and well-filled.
R41: (2 sc, dec) x 6 (18)
R42: (1 sc, dec) x 6 (12)
R43: 6 dec. Fasten off and weave in the ends.
The Muzzle
Use dark brown yarn.
R1: 6 sc in MR (6)
R2: (3 sc in one stitch, 2 sc) x 2 (10)
R3: (3 inc, 2 sc) x 2 (16)
R4: (1 sc, inc) x 3, 2 sc, (1 sc, inc) x 3, 2 sc (22)
R5: (2 sc, inc) x 3, 2 sc, (2 sc, inc) x 3, 2 sc (28)
R6: 3 sc, 3 sc in one stitch, 7 sc, 3 sc in one stitch, 16 sc (32)
R7: 4 sc, inc, 9 sc, inc, 17 sc (34). Leave a long tail for sewing.
Legs (Make 2)
Start with dark brown yarn.
R1: 6 sc in MR (6)
R2: 6 inc (12)
R3-4: 12 sc (2 rounds). Change to beige yarn on the last stitch.
R5: (2 sc, inc) x 4 (16)
R6: 16 sc
R7: (3 sc, inc) x 4 (20)
R8: (4 sc, inc) x 4 (24)
R9-10: 24 sc (2 rounds)
R11: (4 sc, dec) x 4 (20)
R12: 20 sc
R13: (3 sc, dec) x 4 (16)
R14: (2 sc, dec) x 4 (12)
Work 2 additional sc as shift stitches so the leg sits straight when flattened. Leave a tail for sewing. Stuff lightly in the toes and middle.
Arms (Make 2)
Start with dark brown yarn.
R1: 6 sc in MR (6)
R2: (1 sc, inc) x 3 (9)
R3: 9 sc. Change to beige yarn on the last stitch.
R4: (2 sc, inc) x 3 (12)
R5: 12 sc
R6: (5 sc, inc) x 2 (14)
R7-10: 14 sc (4 rounds)
Work 1 additional sc as a shift stitch. Leave a tail for sewing. Stuff the bottom half lightly.
Ears (Make 2)
Use dark brown yarn.
R1: 6 sc in MR (6)
R2: 6 inc (12)
R3-5: 12 sc (3 rounds). Flatten the ear and sc 6 across the opening. Leave a tail for sewing.
Turtle Backpack Accessory
The Shell: Use dark green yarn.
R1: 6 sc in MR (6)
R2: 6 inc (12)
R3: (1 sc, inc) x 6 (18)
R4: (2 sc, inc) x 6 (24)
R5: (3 sc, inc) x 6 (30)
R6: (4 sc, inc) x 6 (36)
R7: 36 sc. Change to light green yarn on the last stitch.
R8: BLO 36 sc
R9: (1 sc, dec) x 12 (24)
R10: 12 dec (12). Stuff the shell.
R11: 6 dec. Fasten off. Use the remaining dark green yarn to sew a decorative edge along the BLO round (R8).
Flippers (Make 4): Light green yarn.
R1: 6 sc in MR (6)
R2-3: 6 sc (2 rounds). Do not stuff. Flatten and sc 3 across the opening.
Head: Light green yarn.
R1: 6 sc in MR (6)
R2: 6 inc (12)
R3: (3 sc, inc) x 3 (15)
R4-5: 15 sc (2 rounds)
R6: (3 sc, dec) x 3 (12)
R7: 12 sc. Stuff lightly, flatten, and sc 5 across the opening.
Straps: Light green yarn. Chain 36 for each strap. Attach to the shell to complete the backpack.
Mandarin Accessory
The Fruit: Use orange yarn (glitter yarn is recommended for texture).
R1: 6 sc in MR (6)
R2: 6 inc (12)
R3: (1 sc, inc) x 6 (18)
R4: (2 sc, inc) x 6 (24)
R5-7: 24 sc (3 rounds)
R8: (2 sc, dec) x 6 (18)
R9: (1 sc, dec) x 6 (12)
R10: 6 dec. To shape the fruit, insert your needle to the bottom, come back up 1 stitch away, and pull tight. Repeat twice to create a flattened orange shape.
The Leaf: Use green embroidery thread and a 0.5 mm hook.
Ch 10. Work 9 sl st, ch 1. Turning: 1 sc, 1 hdc, 1 dc, inc dc, 2 tr, inc dc, 1 dc, 1 hdc, 1 sc, sl st, ch 1. On the other side: 1 sc, 1 hdc, 1 dc, inc dc, 2 tr, inc dc, 1 dc, 1 hdc, 1 sc, sl st. Fasten off.
Finishing
Facial Sculpting
To give your capybara a realistic look, we use “face sculpting.” Using a yarn needle and beige yarn, insert the needle from the bottom of the head up to the eye area, pull tight to create a dimple, and knot it. Repeat this symmetrically for both eyes to pull the muzzle forward and the eyes slightly inward.
Assembly
- Eyes: Embroider tiny white dots on the safety eyes to create highlights.
- Muzzle: Stuff the muzzle slightly and sew it to the face.
- Ears: Sew the ears between rounds 5 and 6 of the head.
- Arms: Sew the arms 1 round below the head.
- Legs: Sew the legs 2 sc away from the bottom edge of the arms.
Final Details
Use black embroidery thread to add the final touches:
- Nostrils: 4-5 small stitches on the nose.
- Face Line & Eyebrows: 1 small stitch for the center line of the muzzle and 1 stitch for each eyebrow.
Tips
- Tension is Key: Since amigurumi requires tight stitches to keep the stuffing inside, try to keep your tension consistent. If you see holes, drop down a hook size.
- Marker Your Rounds: This pattern has many rounds. Use a stitch marker at the beginning of every round to avoid losing your place, especially during the belly shaping.
- Symmetry: When attaching arms and legs, use pins first. Move them around until the capybara sits perfectly balanced before you start sewing.
- The Perfect Plumpness: Be generous with the stuffing in the belly area—it’s what gives the capybara its signature “loaf” shape!