How to Crochet a Cute Demogorgon Amigurumi: Step-by-Step Tutorial
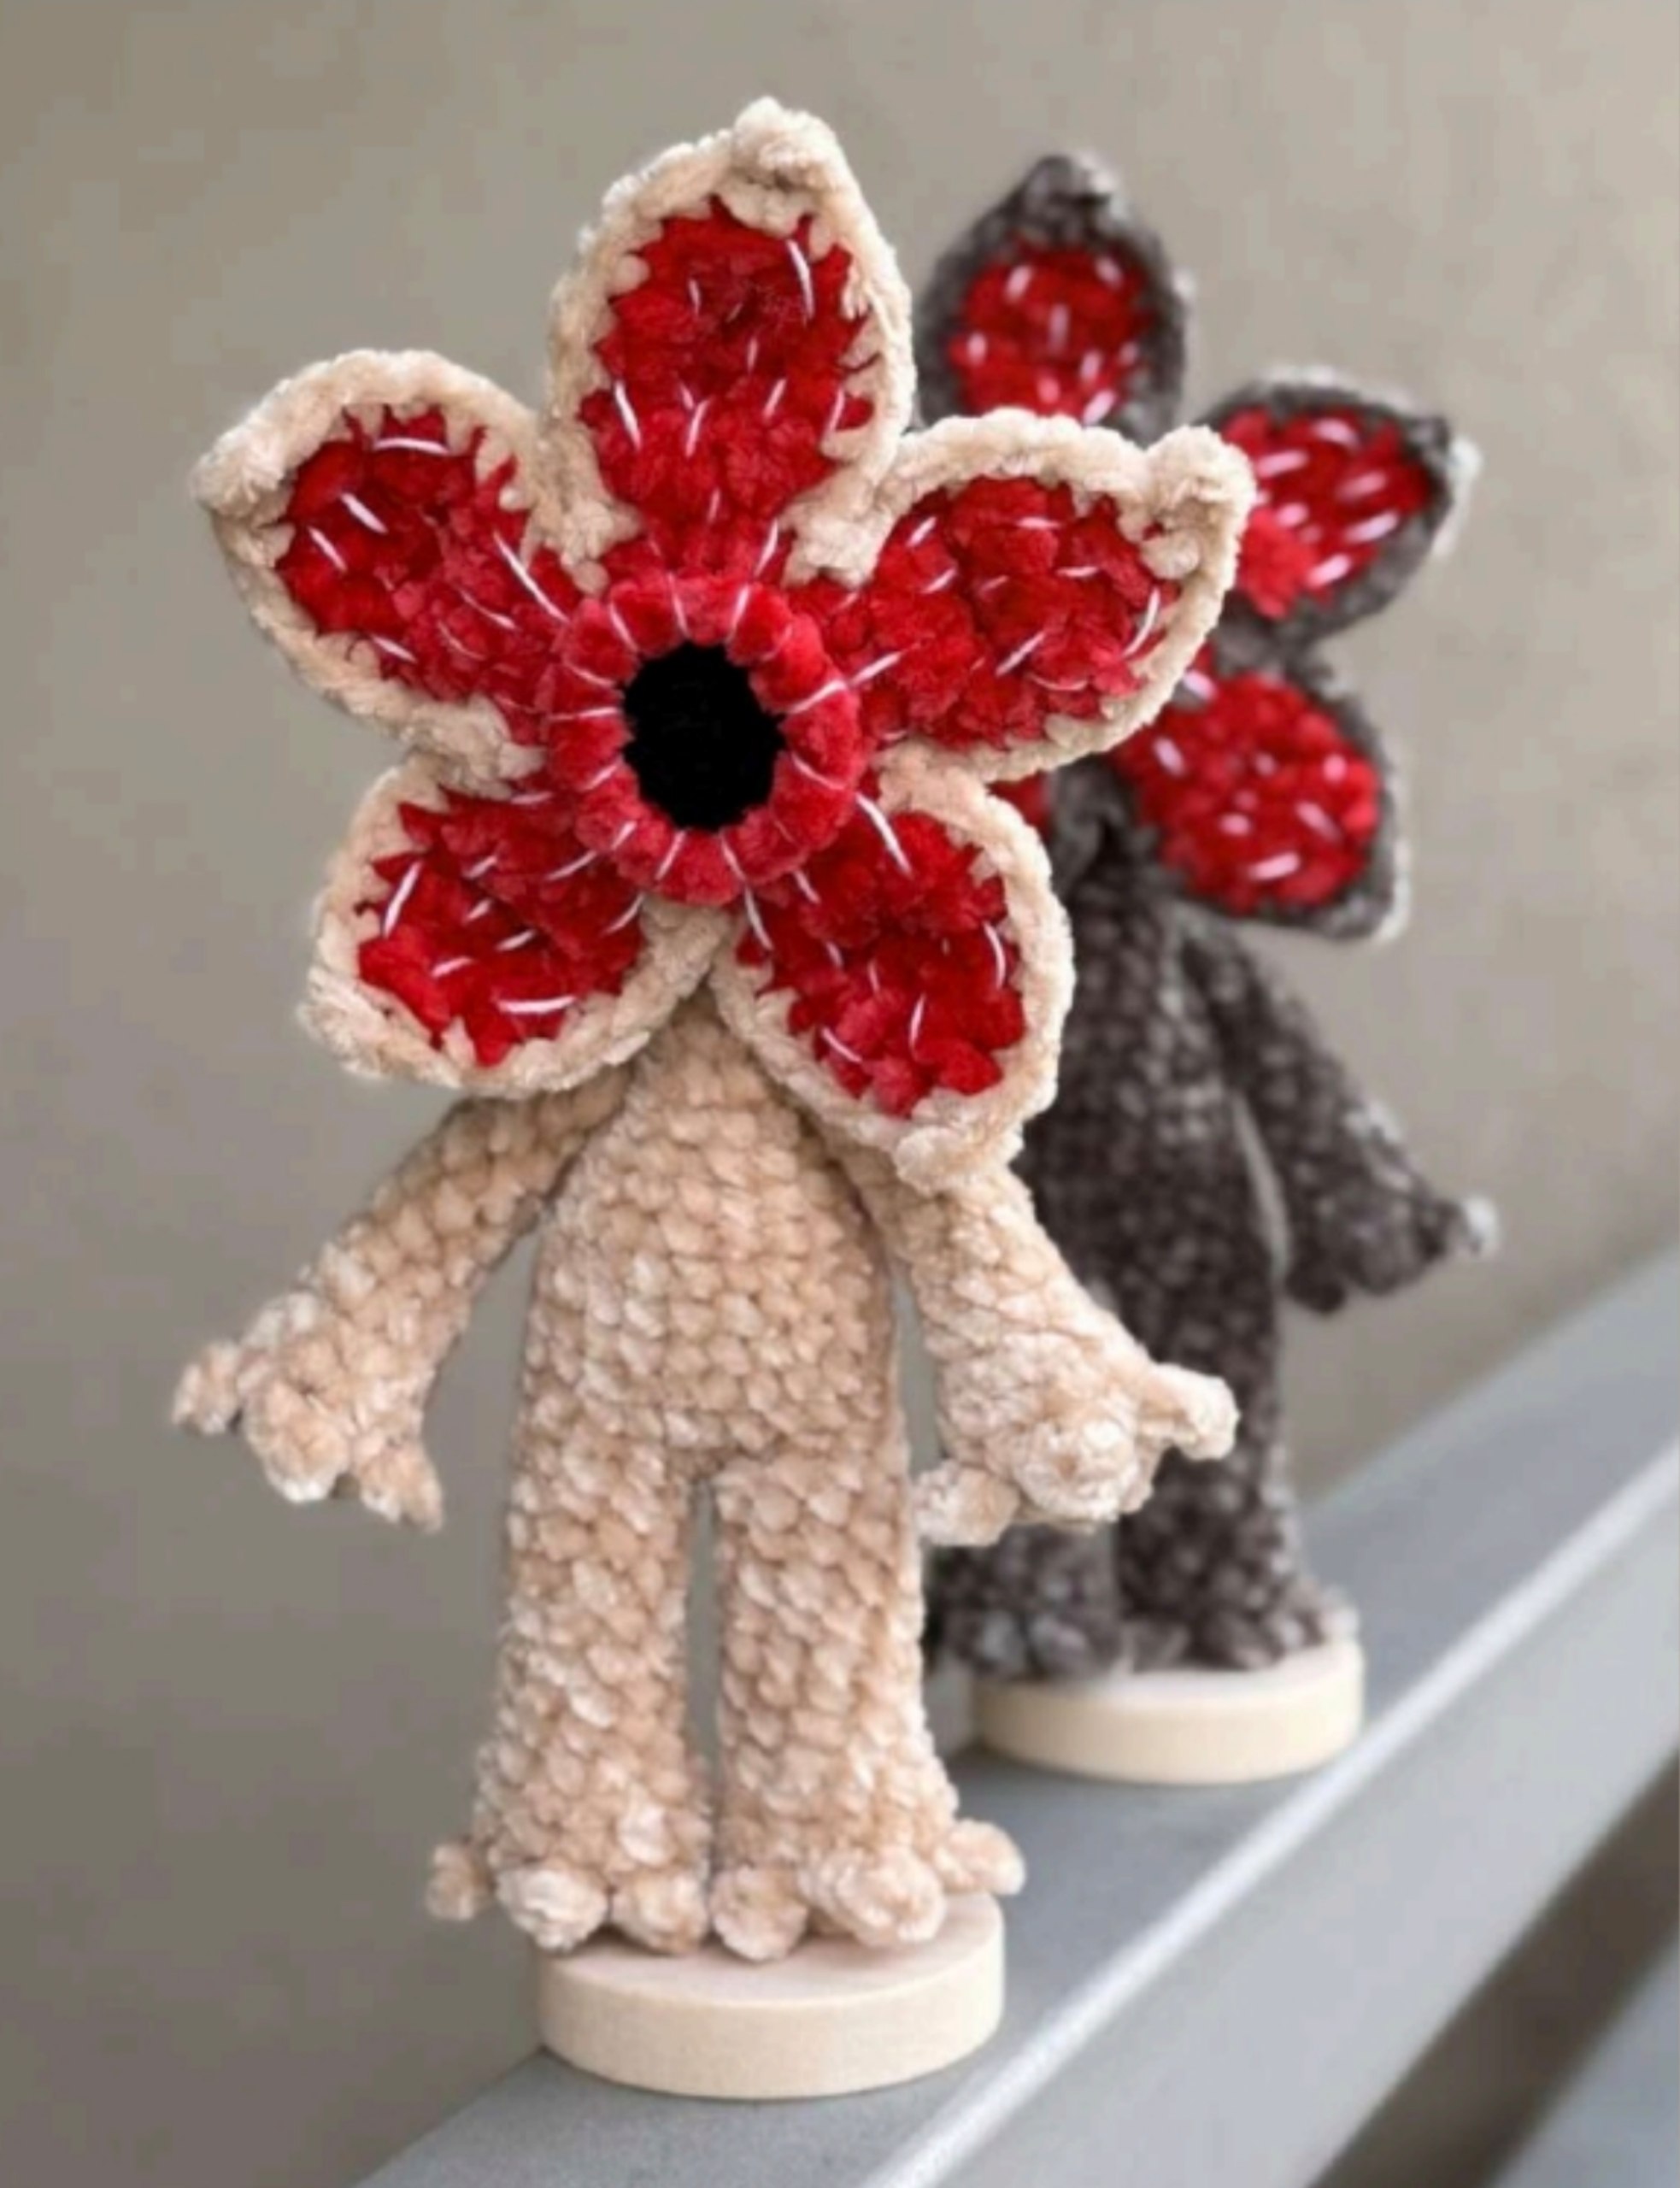
If you are a fan of the eerie atmosphere of the Upside Down, why not bring a little bit of that supernatural energy into your home—but make it adorable? This crochet Demogorgon pattern transforms one of the most fearsome creatures of sci-fi television into a cuddly, plush companion. Perfect for fans of horror and crochet alike, this project is beginner-friendly and results in a unique piece of geeky decor or a great gift for a friend.
In this tutorial, we will guide you through creating this monster from the ground up. We will focus on using plush yarn to give it that soft, velvety texture that makes it look more like a collectible toy than a scary monster. Let’s dive in!
Materials & Abbreviations
To get started, gather the following supplies. Using a plush yarn is highly recommended for this project to achieve the look seen in the photos.
Supplies Needed
- Yarn: A plush or velvet-style yarn in your primary color (beige or grey) and red for the inside of the mouth. A “Chenille” or “Velvet” weight yarn works best.
- Crochet Hook: 2.5mm (or a size that keeps your stitches tight enough so the stuffing doesn’t show through).
- Stuffing: Polyester fiberfill or poly-fill.
- Tools: A tapestry needle for sewing, scissors, and a strand of thin white thread for final decorative details.
US Crochet Terms & Abbreviations
- MR: Magic Ring
- sc: Single Crochet
- inc: Increase (2 sc in one stitch)
- dec: Decrease (sc 2 together)
- ch: Chain
- sl st: Slip Stitch
- hdc: Half Double Crochet
- dc: Double Crochet
- FLO: Front Loop Only
- BLO: Back Loop Only
Step-by-Step Instructions
The Legs, Body, and Head
This piece is worked in a continuous spiral from the feet all the way up to the top of the head. Do not join rounds unless specified.
Creating the Feet
We will start by making the first leg. This pattern uses a specific technique to create the foot shape.
- Round 1: 6 sc in MR (6)
- Round 2: 2 inc, (sc, ch 3, 2 sc in the chain, sc in the same stitch as the first sc) repeat 3 times (12)
- Rounds 3-4: sc in each stitch around (12) — 2 rounds
- Round 5: (4 sc, dec) repeat 2 times (10)
- Rounds 6-13: sc in each stitch around (10) — 8 rounds
Now, prepare for joining. For the first leg, work 1 additional sc. For the second leg, follow the same instructions as the first, but at the end of Round 13, work 6 additional sc, then ch 2 and slip stitch to the first leg to join them together.
The Body
Now we expand the two legs into a single torso.
- Round 14: 10 sc around the first leg, 2 sc across the joining chain, 10 sc around the second leg, 2 sc across the joining chain (24)
- Rounds 15-20: sc in each stitch around (24) — 6 rounds
- Round 21: (4 sc, dec) repeat 4 times (20)
- Round 22: sc in each stitch around (20)
- Round 23: (3 sc, dec) repeat 4 times (16)
- Rounds 24-25: sc in each stitch around (16) — 2 rounds
- Round 26: (2 sc, dec) repeat 4 times (12)
- Rounds 27-28: sc in each stitch around (12) — 2 rounds
The Head
We now begin increasing again to shape the head.
- Round 29: (1 sc, inc) repeat 6 times (18)
- Round 30: (2 sc, inc) repeat 6 times (24)
- Round 31: (3 sc, inc) repeat 6 times (30)
- Round 32: 2 sc, inc, (4 sc, inc) repeat 5 times, 2 sc (36)
- Round 33: (5 sc, inc) repeat 6 times (42)
- Rounds 34-41: sc in each stitch around (42) — 8 rounds
- Round 42: (5 sc, dec) repeat 6 times (36)
- Round 43: 2 sc, dec, (4 sc, dec) repeat 5 times, 2 sc (30)
- Round 44: (3 sc, dec) repeat 6 times (24)
- Round 45: (2 sc, dec) repeat 6 times (18)
- Round 46: (1 sc, dec) repeat 6 times (12)
- Round 47: 6 dec (6)
Fasten off and weave in the ends. Stuff the body and head firmly with poly-fill as you work.
The Arms
Make two arms using the following pattern:
- Round 1: 5 sc in MR (5)
- Round 2: inc, (sc, ch 3, 2 sc in chain, sc in same stitch) repeat 3 times, inc (10)
- Rounds 3-4: sc in each stitch around (10) — 2 rounds
- Round 5: (3 sc, dec) repeat 2 times (8)
- Rounds 6-13: sc in each stitch around (8) — 8 rounds
To finish the arm, work 2 additional sc. Fold the arm in half and work 4 sc through both layers to close the tip. Leave a long tail for sewing.
The Petal Mouth
The mouth is the most detailed part of the Demogorgon. It consists of an inner red layer and an outer skin-colored layer.
Inner Red Layer
Start with black yarn for the center:
- Round 1: 6 sc in MR (6)
- Round 2: 6 inc (12)
- Round 3: (1 sc, inc) repeat 6 times (18)
- Round 4: (2 sc, inc) repeat 6 times in FLO. Sl st to the first stitch, ch 1, and fasten off.
Now, switch to red yarn. Attach it to the BLO (Back Loop Only) of Round 4 and work (2 sc, inc) repeat 6 times. Now we will work the petals in rows (turning at the end of each row).
Creating the Petals
Sl st to the first stitch of the red round, ch 2.
- Row 1: 4 hdc, ch 2, turn.
- Row 2: 2 hdc in first st, 2 dc, 2 hdc in last st, ch 2, turn.
- Row 3: 2 hdc, 2 dc, 2 hdc, ch 1, turn.
- Row 4: 2 hdc, dc dec, 2 hdc, ch 1, turn.
- Row 5: dec, dc, dec, ch 1, turn.
- Row 6: dec over the last 3 stitches, ch 1. Fasten off.
Repeat this process to create a total of 5 petals around the center circle.
Outer Skin Layer
Repeat the exact same process as the inner layer using your main body color. In Round 4, however, work through both loops instead of just the BLO. Once the 5 petals are completed, do not fasten off.
Finishing
Now it is time to bring the monster together!
Assembling the Mouth
- Place the red inner layer and the skin-colored outer layer together (right sides facing out).
- Work a single crochet (sc) around the entire perimeter of the petals to join the two layers.
- At the very tip of each petal, work the following into one stitch: (2 sc, ch 2, sc in the chain, sc in the same stitch). This gives the petals a pointed, organic look.
- Fasten off and sew the completed mouth firmly to the center of the head.
Final Touches
- Arms: Sew the arms to the body between Round 27 and Round 28.
- Detailing: Use a needle and the thin white thread to add small, subtle highlights or veins to the red petals to give them more texture and depth.
Tips for Success
Yarn Choice
If you cannot find “micro-plush” yarn, look for a “super bulky” or “chenille” yarn. If the yarn is too thick, you may need to increase your hook size slightly, but keep it as small as possible to avoid gaps in the stuffing.
Maintaining Tension
Amigurumi requires tight tension. If you notice your stuffing peaking through, try going down half a millimeter in hook size. This is especially important for the head and legs to ensure the figure stands upright.
Perfecting the Petals
Because the petals are worked in rows, they can sometimes curl. You can lightly steam them with an iron (be careful with synthetic yarns!) or use a tiny bit of fabric glue to hold the shape before sewing the layers together.