
How to Crochet a Cute Amigurumi Sheep: A Step-by-Step Tutorial
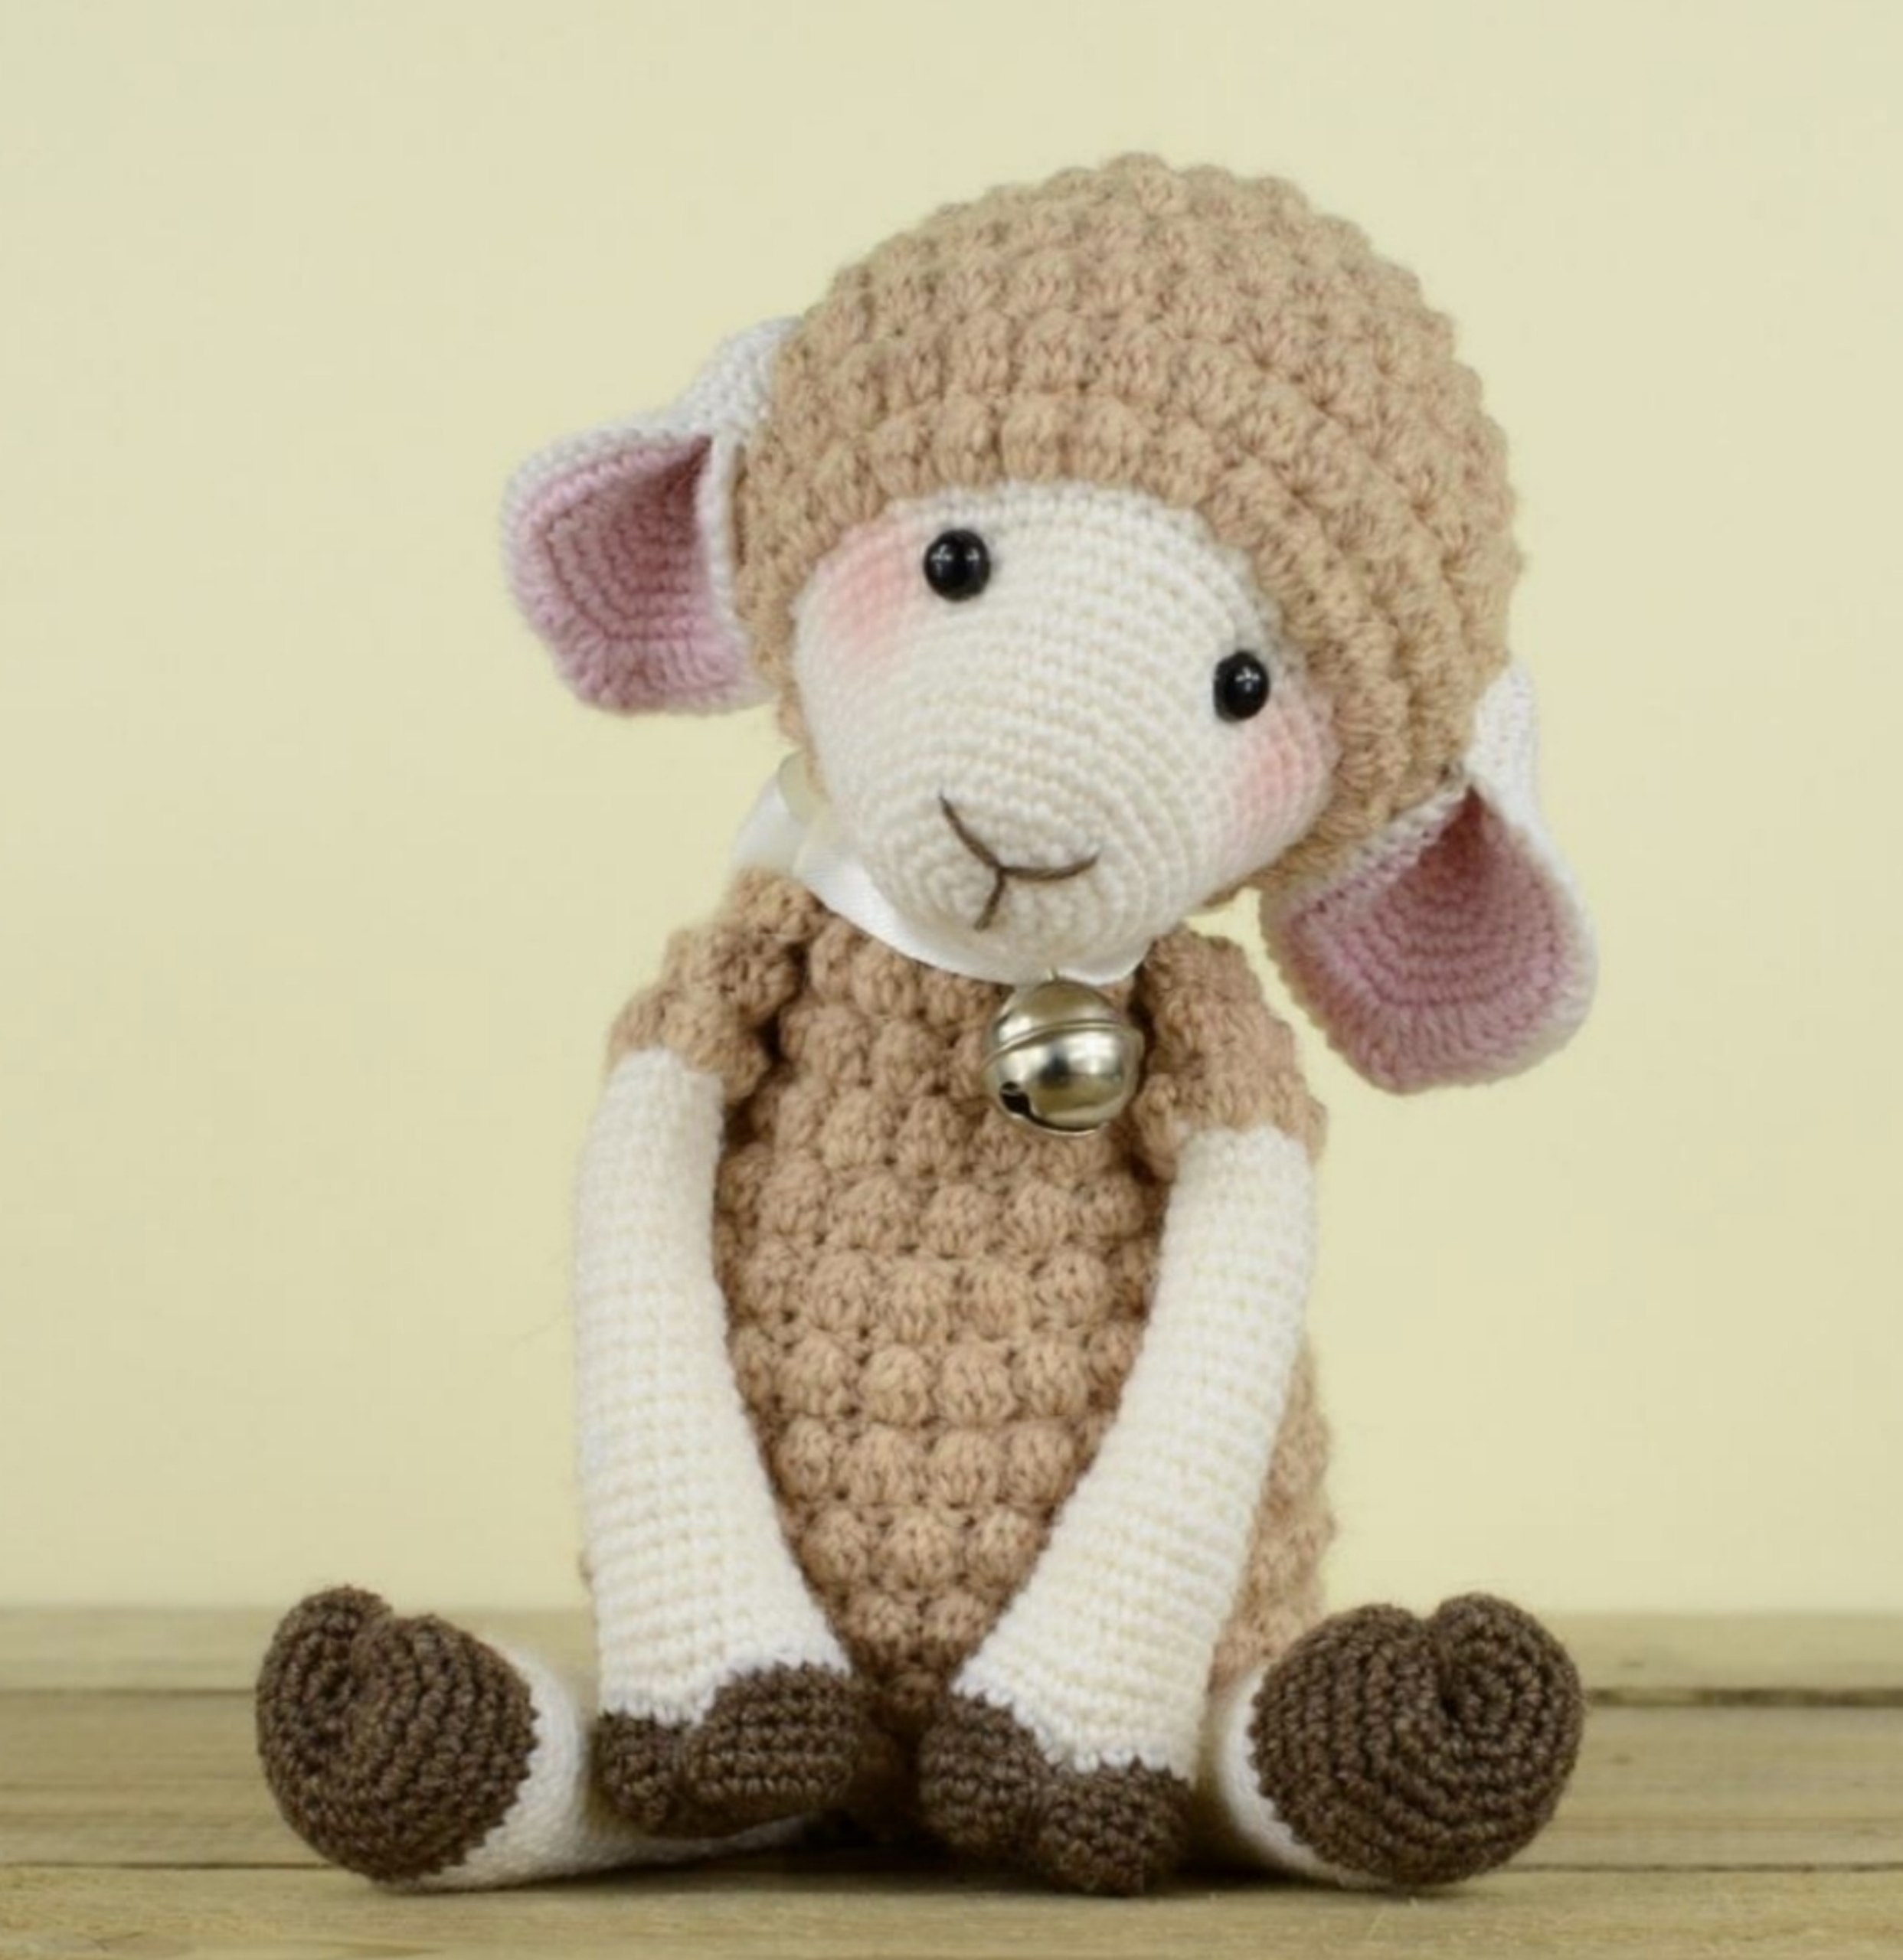
Are you looking for your next adorable crochet project? This “Sheep Mollie” amigurumi is the perfect blend of soft textures and sweet charm. Whether you are looking to create a cuddly nursery companion or a unique gift for a friend, this sheep pattern is designed to be beginner-friendly while offering a wonderful opportunity to practice texture work. With its fluffy, popcorn-stitch body and sweet little bell, this little lamb is sure to steal hearts!
In this tutorial, we will walk you through every step of the process, from the initial magic ring to the final assembly. Grab your favorite hook and let’s get started on making your very own little sheep!
Materials & Abbreviations
Before we begin, let’s make sure you have everything you need. Because amigurumi relies on tight stitches to keep the stuffing from showing, I recommend using a slightly smaller hook than what is suggested on your yarn label.
What You Will Need
- Yarn: You will need four different colors. For a sheep roughly 8 inches tall, aim for the following amounts:
- White: Approximately 230 yards (for the head, ears, arms, and legs).
- Sand/Beige: Approximately 230 yards (for the head texture and body).
- Brown: Approximately 230 yards (for the hooves).
- Pink: Approximately 115 yards (for the inner ears).
- Crochet Hook: 2.5 mm (or the size best suited for your yarn tension).
- Stuffing: High-quality polyester fiberfill.
- Safety Eyes: 7 mm.
- Embellishments: A small white ribbon and a tiny cat bell.
- Tools: A yarn needle for sewing and scissors.
Abbreviations (US Terms)
If you are new to crochet, don’t worry! Most of these are standard terms. We will be working in continuous rounds for the amigurumi pieces.
- MR: Magic Ring
- ch: Chain
- sl st: Slip stitch
- sc: Single crochet
- hdc: Half double crochet
- dc: Double crochet
- tr: Treble crochet
- inc: Increase (2 stitches in one)
- dec: Decrease (2 stitches together)
- hdc inc: Half double crochet increase
- dc inc: Double crochet increase
- pop: Popcorn stitch
Step-by-Step Instructions
The Head
We will start the head with white yarn.
- Rnd 1: 6 sc in a MR (6)
- Rnd 2: inc in each st around (12)
- Rnd 3: (1 sc, inc) x6 (18)
- Rnd 4: (2 sc, inc) x6 (24)
- Rnd 5: (3 sc, inc) x6 (30)
- Rnd 6: sc in each st around (30)
- Rnd 7: (4 sc, inc) x6 (36)
- Rnd 8: sc in each st around (36)
- Rnd 9: (5 sc, inc) x6 (42)
- Rnd 10-11: sc in each st around (42)
- Rnd 12: (6 sc, inc) x6 (48)
- Rnd 13-14: sc in each st around (48)
- Rnd 15: (7 sc, inc) x6 (54)
- Rnd 16-17: sc in each st around (54)
*Note: Insert safety eyes between rounds 14 and 15, spaced 12 stitches apart.*
Switch to Sand yarn. Join with a ch and turn.
- Rnd 18: (pop, 1 hdc) x27 (54)
- Rnd 19: (8 sc, inc) x6 (60)
- Rnd 20: (pop, 1 hdc) x30 (60)
- Rnd 21: sc in each st around (60)
- Rnd 22: (pop, 1 hdc) x30 (60)
- Rnd 23: sc in each st around (60)
- Rnd 24: (pop, 1 hdc) x30 (60)
- Rnd 25: (8 sc, dec) x6 (54)
- Rnd 26: (pop, 1 hdc) x27 (54)
- Rnd 27: (7 sc, dec) x6 (48)
- Rnd 28: (pop, 1 hdc) x24 (48)
- Rnd 29: (2 sc, dec) x12 (36)
- Rnd 30: (pop, 1 hdc) x18 (36)
*Start stuffing the head firmly.*
- Rnd 31: (1 sc, dec) x12 (24)
- Rnd 32: (pop, 1 hdc) x12 (24)
- Rnd 33: dec x12 (12)
- Rnd 34: (pop, 1 hdc) x6 (12)
Fasten off, leaving a long tail for sewing.
The Body
Use sand yarn for the body.
- Rnd 1: 6 sc in a MR (6)
- Rnd 2: (pop, 1 hdc) x6 (12)
- Rnd 3: inc in each st around (24)
- Rnd 4: (pop, 1 hdc) x12 (24)
- Rnd 5: (1 sc, inc) x12 (36)
- Rnd 6: (pop, 1 hdc) x18 (36)
- Rnd 7: (2 sc, inc) x12 (48)
- Rnd 8: (pop, 1 hdc) x24 (48)
- Rnd 9: (7 sc, inc) x6 (54)
- Rnd 10: (pop, 1 hdc) x27 (54)
- Rnd 11: sc in each st around (54)
- Rnd 12: (pop, 1 hdc) x27 (54)
- Rnd 13: sc in each st around (54)
- Rnd 14: (pop, 1 hdc) x27 (54)
- Rnd 15: sc in each st around (54)
- Rnd 16: (pop, 1 hdc) x27 (54)
- Rnd 17: sc in each st around (54)
- Rnd 18: (pop, 1 hdc) x27 (54)
- Rnd 19: (7 sc, dec) x6 (48)
- Rnd 20: (pop, 1 hdc) x24 (48)
- Rnd 21: (6 sc, dec) x6 (42)
- Rnd 22: (pop, 1 hdc) x21 (42)
- Rnd 23: (5 sc, dec) x6 (36)
- Rnd 24: (pop, 1 hdc) x18 (36)
- Rnd 25: sc in each st around (36)
- Rnd 26: (pop, 1 hdc) x18 (36)
- Rnd 27: (4 sc, dec) x6 (30)
- Rnd 28: (pop, 1 hdc) x15 (30)
- Rnd 29: sc in each st around (30)
- Rnd 30: (pop, 1 hdc) x15 (30)
- Rnd 31: (8 sc, dec) x3 (27)
- Rnd 32: (pop, 1 hdc, sl st) x13 (27)
Fasten off, leaving a long tail for sewing. Stuff the body firmly.
The Legs (Make 2)
Start with brown yarn (the “hoof” part).
- Rnd 1: 6 sc in a MR (6)
- Rnd 2: inc in each st around (12)
- Rnd 3: (1 sc, inc) x6 (18)
- Rnd 4: (2 sc, inc) x6 (24)
- Rnd 5: (3 sc, inc) x6 (30)
- Rnd 6-9: sc in each st around (30)
Switch to white yarn.
- Rnd 10-11: sc in each st around (30)
- Rnd 12: (8 sc, dec) x3 (27)
- Rnd 13-14: sc in each st around (27)
- Rnd 15: (7 sc, dec) x3 (24)
- Rnd 16-18: sc in each st around (24)
- Rnd 19: (6 sc, dec) x3 (21)
- Rnd 20-23: sc in each st around (21)
- Rnd 24: (5 sc, dec) x3 (18)
- Rnd 25-29: sc in each st around (18)
Stuff the leg. Fold the open end and crochet through both sides (9 sc) or sew it closed. Leave a long tail for sewing. Attach the legs to the body between rounds 4 and 7 of the body.
The Arms (Make 2)
Start with brown yarn.
- Rnd 1: 6 sc in a MR (6)
- Rnd 2: inc in each st around (12)
- Rnd 3: (1 sc, inc) x6 (18)
- Rnd 4: (2 sc, inc) x6 (24)
- Rnd 5-8: sc in each st around (24)
Switch to white yarn.
- Rnd 9: sc in each st around (24)
- Rnd 10: (6 sc, dec) x3 (21)
- Rnd 11-12: sc in each st around (21)
- Rnd 13: (5 sc, dec) x3 (18)
- Rnd 14-18: sc in each st around (18)
- Rnd 19: (4 sc, dec) x3 (15)
- Rnd 20-24: sc in each st around (15)
- Rnd 25: dec, 13 sc (14)
- Rnd 26-32: sc in each st around (14)
Switch to sand yarn. Join with a ch and turn.
- Rnd 33: (pop, 1 hdc) x7 (14)
- Rnd 34: sc in each st around (14)
- Rnd 35: (pop, 1 hdc) x7 (14)
- Rnd 36: sc in each st around (14)
- Rnd 37: (pop, 1 hdc) x7 (14)
Stuff the arm. Fold and sew/crochet the end closed. Leave a tail for sewing. Attach to the body. Tip: Pull the thread at the very tip of the brown/white part to create a “hoof” indentation.
The Ears (Make 2)
Inner Ear (use pink yarn):
- Rnd 1: 6 sc in a MR (6)
- Rnd 2: inc in each st around (12)
- Rnd 3: (1 sc, inc) x6 (18)
- Rnd 4: (2 sc, inc) x6 (24)
- Rnd 5: (3 sc, inc) x6 (30)
- Rnd 6: (4 sc, inc) x6 (36)
- Rnd 7: (5 sc, inc) x2, 2 hdc, (1 hdc, 1 dc) in one st, 1 dc, hdc inc, 3 dc in one st, hdc inc, 1 dc, (1 dc, 1 hdc) in one st, 2 hdc, inc, (5 sc, inc) x2
Fasten off.
Outer Ear (use white yarn):
Repeat rounds 1-7 exactly as you did for the pink inner ear. Do not fasten off. Join the pink and white pieces together. Starting from the 3rd stitch of the pink piece: 23 sc, 3 sc in one stitch, 23 sc. Fold the pieces together as shown in the photos and sew 5 stitches to secure. Attach between rounds 21 and 26 of the head.
The Tail
Use sand yarn.
- Rnd 1: 6 sc in a MR (6)
- Rnd 2: inc in each st around (12)
- Rnd 3: sc in each st around (12)
- Rnd 4: (2 sc, inc) x3 (15)
- Rnd 5: sc in each st around (15)
- Rnd 6: (3 sc, dec) x3 (12)
- Rnd 7-9: sc in each st around (12)
Fold and sew the end closed. Leave a tail for sewing. Attach to the body at round 9.
Finishing
Now for the most rewarding part—bringing your sheep to life!
- Assembly: Sew the head to the body, and attach the arms and legs as directed.
- Face: Using brown yarn, embroider a small nose and mouth. For an extra cute touch, use a bit of pink blush or pink yarn to add rosy cheeks!
- Accessories: Tie the white ribbon around the sheep’s neck and attach the little bell.
Tips for Success
If this is your first amigurumi project, don’t be discouraged if things look a little wonky at first. Here are a few tips to help you:
- Use Stitch Markers: Amigurumi is worked in continuous rounds, so it’s very easy to lose track of where your round starts. Always use a marker!
- Tight Tension is Key: You want your stitches to be tight so that the stuffing doesn’t peek through the gaps. If you see holes, try using a smaller hook.
- The Popcorn Stitch: To get that wonderful woolly texture, make sure your popcorn stitches are consistent. A popcorn stitch is essentially several stitches worked into one, then pulled together to create a “puff.”
- Stuffing Tip: Stuff your pieces in small increments. This allows you to push the stuffing into the corners and prevents lumps.
Happy crocheting!