
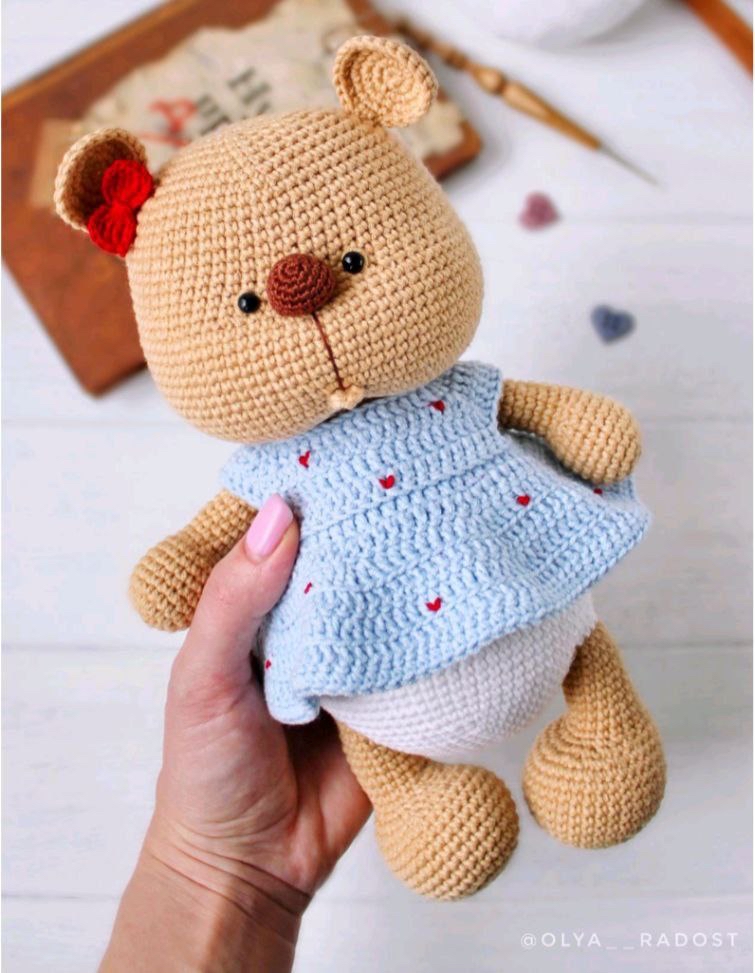
Cute Crochet Teddy Bear Pattern: A Step-by-Step Amigurumi Tutorial
There is nothing quite as heartwarming as a handmade teddy bear. Whether you are looking to create a special gift for a baby shower, a nursery decoration, or a charming companion for a child, this adorable amigurumi bear is the perfect project. This little bear features a sweet, chubby face, tiny limbs, and even comes with a cute little outfit!
This pattern is designed for crocheters who have a grasp of the basics and are ready to dive into a more detailed project. By following this guide, you will create a finished bear standing approximately 9.5 inches tall. Let’s grab our hooks and get started on this cuddly adventure!
Materials & Abbreviations
To ensure your bear turns out just like the photos, I recommend using a fine, high-quality cotton yarn. Using the suggested weights will help maintain the correct shape and size.
What You Will Need:
- Yarn: Cotton/Acrylic blend (Weight: Sport/Fine). You will need approximately 1.5 skeins (about 170 yards) of your main color (e.g., tan or light brown) and a small amount of white yarn if you want to include the little white undies.
- Crochet Hooks: A 2 mm hook for the main body and limbs, and a tiny 1 mm hook for the nose.
- Eyes: 6 mm (approx. 1/4 inch) glass safety eyes.
- Stuffing: High-quality polyester fiberfill (poly-fill).
- Embroidery Thread: A dark brown thread for the nose and facial details.
- Notions: A sewing needle, a long needle for facial sculpting, sewing thread in a color matching your yarn, and a small amount of craft glue (optional, for eyelids).
- Tools: A chopstick or a similar thin wooden stick to help with stuffing the small limbs.
US Crochet Terms & Abbreviations:
- ch: chain
- sc: single crochet
- inc: increase (2 sc in the same stitch)
- dec: decrease (sc 2 together)
- dc: double crochet
- sl st: slip stitch
- mr: magic ring
- st(s): stitch(es)
- BLO: back loops only
- FLO: front loops only
Step-by-Step Instructions
The Ears (Make 2)
We start with the ears to get a feel for the tension. Aim for a tight, even stitch.
- R1: 6 sc in a magic ring (6)
- R2: 6 inc (12)
- R3: (1 sc, inc) repeat 6 times (18)
- R4: (2 sc, inc) repeat 6 times (24)
- R5: 24 sc (24)
Fasten off, leaving a long tail for sewing. Use a needle to hide the starting tail on the inside of the piece.
The Mouth and Nose
The nose is a tiny, textured piece that gives the bear its character.
The Mouth
- R1: 4 sc in a magic ring (4).
Leave a long tail (about 6 inches) attached to the mouth; you will need this to sew the mouth onto the face later. Fasten off and pull the thread through the first stitch to close the hole.
The Nose
Use your 1 mm hook and embroidery thread for this part.
- R1: 6 sc in a magic ring (6)
- R2: 6 inc (12)
- R3: (1 sc, inc) repeat 6 times (18)
- R4-7: 24 sc (4 rows)
- R8: (1 sc, dec) repeat 6 times (12)
Stuff the nose lightly with fiberfill. Fold the piece in half and sc through both sides for 6 stitches to flatten it. Fasten off, leaving a long tail for sewing.
The Limbs
Upper Arms (Make 2)
Work from the bottom up. Keep your marker in place to ensure the side seam stays straight.
- R1: 6 sc in a magic ring (6)
- R2: 6 inc (12)
- R3: (1 sc, inc) repeat 6 times (18)
- R4-9: 18 sc (6 rows)
- R10: 6 dec, 6 sc (12)
- R11-21: 12 sc (11 rows)
- R22: 6 sl st, 6 sc
Stuff the lower part of the arm. Fasten off and leave a tail for sewing.
Lower Legs (Make 2)
Note: The left and right legs have slight variations in the shaping to give them a more natural look.
Base for both legs:
- R1: 6 sc in a magic ring (6)
- R2: 6 inc (12)
- R3: (1 sc, inc) repeat 6 times (18)
- R4: (2 sc, inc) repeat 6 times (24)
- R5: (3 sc, inc) repeat 6 times (30)
- R6: (inc, 1 sc) repeat 3 times, 18 sc, (1 sc, inc) repeat 3 times (36)
- R7-12: 36 sc (6 rows)
For the Right Leg:
- R13: 9 sc, (dec, 1 sc) repeat 6 times, 9 sc (30)
- R14: 6 sc, (dec, 1 sc) repeat 6 times, 6 sc (24)
- R15: 3 sc, (dec, 1 sc) repeat 6 times, 3 sc (18)
- R16: 18 sc
- R17: 6 sl st, 12 sc (18)
- R18-24: 18 sc (7 rows)
- R25: 9 sc, 9 sl st (18)
Stuff the foot only. Fasten off.
For the Left Leg:
- R13: 9 sc, (1 sc, dec) repeat 6 times, 9 sc (30)
- R14: 6 sc, (1 sc, dec) repeat 6 times, 6 sc (24)
- R15: 3 sc, (1 sc, dec) repeat 6 times, 3 sc (18)
- R16: 18 sc
- R17: 12 sc, 6 sl st (18)
- R18-24: 18 sc (7 rows)
- R25: 9 sc, 9 sc, 9 sl st (18)
Stuff the foot only. Fasten off.
The Tail
- R1: 6 sc in a magic ring (6)
- R2: 6 inc (12)
- R3-5: 12 sc (3 rows)
Stuff the tail. Fold it in half and sc through both sides for 6 stitches. Fasten off.
The Body
If you are making the version with the cute little white undies, start with your white yarn. If not, use your main color from the beginning.
- R1: 6 sc in a magic ring (6)
- R2: 6 inc (12)
- R3: (1 sc, inc) repeat 6 times (18)
- R4: (2 sc, inc) repeat 6 times (24)
- R5: (3 sc, inc) repeat 6 times (30)
- R6: (4 sc, inc) repeat 6 times (36)
- R7: (5 sc, inc) repeat 6 times (42)
- R8: (6 sc, inc) repeat 6 times (48)
- R9: (7 sc, inc) repeat 6 times (54)
- R10: (8 sc, inc) repeat 6 times (60)
- R11: (9 sc, inc) repeat 6 times (66)
Attaching the legs:
- R12: 12 sc, take the left leg and sc 9 stitches through both the leg and the body, 24 sc, take the right leg and sc 9 stitches through both the leg and the body, 12 sc (66).
- R13: (10 sc, inc) repeat 3 times, (inc, 10 sc) repeat 3 times (72).
- R14-23: 72 sc (10 rows).
Transitioning to main color:
- R24: If making undies, work in the BLO (back loops only) for 72 sc. If not, work through both loops as usual.
- R25-27: 72 sc (3 rows).
- R28: (dec, 5 sc) repeat 3 times, 30 sc, (5 sc, dec) repeat 3 times (66).
- R29: 66 sc.
- R30: (dec, 9 sc) repeat 6 times (60).
- R31: 60 sc.
- R32: (dec, 8 sc) repeat 6 times (54).
- R33-34: 54 sc (2 rows).
- R35: (dec, 7 sc) repeat 6 times (48).
- R36-37: 48 sc (2 rows).
- R38: (dec, 6 sc) repeat 6 times (42).
- R39: 42 sc.
Attaching the arms:
- R40: 7 sc, sc 6 stitches through both the arm and the body, 16 sc, sc 6 stitches through both the arm and the body, 7 sc (42).
- R41: 7 sc, sc 6 through the arm, 16 sc, sc 6 through the arm, 7 sc (42).
- R42: (dec, 5 sc) repeat 6 times (36).
- R43: (dec, 4 sc) repeat 6 times (30).
- R44: 30 sc.
- R45: 30 inc (60).
- R46: (4 sc, inc) repeat 12 times (72).
- R47: 18 sc, (5 sc, inc) repeat 3 times, (inc, 5 sc) repeat 3 times, 18 sc (78).
- R48: (12 sc, inc) repeat 3 times, (inc, 12 sc) repeat 3 times (84).
- R49-51: 84 sc (3 rows).
- R52: 39 sc, skip 6 stitches, 39 sc (78).
Use the mouth piece to sew the opening closed. After this, you will begin the head.
The Head
- R53: 38 sc, 2 inc, 38 sc (80).
- R54-60: 80 sc (7 rows).
- R61: 20 sc, (dec, 4 sc) repeat 3 times, 2 dec, (4 sc, dec) repeat 3 times, 20 sc (72).
- R62: 72 sc.
- R63: (dec, 10 sc) repeat 6 times (66).
- R64-71: 66 sc (8 rows).
- R72: (dec, 9 sc) repeat 6 times (60).
- R73: (dec, 8 sc) repeat 6 times (54).
- R74: (dec, 7 sc) repeat 6 times (48).
- R75: (dec, 6 sc) repeat 6 times (42).
- R76: (dec, 5 sc) repeat 6 times (36).
- R77: (dec, 4 sc) repeat 6 times (30).
Stuff the neck and head firmly. The neck should be very tight to support the head. Stuff the head until it is smooth and has no gaps, but don’t over-stuff to the point of distorting the shape.
- R78: (dec, 3 sc) repeat 6 times (24).
- R79: (dec, 2 sc) repeat 6 times (18).
- R80: (dec, 1 sc) repeat 6 times (12).
Close the head by pulling the remaining stitches tight or using the needle method described in the tips.
The Tiny Dress
This dress is worked in rows using double crochet. Make sure to work in the back loops only (BLO) for Row 5.
- Start: Chain 51.
- R1: Starting from the 4th ch from the hook: 48 dc, 2 ch.
- R2: 7 dc, 3 dc in one st, 8 dc, 3 dc in one st, 14 dc, 3 dc in one st, 8 dc, 3 dc in one st, 7 dc, 2 ch (56).
- R3: 8 dc, 3 dc in one st, 10 dc, 3 dc in one st, 16 dc, 3 dc in one st, 10 dc, 3 dc in one st, 8 dc, 2 ch (64).
- R4: 10 dc, ch 12, skip 12 sts, 20 dc, ch 12, skip 12 sts, 10 dc, 2 ch (64).
- R5: 64 dc in BLO, 2 ch.
- R6: 3 dc, inc, (7 dc, inc) repeat 7 times, 4 dc, 2 ch (72).
- R7: 4 dc, inc, 1 ch, inc, (7 dc, inc, 1 ch, inc) repeat 7 times, 3 dc, 2 ch (96).
- R8: 96 dc in FLO, 2 ch.
- R9: 5 dc, inc, 1 dc, inc, (9 dc, inc, 1 dc, inc) repeat 7 times, 4 dc, 2 ch (120).
- R10: 120 dc in FLO, 1 ch.
- R11: 120 sc.
Edging: Do not fasten off. 1 ch, work 22 sc along the edge, 1 ch, turn, 22 sc, ch, fasten off. On the second edge, work 4 ch to create button loops.
Finishing
Assembly
- Eyes: If using safety eyes, insert them 19 rows down from the top of the head, about 2 stitches away from the center line. If embroidering, use dark brown thread to create simple almond shapes.
- Ears: Mark the attachment points 9 rows down from the top of the head. Each ear should be 11 stitches away from the center line. Sew the ears securely using a matching sewing thread.
- Nose & Mouth: Sew the nose to the center of the face. Then, pull the mouth thread through the center of the nose to give it a realistic expression.
- Tail: Sew the tail between rows 19 and 20 of the body.
- Dress: Sew the dress onto the bear and add small buttons to the loops.
Facial Sculpting (The “Tug”)
To give your bear a more professional, “sculpted” look, follow these steps:
- Mark the center line of the head with a contrasting thread.
- Use sewing pins to mark the points for sculpting: Points 1 and 4 should be between rows 46 and 47 at the center (1 stitch apart). Points 2 and 3 should be between rows 62 and 63 at the center (2 stitches apart).
- Using a strong thread and a long needle, pass the needle through these points (1-2-3-4) from the bottom up.
- Pull the thread gently to create a slight indentation for the snout. Tie two knots to secure and hide the thread inside the head.
- Optional Eyelids: For extra expression, embroider eyelids using dark brown thread. You can use a tiny bit of craft glue on your needle to help the thread lay flat and stay in place.
Tips
- Invisible Decreases: For a smoother look, especially in the head and limbs, try using the “invisible decrease” technique. Instead of working into the top loops, work into the front loops of the next two stitches.
- Stitch Markers: Always use a stitch marker! In amigurumi, keeping your rounds even is crucial for the shape. If your marker drifts, use a “displacement stitch” (don’t finish the last stitch of the row, and work the next stitch into that same spot) to reset it.
- Stuffing: Don’t over-stuff! If you pack the fiberfill too tightly, you will stretch the stitches and create unsightly lumps. Use a chopstick to distribute the stuffing evenly into the corners and small parts.
- Tension: Try to crochet all parts of a single limb on the same day. Variations in tension between different days can lead to parts not fitting together perfectly.