
Cute Crochet Lamb Pattern: A Beginner-Friendly Amigurumi Tutorial
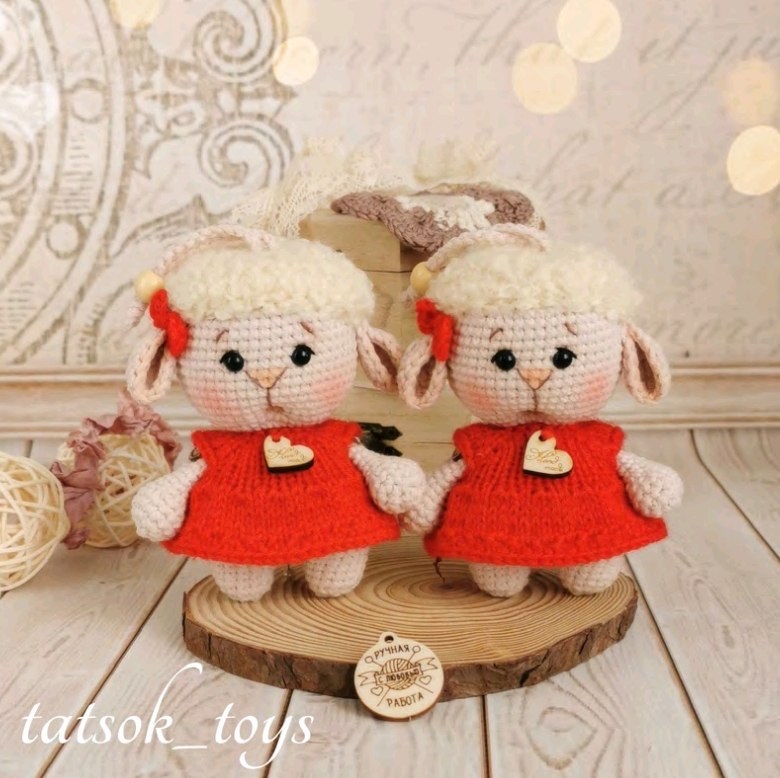
Are you looking for a sweet, small project to brighten up your crochet collection? This adorable little lamb is the perfect addition to your handmade library. Whether you are looking to create a nursery decoration, a unique gift for a baby shower, or just want to practice your amigurumi skills, this little lamb is designed to be charming, cozy, and beginner-accessible.
This project results in a tiny lamb approximately 4.3 inches tall, making it an ideal “pocket pal” or shelf sitter. In this tutorial, we will walk you through every step, from shaping the tiny legs to creating the curly, textured hair and even a tiny knitted dress. Grab your favorite hooks and let’s get started!
Materials & Abbreviations
To ensure your lamb turns out looking just like the photos, I recommend using high-quality cotton or cotton-blend yarns. This provides the stitch definition necessary for cute amigurumi facial expressions.
Materials Needed
- Yarn (Body): Medium weight cotton/acrylic blend in a cream or beige color (approx. 100 yards).
- Yarn (Hair/Wig): Off-white or natural color textured yarn (approx. 30 yards).
- Yarn (Dress & Bow): Bright poppy red yarn.
- Eyes: 5mm screw-on safety eyes.
- Stuffing: Polyester fiberfill.
- Embroidery Thread: Black or dark brown embroidery floss for the face.
- Buttons: 2 small buttons for the dress.
- Crochet Hooks: 2.0mm (for the body) and 3.5mm (for the hair/wig).
- Knitting Needles: Size US 0 (2.0mm) for the tiny dress.
- Other: Sewing needle, scissors, and a bit of fabric glue for the eyes.
US Crochet Abbreviations
- MR: Magic Ring
- ch: Chain
- sc: Single crochet
- inc: Increase (2 sc in the same stitch)
- dec: Decrease (sc 2 stitches together)
- hdc: Half double crochet
- dc: Double crochet
- sl st: Slip stitch
- yo: Yarn over
- st(s): Stitch(es)
- BLO: Back loops only
Step-by-Step Instructions
Legs & Body
We will start by making the legs. You will need to make two identical legs.
The Legs (Make 2)
- MR, 6 sc (6)
- 6 inc (12)
- (3 sc, inc) * 3 (15)
- 4-6. 15 sc (15)
Fasten off the first leg. For the second leg, do not fasten off! We will join the legs to create the body.
The Body
- Ch 2. Work 15 sc along the first leg, 2 sc in the chains, 15 sc along the second leg, and 2 sc in the remaining chains (34).
- 15 sc, 2 inc, 17 sc (36)
- (5 sc, inc) * 6 (42)
- 3 sc, inc, (6 sc, inc) * 5, 3 sc (48)
- 11-13. 48 sc (48)
- (14 sc, dec) * 3 (45)
- 15. 45 sc (45)
- (13 sc, dec) * 3 (42)
- 17. 42 sc (42)
- (12 sc, dec) * 3 (39)
- 19. 39 sc (39)
- 10 sc, dec, (3 sc, dec) * 4, 7 sc (34)
- 8 sc, dec, (1 sc, dec) * 6, 6 sc (27)
- dec, 3 sc, (2 sc, dec) * 5, 2 sc (21)
Stuff the body firmly with fiberfill.
- (dec, 1 sc) * 3, dec, 4 sc, (dec, 1 sc) * 2 (15)
- 24. 15 sc (15)
Add more stuffing as needed.
The Head
- 15 inc (30)
- 26. 2 sc, inc, (4 sc, inc) * 5, 2 sc (36)
- 27. (5 sc, inc) * 6 (42)
- 28. 3 sc, inc, (6 sc, inc) * 5, 3 sc (48)
- 29. (7 sc, inc) * 6 (54)
- 30-39. 54 sc (54)
- 40. (7 sc, dec) * 6 (48)
- 41. 3 sc, dec, (6 sc, dec) * 5, 3 sc (42)
- 42. (5 sc, dec) * 6 (36)
Stuff the head firmly.
- 2 sc, dec, (4 sc, dec) * 5, 2 sc (30)
- 44. (3 sc, dec) * 6 (24)
- 45. 1 sc, dec, (2 sc, dec) * 5, 1 sc (18)
- 46. (1 sc, dec) * 6 (12)
Add more stuffing.
- 6 dec (6)
Fasten off, pull the opening tight, and hide the yarn tail inside the head.
Arms (Make 2)
- MR, 6 sc (6)
- 6 inc (12)
- (3 sc, inc) * 3 (15)
- 15 sc (15)
- (3 sc, dec) * 3 (12)
- (4 sc, dec) * 2 (10)
Place a small amount of stuffing in the “fist” area.
- 7-12. 10 sc (10)
- 13. 5 dec (5)
Fasten off and weave in ends. We will attach these using buttons later!
Ears (Make 2)
- MR, 6 sc (6)
- inc, inc from hdc, (inc from dc) * 2, inc from hdc, inc (12)
- 1 sc, inc, hdc, inc from hdc, (dc, inc from dc) * 2, hdc, inc from hdc, 1 sc, inc (18)
Leave a long tail for sewing.
The Curly Hair (Wig)
Use your larger 3.5mm hook and the off-white yarn. We will use the BLO (Back Loops Only) method to create texture.
- MR, 6 sc (6)
- 6 inc (12)
Note: From this point on, work all rounds in the Back Loops Only (BLO).
- (1 sc, inc) * 6 (18)
- 1 sc, inc, (2 sc, inc) * 5, 1 sc (24)
- (3 sc, inc) * 6 (30)
- 30 sc (30)
Fasten off and leave a long tail for sewing.
Optional: Knitted Red Dress
If you prefer to knit, use the red yarn and size US 0 (2.0mm) needles.
- Cast on 24 stitches (including edge stitches).
- 1. 22 knit (k)
- 2. 3 k, [2 k, yo, k, yo], 2 k, [4 k, yo, k, yo], 6 k, [4 k, yo, k, yo], 3 k, [2 k, yo, k, yo], 2 k, 3 k
- 3. 3 k, 24 purl (p), 3 k
- 4. 3 k, 3 k, [4 k, yo, k, yo], 6 k, [6 k, yo, k, yo], 4 k, [4 k, yo, k, yo], 3 k, 1 k, yo, dec (creating a small loop)
- 5. 3 k, 32 p, 3 k
- 6. 3 k, 4 k, [yo, k, yo, 6 k, yo, k, yo, 8 k, yo, k, yo, 6 k, yo, k, yo, 4 k], 3 k
- 7. 3 k, 40 p, 3 k
- 8. 3 k, purl, cast off 8 stitches (sleeve), 11 k, cast off 8 stitches (sleeve), 5 k, 3 k
- 9. 3 k, purl, cast on 2 (using crossed yarn over), 12 p, cast on 2 (using crossed yarn over), purl, 3 k
- 10. 3 k, 28 k, 3 k
- 11. 3 k, 28 p, 3 k
- 12. 3 k, [1 k, from one stitch work three: (1 k, yo, 1 k) * 14], 3 k
- 13. 3 k, 56 p, 3 k
- 14. 3 k, 56 k, 1 k, yo, dec (loop), 3 k
- 15. 3 k, 56 p, 3 k
- 16. 3 k, 56 k, 3 k
- 17. 3 k, 56 p, 3 k
- 18. 3 k, [1 k, 1 p] * 28, 3 k
- 19. 3 k, [1 p, 1 k] * 28, 3 k
Cast off all stitches. Block the finished piece for the best shape.
Finishing
Assembly & Facial Features
This is where your little lamb truly comes to life!
Eye Placement
Count 13 rows up from the end of the head (the closing part). Place the eyes with a distance of 6 sc between them. Secure the safety eyes with a little bit of glue for extra stability.
Embroidering the Face
- Eyebrows: Using black embroidery thread, stitch small lines 1 row above the eyes. Keep them about 7 sc apart.
- Eyeshadow/Lashes: Add a small “flick” or lash above each eye with black thread.
- Nose: At eye level, place pins 4 sc apart and 2 rows down. Embroider a small nose with brown thread and add a single stitch toward the mouth area.
Attaching Limbs and Hair
- Arms: Use the button method to attach the arms to the body. This gives a professional, vintage look.
- Hair: Sew the curly wig onto the head, starting about 1 row below the eyebrows.
- Ears: Sew the ears to the sides of the head, attaching them to the edge of the hair/wig.
- Dress: Put the dress on the lamb and secure it with the two small buttons.
Pro Tip: Use a little bit of blush or pink eyeshadow on the cheeks, nose, and mouth area to give your lamb a soft, lifelike glow!
Tips for Success
- Tension is Key: When making amigurumi, try to keep your tension tight so the stuffing doesn’t peek through the stitches.
- Safety First: If you are making this for a very young child, instead of screw-on safety eyes, consider embroidering the eyes entirely with black yarn to prevent any choking hazards.
- Stuffing Technique: Stuff in small increments. It is much easier to add more stuffing than it is to fix a lumpy limb!
- Blocking: For the knitted dress, blocking is essential to make the stitches lay flat and look professional.
Enjoy your new little lamb friend! Happy crocheting!