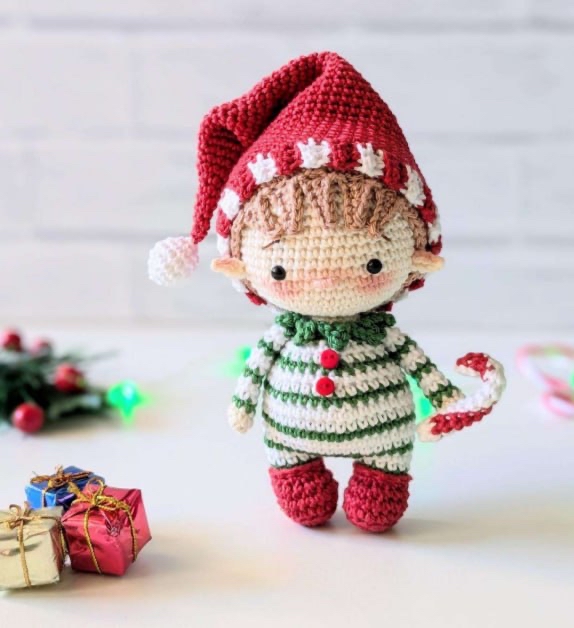
DIY Crochet Christmas Elf Pattern: A Step-by-Step Amigurumi Tutorial
Get ready to add some holiday magic to your home with this adorable DIY Crochet Christmas Elf! Whether you are looking for a festive nursery decoration, a unique stocking stuffer, or a charming gift for a loved one, this little elf is the perfect project. This amigurumi-style elf features a cozy striped sweater, a classic pointed hat, and a tiny candy cane to complete the look. This tutorial is designed to be beginner-friendly, walking you through every stitch to ensure your little helper turns out perfectly.
This finished elf stands approximately 4.7 inches tall, making it the ideal size to sit on a mantelpiece, a bookshelf, or tucked into a holiday display. Grab your crochet hook and some festive yarn, and let’s get started!
Materials & Abbreviations
To ensure your elf looks just like the photos, I recommend using a smooth, high-quality cotton yarn. While you can experiment with different colors, staying within a classic red, green, and white palette will give you that quintessential Christmas feel.
Materials Needed
- Yarn: Medium weight (DK or Sport weight) cotton yarn in the following colors:
- Cream (for skin/head)
- Red (for hat, boots, and trim)
- Green (for sweater and legs)
- White (for sweater stripes and hat trim)
- Brown (for hair/wig)
- Crochet Hook: 2.5mm (or the size appropriate for your yarn to achieve a tight stitch)
- Safety Eyes: 5mm black safety eyes
- Buttons: Two 6mm red buttons for the sweater
- Stuffing: Polyester fiberfill
- Extras: Yarn needle, scissors, stitch marker, and a small piece of 2mm thick wire (about 2.5 inches long) for the candy cane.
Abbreviations (US Terms)
- MR: Magic Ring
- ch: Chain
- sc: Single crochet
- sc BLO: Single crochet in the back loop only
- sc FLO: Single crochet in the front loop only
- inc: Increase (2 sc in one stitch)
- inv dec: Invisible decrease
- hdc: Half double crochet
- sl st: Slip stitch
- BLO: Back loop only
- FLO: Front loop only
Step-by-Step Instructions
The Boots and Legs
We will begin by creating the base of the feet. Use Red yarn.
Soles:
- Start with a foundation chain of 5 ch.
- Round 1: From the second ch from your hook, work 1 sc in the next, then 1 inc in the last ch. Turn your work and work along the opposite side of the foundation chain: 1 sc, 1 inc (10).
- Round 2: Work sc BLO, dec BLO, sc BLO, inc (14).
- Round 3: Work 4 sc BLO, (inc, sc) * 2, inc, 5 sc BLO (17).
- Round 4: Work 17 sc in both loops (17).
- Round 5: 6 sc, one decorative “bump” stitch (extra sc), 5 sc (14).
- Round 6: 5 sc, one decorative “bump” stitch, 5 sc (12).
Fasten off, leaving a long tail for sewing. Do not forget to stuff the soles lightly.
Legs:
Switch to Green yarn. Join the yarn to the back of the boots by working in the back loops.
- Round 7: Work 12 sc in the back loops (12).
- Fasten off and repeat the entire process for the second leg.
Mark the center of the inner part of each leg; you will need this for assembly later.
The Body and Striped Sweater
For the body, we will join the two legs together using Green and White yarn.
- Round 8: Join the legs. Work 12 sc around the first leg, ch 3 (this forms the bridge between legs), 12 sc around the second leg, and 3 sc along the bridge chain (30).
- Round 9: 12 sc, inc, sc, inc, 12 sc, inc, sc, inc (34).
- Round 10: 12 sc, inc, 3 sc, inc, 12 sc, inc, 2 sc, sc, inc, 12 sc, inc, 5 sc, inc, 12 sc, inc, 5 sc, inc (38).
- Round 11: 12 sc, inc, 5 sc, inc, 12 sc, inc, 5 sc, inc (42).
- Rounds 12-23: Continue working in rounds, alternating between Green and White to create the striped pattern. Ensure you reach the midpoint of the back before placing a stitch marker.
- Rounds 16-23: Follow the shaping instructions to taper the body:
- R16: (5 sc, inv dec) * 6 (36)
- R18: (4 sc, inv dec) * 6 (30)
- R20: (3 sc, inv dec) * 6 (24)
- R22: (2 sc, inv dec) * 6 (18)
- R23: 18 sc (18)
Fasten off the White yarn. Keep the Green yarn attached, as it will be used for the collar.
The Head and Ears
Switch to Cream yarn for the head. Stuff the head firmly as you work.
- Round 1: 12 inc in MR (24).
- Round 2: (2 sc, inc) * 6 (30).
- Round 3: (2 sc, inc) * 6 (36).
- Round 4: (3 sc, inc) * 6 (42).
- Round 5: (4 sc, inc) * 6 (48).
- Rounds 6-16: 48 sc (48).
- Round 17: (5 sc, inv dec) * 6 (42).
- Round 18: (5 sc, inv dec) * 6 (36).
- Round 19: (4 sc, inv dec) * 6 (30).
- Round 20: (3 sc, inv dec) * 6 (24).
- Round 21: (2 sc, inv dec) * 6 (18).
- Round 22: (1 sc, inv dec) * 6 (12).
- Round 23: 6 inv dec (6).
Fasten off and close the hole using a yarn needle.
Ears: Using Cream yarn, create two small ears.
Ch 4, then from the 2nd ch from hook: sl st, sc, hdc.
Fasten off and sew onto the head at the level of Round 7, about 4 stitches away from the eyes.
The Hair (Wig) and Hat
Hair: Use Brown yarn to create a wig cap. Work in rounds following the head’s structure, increasing until you reach 50 stitches, then working even for 10 rows. This “wig” is then sewn onto the head.
The Elf Hat: Use Red yarn. This is a large, conical hat.
- Work through the rounds to create a large cone shape, increasing until you reach 52 stitches around.
- Work even for 14 rounds.
- Decrease gradually: (11 sc, inv dec) * 4, then (6 sc, inv dec) * 6, and so on, until you reach the tip.
Hat Trim: Using White yarn, create a decorative jagged trim by working loops (ch and sl st) around the edge of the hat to create a festive, ruffled look.
Pom-pom: Using White yarn, create a small sphere (MR, inc, pattern, dec) and sew it to the tip of the hat.
The Arms and Candy Cane
Arms: Make two small tubes using Cream, Green, and White yarn. Sew them to the body at Rounds 22-23.
Candy Cane: Using Red and White yarn, crochet a small spiral. Insert a 2.5-inch piece of wire into the center to allow the cane to hold its shape. Fasten off and sew it into the elf’s hand.
Finishing
Assembly is the most important part to bring your elf to life! Follow this order:
- Stuffing: Ensure the body, legs, and head are firmly stuffed.
- Eyes: Place the safety eyes between Rounds 8 and 9, roughly 7 stitches apart.
- Face Details: Use embroidery thread to add eyebrows between Rounds 10 and 11, and a small nose between the eyes at Rounds 7-8.
- Sewing: Attach the head to the body, then the ears, then the hair wig, and finally the hat.
- Clothing: Sew the arms to the body and attach the two red buttons to the front of the sweater.
- Cheeks: Use a bit of pink blush or makeup to give the elf cute, rosy cheeks.
- Accessory: Place the candy cane in the elf’s hand.
Tips for Success
- Tension Matters: Since amigurumi involves stuffing, keep your tension tight to prevent the white stuffing from peeking through your stitches.
- Color Changes: When changing colors, always pull the new color through the final loop of the previous stitch to ensure a clean transition.
- Stitch Markers: Always use a stitch marker. Working in continuous rounds can make it very easy to lose your place!
- Customization: Don’t be afraid to get creative! You can change the colors of the sweater or the hair to make your elf unique.