Crochet Yorkie Pattern: DIY Miniature Amigurumi Yorkshire Terrier
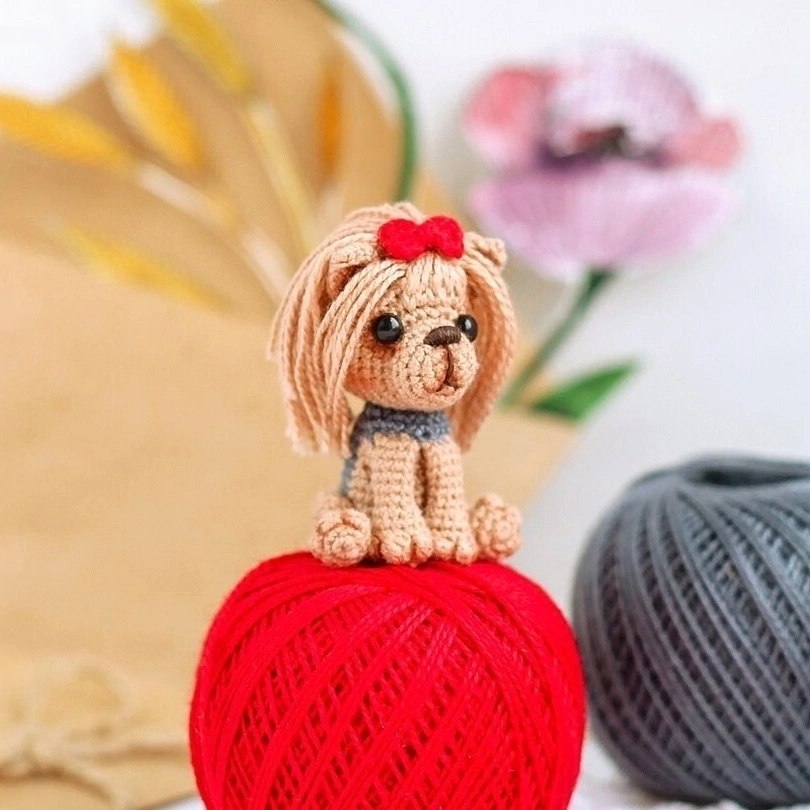
Are you looking for a tiny, adorable project to add to your crochet collection? This miniature Yorkie amigurumi is the perfect project for anyone who loves small, detailed crafts. This little Yorkshire Terrier is designed to be incredibly cute, featuring a tiny sweater, a stylish bow, and even a little tuft of hair! Because this project uses very fine thread and a small hook, it results in a dense, high-quality finished product that looks like a professional little figurine.
Whether you want to make a keychain, a desk buddy, or a unique gift for a dog lover, this Yorkie pattern is a delightful way to practice your amigurumi skills. While the scale is small, the process is straightforward and very rewarding. Let’s dive into how you can create your very own micro-crochet Yorkie!
Materials & Abbreviations
To achieve the tiny, detailed look seen in the photos, you will need specialized materials. Using standard bulky yarn will not work for this specific pattern, as the magic lies in the fine texture.
What You Will Need
- Fine Cotton Thread: A thin cotton thread (such as Iris or a similar fine embroidery weight) is required. You will need colors in sand/beige, gray, red (for the bow), and a bit of black for the nose.
- Crochet Hook: A very small hook, specifically 1.00 mm (approximately 0.4 inches).
- Stuffing: Small amounts of polyester fiberfill.
- Safety Eyes or Embroidery Thread: Tiny black beads or black thread to create the eyes.
- Sewing Supplies: A fine needle, scissors, and optional dry pastels for shading.
Abbreviations
This pattern uses standard US crochet terminology. Please ensure you are familiar with these terms before starting:
- mr: magic ring
- ch: chain
- sc: single crochet
- inc: increase (2 sc in the same stitch)
- dec: decrease (sc 2 stitches together)
- dc: double crochet
- sl st: slip stitch
Step-by-Step Instructions
The Front Legs (Make 2)
The front legs are designed to be slightly soft at the bottom while maintaining their shape. Note: Do not stuff the entire leg, only the bottom portion.
- 6 sc in a magic ring
- 6 inc (12 sc)
- This round creates the “toes.” Follow this special sequence: 3 sc, finger*, 1 sc, finger, 1 sc, finger, 4 sc.
- 12 sc
- 12 sc
- (1 dec, 1 sc) repeat 4 times (8 sc)
- 7-12. 8 sc
*How to make a “finger”: In the stitch indicated, yarn over and pull up a loop. Yarn over and pull through 2 loops (this is a half-double crochet). Yarn over and pull through 2 loops. Yarn over and pull through 2 loops. Instead of finishing the stitch normally, pull the final loop through all three loops on your hook at once to create a single “cap” or toe.
Finish the round with a slip stitch, cut the yarn, and weave in the ends. Stuff only the bottom part of the leg.
The Back Legs (Make 2)
The back legs are slightly different and should be stuffed completely.
- 6 sc in a magic ring
- 6 inc (12 sc)
- 3 sc, finger, 1 sc, finger, 1 sc, finger, 4 sc.
- 12 sc
- 12 sc
- (1 dec, 2 sc) repeat 3 times (9 sc)
- 9 sc
- 3 sc, 3 inc, 3 sc (12 sc)
- 9-13. 12 sc
- 6 dec.
Finish with a slip stitch, cut the yarn, and weave in the ends. Stuff these legs firmly as you go.
The Tail
- Leave a long tail at the beginning for sewing.
- Chain 7.
- In the 2nd chain from the hook, work 6 sc.
- Leave a long tail at the end for sewing.
The Body
The body features a color-change pattern to simulate a little doggy sweater.
- Starting with Sand/Beige color: 6 sc in a magic ring.
- 6 inc (12 sc)
- (1 sc, inc) repeat 6 times (18 sc)
- 1 sc, inc, (2 sc, inc) repeat 5 times, 1 sc (24 sc)
- Color Change: Join gray thread. Work 14 sc in gray, then 10 sc in beige (24 sc total).
- Repeat Round 5. At this stage, attach the tail by threading the tail through the body and tying it securely on the inside.
- 7-11. 14 sc in gray, 10 sc in sand/beige (24 sc)
- Switch to Gray only: At this round, you will attach the front legs. Insert your hook through both sides of the front leg and the body wall, and work 24 sc all together.
- 24 sc
- (1 dec, 2 sc) repeat 6 times (18 sc)
- Work 5 more sc to ensure the yarn end stays on the back.
Finish with a slip stitch, leaving a long tail for sewing. Stuff the body firmly.
The Head & Hair
The head is where the character comes to life. It includes a special section for the hair.
- 6 sc in a magic ring
- 6 inc (12 sc)
- (1 sc, inc) repeat 6 times (18 sc)
- 4-5. 18 sc
- 6-7. 4 sc, 10 sl st, 4 sc (Note: Do not pull the slip stitches too tight; this makes it easier to insert the hair later).
- 3 sc, (1 sc, inc) repeat 6 times, 3 sc (24 sc)
- 4 sc, inc, (2 sc, inc) repeat 5 times, 4 sc (30 sc)
- 8 sc, inc, (3 sc, inc) repeat 3 times, 9 sc (34 sc)
- 8 sc, inc, (4 sc, inc) repeat 3 times, 10 sc (38 sc)
- 12-17. 38 sc
- (1 dec, 17 sc) repeat 2 times (36 sc)
- 2 sc, dec, (4 sc, dec) repeat 5 times, 2 sc (30 sc)
- (3 sc, dec) repeat 6 times (24 sc)
- 1 sc, dec, (2 sc, dec) repeat 5 times, 1 sc (18 sc)
- (1 sc, dec) repeat 6 times (12 sc)
- 6 dec.
Finish with a slip stitch and weave in ends. Stuff firmly.
Adding the Hair
The hair gives the Yorkie its iconic look. You will insert strands of sand-colored thread directly into the head.
- Insert 5 strands of thread into 2 rows along the center of the muzzle/nose area (use pins to help guide the placement).
- Insert another 5 strands in 2 rows across the nose.
- Pull the threads through and secure them. We will secure these strands later using the bow.
The Ears (Make 2)
These are worked in rows rather than rounds.
- Chain 2. In the 2nd chain from hook, work an increase (2 sc).
- 2 inc (4 sc)
- 4 sc
- Edging: Chain 1, work 3 sc along the edge, work an increase in the top corner, and 3 sc along the other edge. (For the final sc, work it into the very last stitch of the previous row).
Leave a long tail for sewing.
The Tiny Bow
- Chain 3. In the first chain from hook, work 2 dc, 2 ch, and a sl st into that same chain.
- In the next chain, work 2 ch, 2 dc, 2 ch, and a sl st.
- Leave a long tail and wrap it tightly around the center of the bow to create the knot shape.
Finishing
Now it is time to bring your little Yorkie together!
- Assembly: Sew the ears to the top of the head. Sew the head onto the body. Finally, sew the back legs to the sides of the body.
- The Face: Embroider a small nose with black thread or use a tiny bead. Attach your safety eyes or sew on black eyes.
- The Bow & Hair: Position the bow on top of the head to secure the hair strands. Thread the bow tails through the head and tie them on the inside to keep everything in place. Trim any excess hair strands to look neat.
- Shading (Optional): For a professional, realistic look, use a little bit of dry pastel on a brush to lightly shade the muzzle and the paws.
Tips for Success
- Watch your tension: When working with such fine thread, try to keep your tension consistent. If you crochet too tightly, it will be difficult to insert the hair or stuff the parts.
- Use pins: Since the parts are so small, using sewing pins to hold the eyes, ears, and legs in place before you sew them on is a lifesaver.
- Stuffing is key: Because the pieces are tiny, it can be hard to get stuffing inside. Use small scraps of fiberfill and push them in with your crochet hook.
- Practice the “Finger” stitch: This unique stitch is what gives the paws their character. Practice a few times on a scrap piece of yarn before starting the actual legs!