Adorable Amigurumi Baby Bunny Crochet Pattern: A Step-by-Step Beginner Guide
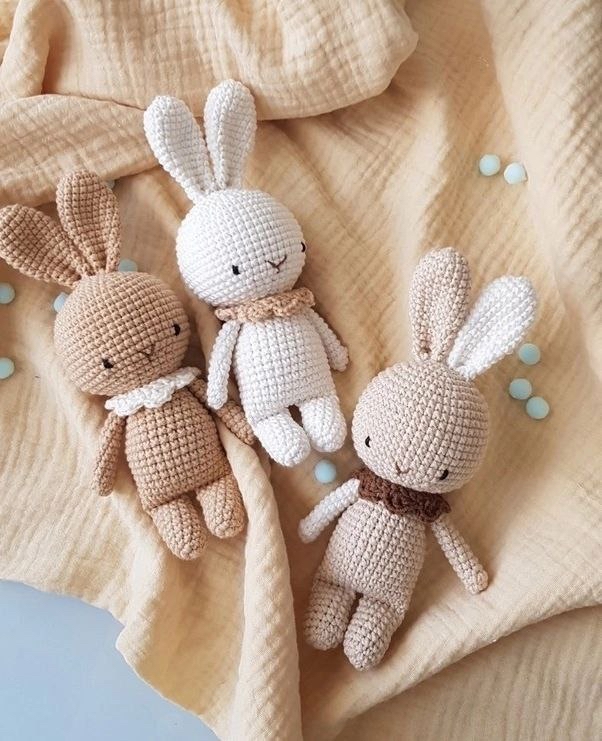
Are you looking for a sweet, cuddly project that is perfect for baby showers, nursery decor, or a thoughtful handmade gift? This adorable amigurumi baby bunny is the answer! With its oversized ears, tiny limbs, and charming little collar, this bunny is a showstopper that looks much more complicated than it actually is to make.
In this tutorial, we will walk through the entire process of creating this little woodland friend. Whether you are a seasoned crochet enthusiast or a beginner looking to practice your amigurumi skills, this pattern is designed to be approachable, fun, and highly rewarding. Grab your favorite soft yarn and let’s get started on making your very own little bunny!
Materials & Abbreviations
To ensure your bunny turns out as soft and professional as possible, I recommend using high-quality cotton or a cotton-blend yarn. This provides excellent stitch definition, which is crucial for amigurumi.
What You Will Need
- Yarn: A medium-weight (Category 2 or 3) cotton/acrylic blend yarn. You will need a main color for the body and a contrasting color for the decorative collar.
- Crochet Hook: A 2.0mm (B-1) or 2.25mm crochet hook. Using a smaller hook than the yarn suggests helps keep your stitches tight so the stuffing doesn’t peek through.
- Embroidery Thread: Black and brown cotton embroidery floss for the eyes and nose.
- Stuffing: Polyfill or high-quality fiberfill.
- Tools: A large-eye tapestry needle, scissors, and a stitch marker.
Finished Size: Once completed, your bunny will be approximately 7 inches tall (18 cm).
US Crochet Abbreviations
- MR: Magic Ring
- ch: Chain
- sc: Single Crochet
- dc: Double Crochet
- inc: Increase (2 sc in the same stitch)
- dec: Decrease (sc 2 together)
- st(s): Stitch(es)
Note: This pattern is worked in continuous rounds. Please use a stitch marker to keep track of the beginning of each round. Do not use turning chains at the start of rounds.
Step-by-Step Instructions
The Head
The head is the centerpiece of your bunny. Make sure to stuff it firmly as you go!
- Round 1: 6 sc in a MR (6)
- Round 2: (inc) in each st around (12)
- Round 3: (1 sc, inc) repeat 6 times (18)
- Round 4: (2 sc, inc) repeat 6 times (24)
- Round 5: (3 sc, inc) repeat 6 times (30)
- Round 6: (4 sc, inc) repeat 6 times (36)
- Round 7: (5 sc, inc) repeat 6 times (42)
- Round 8: (6 sc, inc) repeat 6 times (48)
- Rounds 9-18: sc in each st around (48)
- Round 19: (6 sc, dec) repeat 6 times (42)
- Round 20: (5 sc, dec) repeat 6 times (36)
- Round 21: (4 sc, dec) repeat 6 times (30)
- Lightly stuff the head at this point.
- Round 22: (1 sc, dec) repeat 10 times (20)
- Round 23: 2 decreases at the sides (18)
Stop here and stuff the head completely. You will finish the facial embroidery later.
The Ears
The bunny’s ears are long and floppy, giving it that classic “baby” look. You will make two ears.
- Round 1: 6 sc in a MR (6)
- Round 2: (inc) in each st around (12)
- Round 3: (1 sc, inc) repeat 6 times (18)
- Rounds 4-11: sc in each st around (18)
- Round 12: (1 sc, dec) repeat 6 times (12)
- Rounds 13-16: sc in each st around (12)
Fold the ears in half lengthwise and crochet 6 sc around the open edge to close them. Repeat for the second ear.
The Arms
You will make two arms.
- Round 1: 8 sc in a MR (8)
- Rounds 2-12: sc in each st around (8)
Fold the arm and crochet 4 sc around the edge to close it. Repeat for the second arm.
The Legs & Body
This part is slightly unique because the legs and body are worked together to create a seamless bottom.
Making the Legs
- Round 1: 6 sc in a MR (6)
- Round 2: (inc) in each st around (12)
- Rounds 3-9: sc in each st around (12)
Lightly stuff the legs. Fold the leg and crochet 6 sc around the edge to close it.
Important Construction Step: For the first leg, fasten off your yarn. For the second leg, do not fasten off. Instead, ch 3 and join to the first leg to continue your work into the body.
Making the Body
- Round 1: 12 sc around the edge of the first leg, 3 sc in the chain, 12 sc around the edge of the second leg, 3 sc in the chain. (Total: 30 sc)
- Rounds 2-10: sc in each st around (30)
- Round 11: 2 decreases at the sides (28)
- Round 12: 2 decreases at the sides (26)
- Round 13: 2 decreases at the sides (24)
- Round 14: 2 decreases at the sides (22)
- Round 15: 2 decreases at the sides (20)
- Round 16: Crochet the arms into this round (attach them to the sides of the body) (20)
- Round 17: 2 decreases at the sides (18)
Stuff the body firmly.
The Decorative Collar
The collar adds a touch of elegance to your bunny. Use your contrasting color yarn for this part.
- Foundation: ch 24
- Round 1: Starting in the 2nd ch from the hook, sc in each ch (23)
- Round 2 (The Ruffle): (dc, ch 2, dc in the same stitch, ch 2, dc in the same stitch), skip 1 st, dc in the next st. Repeat this pattern all the way around to create a beautiful scalloped edge.
Finishing
Now comes the fun part—bringing your bunny to life!
Assembly
- Attach the Head: Using your tapestry needle and a bit of the main color yarn, sew the head onto the top of the body.
- Attach the Ears: Sew the ears to the top of the head. You can position them pointing up or slightly to the side for a different look.
- Attach the Collar: Sew the finished ruffle collar around the neck area, between the head and the body.
Embroidery
- Eyes: Using your black embroidery thread, stitch two small eyes. For a “kawaii” or cute look, place them on the 7th row from the bottom of the head.
- Nose: Using your brown embroidery thread, stitch a small, delicate nose just below and between the eyes.
Tips for Success
Crocheting amigurumi can be tricky for beginners, so here are a few professional tips to help you achieve a perfect result:
Tight Tension is Key
The most common mistake in amigurumi is having gaps between stitches that allow the stuffing to show. If you notice this happening, try using a smaller hook or pulling your yarn slightly tighter. Consistency is more important than extreme tightness.
Don’t Overstuff!
While you want a firm toy, overstuffing can actually distort the shape of the crochet stitches and make the toy look lumpy. Stuff in small increments, ensuring the stuffing reaches all the corners of the head and body without stretching the fabric too much.
The Magic Ring Trick
If you are new to the Magic Ring (MR), it might feel a bit fiddly at first. Don’t be discouraged! It is the best way to ensure there is no hole in the center of your round. Practice it a few times on scrap yarn until it becomes second nature.
Perfecting the Ruffle
When making the collar, the “dc, ch 2, dc in same stitch” sequence is what creates that voluminous, wavy look. Make sure you are consistently skipping exactly one stitch between your decorative clusters to keep the ruffle even all the way around.