
Adorable Chubby Penguin Crochet Pattern: A Step-by-Step Amigurumi Tutorial
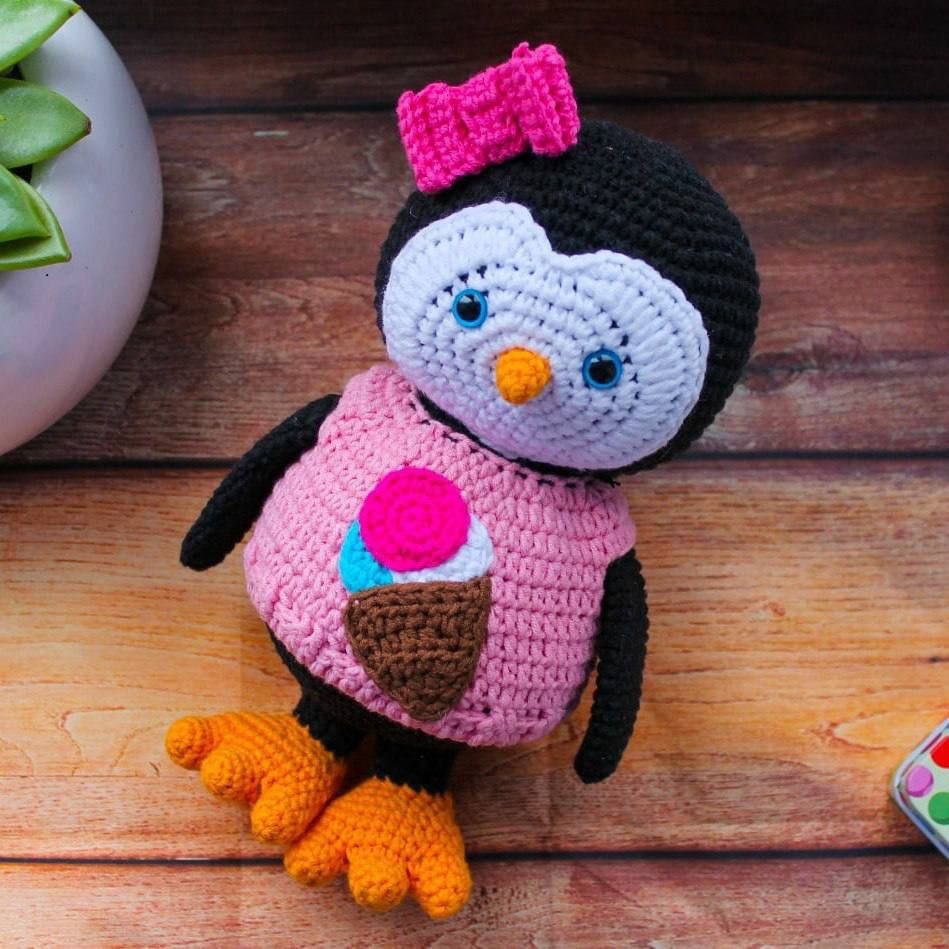
If you are looking for your next adorable amigurumi project, look no further! This chubby, little penguin is absolutely irresistible. With its oversized head, tiny wings, and a stylish little sweater complete with an ice cream applique, this penguin is the perfect companion for a nursery, a desk buddy, or a unique gift for a crochet lover. This tutorial is designed to be beginner-friendly, guiding you through every stitch to create a high-quality, professional-looking plushie.
In this guide, we will walk through creating each individual part—from the round head to the tiny feet—and finally, how to assemble them all into one precious character. Grab your hook and some cozy yarn, and let’s get started!
Materials & Abbreviations
To ensure your penguin turns out just like the pictures, I recommend using a DK weight cotton or cotton-blend yarn. This provides excellent stitch definition, which is crucial for amigurumi.
Materials Needed
- Yarn (DK Weight): Black, White, Orange, Raspberry (or bright pink), Light Pink, Light Blue, and Brown.
- Crochet Hook: 2.25 mm (or a size that produces very tight stitches).
- Safety Eyes: 8 mm.
- Stuffing: Polyester fiberfill (synthetic stuffing).
- Tools: A tapestry needle for sewing and weaving in ends, and scissors.
Abbreviations (US Terms)
- MR: Magic Ring
- sc: Single crochet
- inc: Increase (2 sc in the same stitch)
- dec: Decrease (sc 2 stitches together)
- hdc: Half double crochet
- dc: Double crochet
- ch: Chain
- sl st: Slip stitch
- st(s): Stitch(es)
- BLO: Back loops only (if applicable)
Step-by-Step Instructions
The Head (Black Yarn)
We begin with the head, which serves as the main body of our penguin’s character. Remember to stuff the head firmly as you work to maintain its shape.
- MR, 6 sc (6)
- 6 inc (12)
- (1 sc, inc) * 6 times (18)
- (2 sc, inc) * 6 times (24)
- (3 sc, inc) * 6 times (30)
- (4 sc, inc) * 6 times (36)
- (5 sc, inc) * 6 times (42)
- (6 sc, inc) * 6 times (48)
- (7 sc, inc) * 6 times (54)
- (8 sc, inc) * 6 times (60)
- Rounds 11-20: 60 sc (10 rounds total)
- (8 sc, dec) * 6 times (54)
- (7 sc, dec) * 6 times (48)
- (6 sc, dec) * 6 times (42)
- (5 sc, dec) * 6 times (36)
- (4 sc, dec) * 6 times (30)
- (3 sc, dec) * 6 times (24)
- Finish with a sl st. Fasten off, leaving a long tail for sewing.
The Muzzle (White Yarn)
The muzzle adds that cute, expressive look to our penguin. Work this in a flat or slightly rounded manner as instructed.
- MR, 6 sc (6)
- 6 inc (12)
- (1 sc, inc) * 6 times (18)
- (2 sc, inc) * 6 times (24)
- (3 sc, inc) * 6 times (30)
- (4 sc, inc) * 6 times (36)
- Shaping Row: 6 sc, (inc in hdc) * 5, (inc in dc) * 3, (inc in hdc) * 3, 1 sc, 3 sl st, 1 sc, (inc in hdc) * 3, (inc in dc) * 3, (inc in hdc) * 5.
- Work in rounds: 1 sc in every stitch. However, where you worked the 3 sl st, work 1 sl st.
- End the round with a sl st. Fasten off, leaving a long tail for sewing.
The Beak (Orange Yarn)
- MR, 6 sc (6)
- (1 sc, inc) * 3 times (9)
- 9 sc (3)
- Fasten off, leaving a tail for sewing.
The Body (Black Yarn)
The body is quite plump to give it that “chubby” look. Pay close attention to Row 10 to create the belly bulge.
- MR, 6 sc (6)
- 6 inc (12)
- (1 sc, inc) * 6 times (18)
- (2 sc, inc) * 6 times (24)
- (3 sc, inc) * 6 times (30)
- (4 sc, inc) * 6 times (36)
- (5 sc, inc) * 6 times (42)
- (6 sc, inc) * 6 times (48)
- (7 sc, inc) * 6 times (54)
- Belly Shaping: 20 sc, (1 sc, inc) * 7 times, 19 sc (60)
- Rounds 11-15: 60 sc (5 rounds)
- 20 sc, (1 sc, dec) * 7 times, 18 sc, inc (54)
- Rounds 17-21: 54 sc (5 rounds)
- (7 sc, dec) * 6 times (48)
- (6 sc, dec) * 6 times (42)
- (5 sc, dec) * 6 times (36)
- (4 sc, dec) * 6 times (30)
- Rounds 26-27: 30 sc (2 rounds)
- Fasten off, leaving a long tail for sewing. Stuff firmly.
The Feet (2 Pieces Required)
The feet are worked in two parts: first the toes (orange), and then the foot base (black) connected to those toes.
Part 1: Toes (Orange Yarn)
- MR, 6 sc (6)
- (1 sc, inc) * 3 times (9)
- Rounds 3-4: 9 sc (2 rounds)
Part 2: Connecting the Foot (Black Yarn)
Note: Do not cut the orange yarn on the 3rd toe; you will continue working from it.
- Joining: On the 2nd toe, work 5 sc; on the 3rd toe, work 9 sc; on the 2nd toe, work 4 sc; on the 1st toe, work 9 sc. (This creates a total of 27 stitches).
- Rounds 2-3: 27 sc (2 rounds)
- (7 sc, dec) * 3 times (24)
- (2 sc, dec) * 6 times (18)
- Rounds 6-7: 18 sc (2 rounds)
- 1 sc, 4 ch, skip 4 stitches, 13 sc.
- (1 sc, dec) * 6 times (12). Stuff the toes/foot base.
- 6 dec (6)
- Fasten off and pull tight. Join black yarn to the remaining loops in Round 8 to complete the foot.
- 12 sc
- 12 sc
- (3 sc, inc) * 3 times (15)
- Rounds 4-5: 15 sc (2 rounds), sl st.
- Stuff the foot and fasten off, leaving a long tail.
The Wings (2 Pieces Required – Black Yarn)
- MR, 6 sc (6)
- 6 inc (12)
- 12 sc (3)
- 5 sc, (inc) * 3 times, 7 sc (17)
- 17 sc (5)
- 6 sc, (inc) * 3 times, 7 sc (19)
- Rounds 7-11: 19 sc (5 rounds)
- 6 sc, (dec) * 3 times, 7 sc (16)
- 16 sc (13)
- 5 sc, (dec) * 3 times, 6 sc (14)
- Rounds 15-19: 14 sc (5 rounds)
- Finishing: Fold the wing in half and crochet 7 sc across the opening. Fasten off, leaving a 4-inch tail for sewing.
The Tail (Black Yarn)
- MR, 6 sc (6)
- (1 sc, inc) * 3 times (9)
- Rounds 3-4: 9 sc (2 rounds)
- Fold in half and crochet 4 sc across the opening. Fasten off.
Clothing: Sweater & Bow
The Pink Sweater
- With pink yarn, ch 65 and join in a ring.
- Row 1: 65 sc (65)
- Row 2 (Ribbing): Work 2 dc in every 2nd stitch to create a ribbed effect.
- Rows 3-5: hdc in each stitch, sl st to finish the round.
- Row 6: 2 ch, (15 hdc, dec) * 3 times, 13 hdc.
- Row 7: hdc in each stitch around, sl st (62)
- Row 8: 2 ch, 15 hdc, 7 ch, skip 7 stitches, 24 hdc, 7 ch, skip 7 stitches, 8 hdc.
- Row 9: hdc in each stitch around.
- Row 10: 2 ch, (9 hdc, dec) * 5 times, 6 hdc.
- Row 11: (2 hdc, dec) * 14 times, 1 hdc.
- Pro-tip: Pull the thread tight around the neck at row 11 to create a cinched look.
The Raspberry Bow
- With raspberry yarn, ch 9. Work in rows (turning each row) for approximately 14-16 rows of sc. Join the first and last rows with a sl st.
- Create a band: Ch 4, work in rows until it is long enough to wrap around your bow. Join the ends with a sl st.
Ice Cream Applique
The Cone (Brown Yarn)
- Ch 3, turn, 2 hdc in the first stitch.
- Row 2: 3 hdc.
- Row 3: (inc in hdc, 1 hdc, inc in hdc).
- Row 4: 5 hdc.
- Row 5: (inc in hdc, 3 hdc, inc in hdc).
- Row 6: sc around the edge. Fasten off.
The Scoops (3 Pieces – Light Blue Yarn)
- MR, 6 sc (6)
- Inc 6 (12)
- (1 sc, inc) * 6 times (18)
- 4: sl st. Fasten off.
Finishing
Assembly is where the magic happens! Follow this order for the best results:
- Face: Sew the white muzzle to the head. Insert the 8mm safety eyes into the white area, then sew the orange beak in place.
- Body: Sew the feet, wings, and tail to the body. Stuff the body firmly before closing.
- Clothing: Sew the ice cream applique (cone and blue scoops) onto the sweater first. Then, slide the sweater onto the penguin and sew it to the body.
- Final Touch: Sew the head onto the body. You can pull the sweater yarn tight around the neck to snuggle the head in.
Tips
- Tension is Key: Amigurumi requires tight tension to prevent stuffing from showing through the stitches. If your stitches look loose, try using a smaller hook.
- Safety First: If you are making this for a small child, instead of plastic safety eyes, consider embroidering the eyes with black yarn for extra safety.
- Personalize: Feel free to add “blush” to the cheeks using a little bit of pink eyeshadow or fabric marker, or even add tiny eyelashes with black thread!
- Yarn Ends: Always leave long tails when finishing pieces to make sewing them together much easier.