Adorable Amigurumi Horse Crochet Pattern: Step-by-Step Tutorial
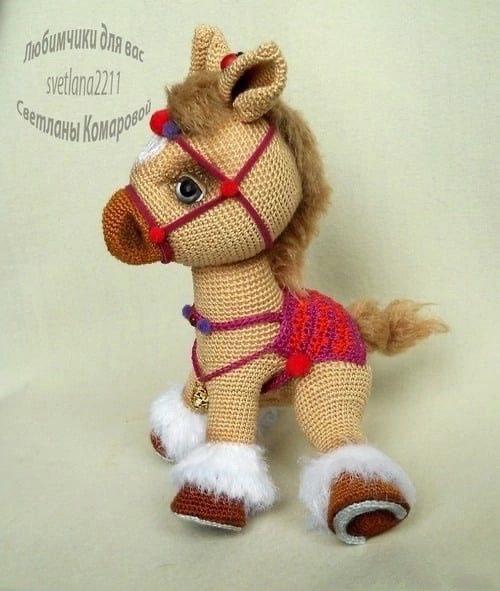
Welcome to this delightful crochet journey! Today, we are going to create a charming, miniature amigurumi horse. This little pony is perfect for children’s gifts, nursery decor, or as a cute addition to your own crochet collection. With its fluffy leg warmers and detailed saddle, this project is a wonderful way to practice shaping and assembling a 3D figure.
While this pattern includes some detailed shaping, it is written in a way that is accessible to intermediate beginners. If you have a basic grasp of amigurumi and know how to work in the round, you are ready to bring this little friend to life!
Materials & Abbreviations
To get the best results, I recommend using a fine cotton yarn to keep the stitches tight and the stuffing hidden.
Supplies Needed:
- Yarn: Mercerized cotton or fine acrylic in Beige (about 1.5 skeins), Brown (less than 1 skein), and a small amount of White. You will also need two colors of your choice for the saddle blanket.
- Furry Yarn: White and Brown faux-fur or “chenille” style yarn for the mane, tail, and leg fluff.
- Crochet Hook: 1.5mm (steel hook recommended).
- Eyes: 10mm safety eyes or half-beads for the pupils.
- Stuffing: High-quality polyester fiberfill.
- Other: Yarn needle, scissors, and optional fabric markers or blush for toning the cheeks and muzzle.
Abbreviations (US Terms):
- MR: Magic Ring
- sc: Single Crochet
- inc: Increase (two sc in one stitch)
- dec: Decrease (sc two stitches together)
- hdc: Half Double Crochet
- dc: Double Crochet
- BLO: Back Loop Only
- ch: Chain
- st(s): Stitch(es)
- sl st: Slip Stitch
Step-by-Step Instructions
The Ears (Make 2)
Using beige yarn, work in continuous spirals.
- R1: MR 6 sc (6)
- R2: sc around (6)
- R3: inc x6 (12)
- R4: sc around (12)
- R5: (1 sc, inc) x6 (18)
- R6: sc around (18)
- R7: (2 sc, inc) x6 (24)
- R8: sc around (24)
- R9: (3 sc, inc) x6 (30)
- R10: sc around (30)
- R11: (4 sc, inc) x6 (36)
- R12-15: sc around (36)
- R16: (4 sc, dec) x6 (30)
- R17: sc around (30)
- R18: sc across the edge to flatten the ear, closing it to 15 sts.
The Head
Start with brown yarn for the muzzle.
- R1: MR 6 sc (6)
- R2: inc x6 (12)
- R3: (1 sc, inc) x6 (18)
- R4: (2 sc, inc) x6 (24)
- R5: (3 sc, inc) x6 (30)
- R6: (4 sc, inc) x6 (36)
- R7: (5 sc, inc) x6 (42)
- R8-12: sc around (42)
- R13: (5 sc, dec) x6 (36)
Switch to beige yarn.
- R14: 11 sc, (4 sc, dec) x2, 11 sc (33)
- R15: BLO (2 sc, inc) x11 (44)
- R16: sc around (44)
- R17: 5 sc, (1 sc, inc) x4, 5 sc, (1 sc, inc) x4, 5 sc, (1 sc, inc) x4, 5 sc (56)
- R18-19: sc around (56)
- R20: 5 sc, (2 sc, inc) x4, 5 sc, (2 sc, inc) x4, 5 sc, (2 sc, inc) x4, 5 sc (68)
- R21-22: sc around (68)
- R23: 5 sc, (3 sc, inc) x4, 1 sc, 2 dec, (3 sc, inc) x4, 2 dec, 1 sc, (3 sc, inc) x4, 5 sc (76)
- R24-25: 25 sc, 2 dec, 19 sc, 2 dec, 24 sc (72)
- R26: 10 sc, (2 sc, inc) x4, 2 sc, 2 dec, (2 sc, inc) x5, 2 sc, 2 dec, 1 sc, (2 sc, inc) x4, 10 sc (81)
- R27-28: 28 sc, dec, 22 sc, dec, 27 sc (79)
- R29-30: sc around (79)
- R31: 10 sc, (dec, 3 sc) x3, 10 sc, (2 sc, inc) x3, 10 sc, (3 sc, dec) x3, 10 sc (76)
- R32: sc around (76)
- R33: 10 sc, (dec, 2 sc) x3, 10 sc, (3 sc, inc) x3, 10 sc, (2 sc, dec) x3, 10 sc (73)
- R34-36: sc around (73)
- R37: 27 sc, 7 dc (working around the first ear to attach it), 5 sc, 7 dc (working around the second ear), 27 sc (73)
- R38: 26 sc, (2 sc, dec) x5, 27 sc (68)
- R39: sc around (68)
- R40: (9 sc, dec) x6, 2 sc (62)
- R41: (8 sc, dec) x6, 2 sc (56)
Continue decreasing evenly until the opening is small, stuff firmly, and close.
The Front Legs (Make 2)
Start with brown yarn for the hooves.
- R1: MR 6 sc (6)
- R2: inc x6 (12)
- R3: (1 sc, inc) x6 (18)
- R4: (2 sc, inc) x6 (24)
- R5: (3 sc, inc) x6 (30)
- R6: (4 sc, inc) x6 (36)
- R7: (5 sc, inc) x6 (42)
- R8: BLO sc around (42)
Tip: Insert a small plastic or cardboard disk here for a sturdy hoof base.
- R9: (5 sc, dec) x6 (36)
- R10: sc around (36)
- R11: 6 sc, (4 sc, dec) x3, 12 sc (33)
- R12: sc around (33)
- R13: 6 sc, (3 sc, dec) x3, 12 sc (30)
- R14: 7 sc, 16 hdc, 7 sc (30)
Switch to white furry yarn.
- R15: sc around (30)
- R16: 6 sc, (2 sc, dec) x3, 12 sc (27)
- R17: 6 sc, (1 sc, dec) x3, 12 sc (24)
- R18-22: sc around (24)
Switch to beige yarn.
- R23-33: sc around (24)
- R34: (3 sc, inc) x6 (30)
- R35-40: sc around (30)
Stuff the leg and leave a long tail for sewing.
The Back Legs (Make 2)
Follow the front leg pattern exactly through R30.
- R31: (3 sc, inc) x6 (30)
- R32: sc around (30)
- R33: (4 sc, inc) x6 (36)
- R34: sc around (36)
- R35: 15 sc, inc x6, 15 sc (42)
- R36-40: sc around (42)
For the Left Leg: R41-43: 5 sc, 21 hdc, 16 sc (42)
For the Right Leg: R41-43: 16 sc, 21 hdc, 5 sc (42)
Stuff and leave a long tail for sewing.
The Body
Using beige yarn, start at the neck.
- Chain 36, join in a circle.
- R1-3: sc around (36)
- R4: (17 sc, inc) x2 (38)
- R5: sc around (38)
- R6: (18 sc, inc) x2 (40)
- R7: sc around (40)
- R8: (19 sc, inc) x2 (42)
- R9: sc around (42)
- R10: (20 sc, inc) x2 (44)
- R11: sc around (44)
- R12: (21 sc, inc) x2 (46)
- R13: sc around (46)
- R14: 5 hdc, 36 sc, 5 hdc (46)
- R15: 3 hdc-inc, 3 hdc, 34 sc, 3 hdc, 3 hdc-inc (52)
- R16: 3 hdc-inc, 3 hdc, 40 sc, 3 hdc, 3 hdc-inc (58)
- R17: 2 hdc-inc, 6 hdc, 42 sc, 6 hdc, 2 hdc-inc (62)
- R18: 2 hdc-inc, 6 hdc, 46 sc, 6 hdc, 2 hdc-inc (66)
- R19: Ch 12, 9 hdc, hdc-dec, 2 hdc, 14 sc, 15 dc (around Front Leg 1), 15 dc (around Front Leg 2), 14 sc, 2 hdc, triple-hdc-dec, 9 hdc, 4 hdc in last st (86)
- R20: 9 hdc, hdc-dec, 4 hdc, 11 sc, 15 sc (leg 1), 15 sc (leg 2), 11 sc, 4 hdc, hdc-dec, 9 hdc, 3 inc (87)
- R21: (Attach Back Legs) 21 dc (around hdc part), 6 dc (around sc part), 30 sc, 6 dc (leg 2 sc part), 21 dc (leg 2 hdc part), 4 sc (87)
- R22: 15 sc (leg 1), 30 sc, 15 sc (leg 2), 4 sc (64)
- R23: (6 sc, dec) x8 (56)
- R24: (5 sc, dec) x8 (48)
Continue decreasing gradually, stuff the body firmly, and close the opening.
Finishing
Final Assembly
- Legs: Carefully trim the white furry yarn on the hooves for a neat “feathered” look.
- Head: Stuff the neck and sew the head securely to the body.
- The White Spot: With white yarn, MR 6 sc, inc x6 (12). R3: 1 hdc, hdc-inc, (1 sc, inc) x2, 1 hdc, (1 sc, inc) x2, 1 inc. Sew this to the horse’s forehead.
Mane, Tail, and Hooves
- Horseshoes: Use gray or white yarn. Ch 25. In 2nd ch from hook: 7 sc, 4 hdc, 2 hdc-inc, 4 hdc, 7 sc. Make 4 and sew to the bottom of each hoof.
- Mane: With brown furry yarn, ch 41. Work 39 sc and 4 sc in the last chain. Return along the other side with 38 sc and 3 sc in the last chain. Work 2-3 more rounds. Sew to the neck.
- Tail: With brown furry yarn, MR 6 sc, inc x6 (12). R3-4: sc around. R5-8: work loop stitches. Cut the loops, brush the yarn out, trim, and tie with a ribbon.
The Saddle Blanket
Using a bright color, ch 27. Work 3 rows of sc (26 sts each). Switch to a second color and create a “jagged” edge by working 1 sc in the current stitch and 1 sc in the stitch of the row below. Follow with a straight sc row. Repeat for 3 stripes. Add straps by chaining the required length (28 for front, 26 for belly, 15 for tail) and sewing them in place.
Tips for a Perfect Pony
- Needle Sculpting: Use a long needle and strong thread to pull the muzzle slightly inward and the eyes closer together. This gives the horse a more realistic, expressive face.
- Toning: Use a tiny bit of pink blush or brown eyeshadow on the cheeks, the tip of the nose, and the edges of the hooves to add depth and character.
- Tight Stitches: Since this is a small toy, ensure your tension is tight. If you see stuffing poking through, try dropping down a hook size.