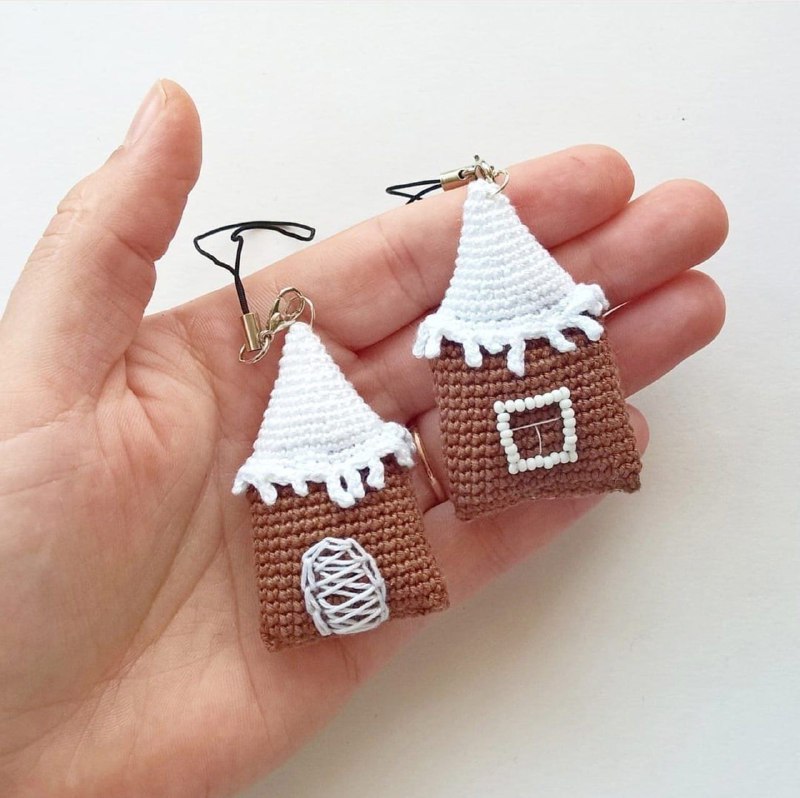
DIY Crochet Gingerbread House Pattern: A Cute Christmas Ornament Tutorial
There is nothing quite like the cozy, magical feeling of the holiday season. As the air gets crisp and the lights begin to twinkle, it is the perfect time to grab your favorite crochet hook and settle in for a heartwarming project. If you are looking for a way to add a touch of sweetness to your holiday decor, look no further! This adorable Crochet Gingerbread House pattern is the perfect little project to whip up.
This miniature gingerbread house is incredibly versatile. Once you finish your little creation, you can decide its destiny: turn it into a whimsical Christmas tree ornament, a charming keychain for your holiday bag, or even a festive brooch to pin onto your winter coat. Because it is worked in rounds and uses basic amigurumi techniques, it is a wonderful project for beginners looking to practice their tension and shaping skills.
In this tutorial, I will walk you through every single stitch, from the warm brown “cookie” base to the snowy, dripping white icing on the roof. Let’s get started and bake something wonderful with yarn!
Materials & Abbreviations
Before we dive into the stitches, let’s make sure you have everything you need on your crafting table. Since this is a small project, you won’t need a massive amount of supplies, but using high-quality yarn will make a huge difference in the finished look.
What You Will Need
- Yarn: Medium weight (worsted weight) cotton or acrylic yarn in two colors: a warm “gingerbread” brown and a bright “icing” white. You will only need a few yards of each.
- Crochet Hook: A 3.5mm (E) or 4.0mm (G) hook is recommended to keep your stitches tight so the stuffing doesn’t show through.
- Stuffing: A small amount of polyester fiberfill to give your house its shape.
- Tapestry Needle: A blunt-tipped needle for sewing the base closed and embroidering details.
- Scissors: To trim your yarn ends.
- Optional Extras: A keychain ring, an ornament loop, or a brooch pin depending on how you want to use your house.
- Embroidery Thread: A bit of white or brown thread if you want extra detail for the windows and doors.
Abbreviations (US Terms)
Please note that this pattern uses standard US crochet terminology. If you are used to UK terms, please be sure to convert your stitches accordingly!
- ch: chain
- sc: single crochet
- sl st: slip stitch
- dec: decrease
- BLO: back loop only
- FLO: front loop only
- st(s): stitch(es)
Step-by-Step Instructions
We will work this project in continuous rounds. It is highly recommended to use a stitch marker to keep track of the beginning of each round so you don’t lose your place.
Part 1: The Gingerbread Base
We begin by creating the sturdy, rectangular body of the house. We will start with our brown yarn to represent the baked cookie.
Foundation: Start with a foundation chain of 30 ch.
Rounds 1-15: Work 30 sc in each round using the brown yarn. (Note: On your first round, you will be working along the foundation chain. Ensure you work into the 2nd chain from your hook and continue around the chain to create a loop).
Round 16: Switch to your white yarn. Work 30 sc in the round. This creates a thin layer of “icing” at the top of the walls.
Round 17: Still using the white yarn, work 30 sc, but work them into the back loops only (BLO). Working in the back loops here is crucial, as it creates a distinct ridge on the front of the house where we will later attach our snowy roof trim.
Part 2: Shaping the Roof
Now, we will begin tapering the top of the house to create the pointed roof shape. We will continue using the white yarn for these rounds.
- Round 18: [1 dec, 8 sc] repeat 3 times. (You should now have 27 stitches).
- Round 19: [1 dec, 7 sc] repeat 3 times. (24 stitches).
- Round 20: [1 dec, 6 sc] repeat 3 times. (21 stitches).
- Round 21: [1 dec, 5 sc] repeat 3 times. (18 stitches).
- Round 22: [1 dec, 4 sc] repeat 3 times. (15 stitches).
- Round 23: [1 dec, 3 sc] repeat 3 times. (12 stitches).
- Round 24: [1 dec, 2 sc] repeat 3 times. (9 stitches).
- Round 25: [1 dec, 1 sc] repeat 3 times. (6 stitches).
After completing Round 25, pull your yarn tail tight to close the hole at the top of the roof. Leave a long tail for sewing later.
Part 3: The Snowy Icing Trim
This is where the magic happens! We are going to go back to the ridge we created in Round 17. We will work into the front loops only (FLO) to create a decorative, dripping snow effect.
Round 1: Using white yarn, work in the front loops: (9 sc, 1 sl st) repeat 3 times. This should bring you back to a total of 30 stitches.
Round 2 (The Icicle Round): This round creates the “drip” look. We will alternate between single crochet stitches and “icicles” made of chains.
How to make an icicle:
- Large Icicle: Chain 4. From the 2nd chain from your hook, work 1 sl st into the next chain. This creates a long, beautiful drip.
- Small Icicle: Chain 2 or 3. From the 2nd chain from your hook, work 1 sl st into the next chain.
The Sequence: Work 1 sc, then a large icicle. Work 2 sc, then a large icicle. From there, continue the pattern by alternating the number of sc stitches between icicles (e.g., 3 sc, icicle; 4 sc, icicle; etc.) until you have completed the round. The goal is to create a rhythmic, uneven “melting snow” look around the edge.
Finishing
Now that your house is crocheted, it is time to bring it to life!
Stuffing and Closing
Before you sew the bottom shut, take your tapestry needle and your polyester fiberfill. Gently stuff the gingerbread house through the bottom opening. Be careful not to overstuff it; you want it to maintain its rectangular base shape without bulging too much. Once it is snugly filled, use your needle and the brown yarn tail to sew the bottom opening closed with tight, invisible stitches.
Securing the Trim
The icicles might want to flop around a bit. Use a tapestry needle and a little bit of white yarn to make a few tiny stitches at the base of each icicle to secure them to the house. This ensures they stay looking like perfect little frozen drips.
Adding Details
This is your chance to be creative! Using your tapestry needle and either white or brown yarn (or embroidery thread), embroider a small rectangular door on the front. You can also add a small square window. For an extra “sweet” look, use white yarn to create a “frosting” border around the door or window, just like real gingerbread decorating!
Final Assembly
Depending on your chosen use:
- For an Ornament: Attach a small loop of thread or a metal ornament hook to the very top point of the roof.
- For a Keychain: Use a jump ring to attach a keychain ring through the top of the roof.
- For a Brooch: Carefully sew a brooch pin to the back of the house.
Tips for Success
To ensure your gingerbread house looks professional and polished, keep these tips in mind:
- Tight Tension is Key: When working amigurumi, try to keep your tension slightly tighter than usual. This prevents the white stuffing from peeking through the gaps in your brown stitches.
- Use Stitch Markers: Because you are working in rounds, it is very easy to lose count. Always mark your first stitch of every round.
- Don’t Fear the Icicles: If your icicles look a little uneven, don’t worry! The “melting snow” look is supposed to be organic and slightly irregular. That imperfection is what makes it look charming and handmade.
- Play with Colors: While brown and white are classic, you can get creative! Try a red and white version for a candy cane theme, or even a pink and white version for a “strawberry” gingerbread house.
Happy crocheting, and may your holiday season be as sweet as this little gingerbread house!