Crochet Doll Pattern Tutorial: How to Make a Cute Amigurumi Girl
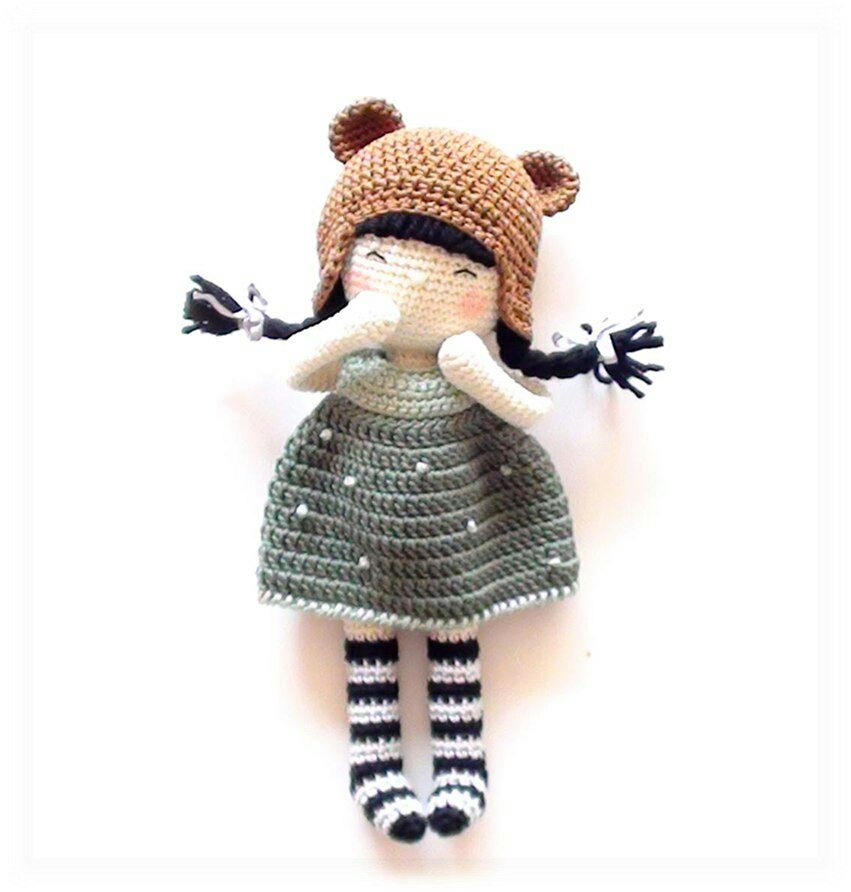
If you are looking for your next intermediate crochet project, this adorable amigurumi doll is the perfect choice. This little girl, featuring a cozy beanie, a charming olive green dress, and even tiny striped socks, is a wonderful project for anyone looking to practice shaping, color changes, and detailed finishing techniques. Once completed, she stands approximately 10 inches tall, making her a lovely nursery decoration or a sweet gift for a loved one.
In this comprehensive tutorial, we will walk you through every step of the process, from crafting the tiny limbs to assembling the final, blushing character. Grab your hook and some cozy yarn, and let’s start creating!
Materials and Abbreviations
To ensure your doll turns out looking professional and holds its shape, it is important to use the right materials. For this project, we recommend using cotton yarn, as it provides excellent stitch definition and prevents the stuffing from showing through.
Required Materials
- Yarn: Cotton yarn in the following colors:
- Beige (for skin, body, head, and arms)
- Black (for socks and hair)
- Gray (for socks)
- Olive Green (for the dress)
- Dark Olive Green (for dress accents)
- Brown (for the beanie)
- Crochet Hook: 3.00 mm (or a size appropriate for your yarn weight)
- Stuffing: Polyester fiberfill
- Eyes: Safety eyes or embroidery thread for eyes
- Tools: Yarn needle, sewing needle, scissors, and a stitch marker
Crochet Abbreviations
This pattern uses standard US crochet terms. Please review these abbreviations before you begin:
- mr: magic ring
- sc: single crochet
- inc: increase (two single crochets in the same stitch)
- dec: invisible decrease (two stitches decreased together)
- dc: double crochet
- hdc: half double crochet
- ch: chain
- sl st: slip stitch
- st(s): stitch(es)
- rd(s): round(s)
- BL(O): back loop only
- CC: color change
Note: Unless otherwise instructed, work in a continuous spiral and do not join rounds. Use a stitch marker to keep track of the beginning of each round. Always work into both loops of the stitch unless the pattern specifies “back loop only.”
Step-by-Step Instructions
Part 1: The Legs and Striped Socks
The legs are worked in rounds, but we will transition to flat rows to create the foot shape. You will be changing colors frequently to create the striped sock effect.
Starting with Black Yarn:
- Round 1: 6 sc in a magic ring. Join with a sl st.
- Round 2: Ch 1. *1 sc, 1 inc* repeat 3 times = 9 sc. Join with a sl st.
- Round 3: Change to Gray yarn. Ch 1. *2 sc, 1 inc* repeat 3 times = 12 sc. Join with a sl st.
- Round 4: 1 sc in each stitch around = 12 sc. Join with a sl st. Change to Black yarn.
- Round 5: Ch 1. 1 sc in each stitch around = 12 sc. Join with a sl st.
- Round 6: Ch 1. 1 sc in each stitch around = 12 sc. Join with a sl st. Change to Gray yarn.
- Round 7: Ch 1. 1 sc in each stitch around = 12 sc. Join with a sl st.
- Round 8: Ch 1. 1 sc in each stitch around = 12 sc. Join with a sl st. Change to Black yarn.
Creating the Foot (Flat Work):
- Round 9: Ch 1, 6 sc, turn your work.
- Round 10: Ch 1, 6 sc, turn your work.
- Round 11: Ch 1, 6 sc. Stop turning your work and join the yarn to continue in rounds.
Continuing the Leg:
- Rounds 12-13: Ch 1, 1 sc in each stitch around = 12 sc. Join with a sl st. Change to Gray yarn.
- Rounds 14-15: Ch 1, 1 sc in each stitch around = 12 sc. Join with a sl st. Change to Black yarn.
- Rounds 16-17: Ch 1, 1 sc in each stitch around = 12 sc. Join with a sl st. Change to Gray yarn.
- Rounds 18-19: Ch 1, 1 sc in each stitch around = 12 sc. Join with a sl st. Change to Black yarn.
- Rounds 20-21: Ch 1, 1 sc in each stitch around = 12 sc. Join with a sl st. Change to Gray yarn.
- Rounds 22-23: Ch 1, 1 sc in each stitch around = 12 sc. Join with a sl st. Change to Black yarn.
- Fasten off and weave in your ends.
Repeat these exact steps to create the second leg.
Part 2: The Body
We will now join the legs together to form the body using Beige yarn. Stuff the body as you go.
Connecting the Legs:
After completing the second leg, repeat rounds 24-35 from the leg section (working in the back loops for round 24 and both loops for the rest). On round 35, make enough single crochets so the two legs are facing each other, but do not cut the yarn.
Starting the Body with Beige Yarn:
- Make ch 4, and join to the right leg after skipping 2 stitches from the slip stitch you made when connecting.
- Round 36: 12 sc, 4 sc in the next 4 ch, 12 sc, 4 sc in the next 4 ch = 32 sc.
- Rounds 37-47: 1 sc in each stitch around = 32 sc.
- Round 48: *6 sc, 1 dec* repeat 4 times = 28 sc.
- Rounds 49-50: 1 sc in each stitch around = 28 sc.
- Round 51: *5 sc, 1 dec* repeat 4 times = 24 sc.
- Rounds 52-53: 1 sc in each stitch around = 24 sc.
- Round 54: *4 sc, 1 dec* repeat 4 times = 20 sc.
- Round 55: 1 sc in each stitch around = 20 sc.
- Round 56: *3 sc, 1 dec* repeat 4 times = 16 sc.
- Round 57: *2 sc, 1 dec* repeat 4 times = 12 sc.
- Round 58: 1 sc in each stitch around = 12 sc.
Stuff the remaining body with fiberfill and continue with the head without cutting the yarn.
Part 3: The Head and Face
The head is worked in Beige yarn. This is where your doll really starts to come to life!
Working the Head:
- Round 1: *inc* repeat 12 times = 24 sc.
- Round 2: *2 sc, 1 inc* repeat 8 times = 32 sc.
- Round 3: *3 sc, 1 inc* repeat 8 times = 40 sc.
- Round 4: *4 sc, 1 inc* repeat 8 times = 48 sc.
- Rounds 5-17: 1 sc in each stitch around = 48 sc.
Adding Personality:
At this point, insert your safety eyes (or embroider them) at rounds 10-11, leaving about 5 holes of space between them. To add a nose, sew one or two stitches one round below the eyes. For a mouth, sew one stitch four rounds below the nose.
Hair (Black Yarn):
- Rounds 18-19: 1 sc in each stitch around = 48 sc.
- Cut several strands of black yarn (about 12 inches long). Fold a strand in half, insert your hook under a stitch, grab the center, and pull a loop through. Pull the tails through the loop to secure. Attach these strands to the head at round 18.
Finishing the Head:
- Round 20: *4 sc, 1 dec* repeat 8 times = 40 sc.
- Round 21: *3 sc, 1 dec* repeat 8 times = 32 sc.
- Round 22: *2 sc, 1 dec* repeat 8 times = 24 sc.
- Round 23: *1 sc, 1 dec* repeat 8 times = 16 sc.
- Round 24: *dec* repeat 8 times = 8 sc. Join with a sl st, break yarn, and close the hole.
Part 4: The Arms
Make two arms using Beige yarn.
- Round 1: 4 sc in a magic ring = 4 sc.
- Round 2: *inc* repeat 4 times = 8 sc.
- Round 3: *1 sc, 1 inc* repeat 4 times = 12 sc.
- Round 4: 5 sc, 1 bobble stitch, 6 sc = 12 sc.
- Round 5: 4 sc, 1 dec, 4 sc, 1 dec = 10 sc.
- Round 6: 4 sc, 1 dec, 4 sc = 9 sc.
Stuff only the hand portion with fiberfill. Continue with 1 sc in each stitch around for rounds 7-26. Press the open ends together and make 4 sc across the top to close. Fasten off, leaving a long tail for sewing.
Part 5: The Cute Olive Green Dress
The dress is a beautiful layered piece. We will start with Olive Green and add Dark Olive details.
Base of the Dress (Olive Green):
- Ch 25, turn.
- Starting in the 2nd chain from the hook, lsc in each chain = 24 sc. Ch 1 and turn.
- *2 sc, 1 inc* repeat 8 times = 32 sc. Ch 1 and turn.
- *3 sc, 1 inc* repeat 8 times = 40 sc. Ch 1 and turn.
- 5 sc, 6 ch (skip 6 sc), 18 sc, 6 ch (skip 6 sc), 5 sc = 40 sc. Ch 1 and turn.
- 1 sc in each stitch around = 40 sc. Ch 1 and turn.
Adding Detail (Dark Olive Green):
- Round 7: Work in front loops only, 1 dc in each stitch around = 40 dc. Ch 2 and turn.
- Round 8: Work in both loops, 1 dc in each stitch around = 40 dc. Join with a sl st. Ch 2.
- Round 9: *1 dc, 1 dc-inc* repeat 20 times = 60 dc. Join with a sl st. Ch 2.
- Rounds 10-16: 1 dc in each stitch around = 60 dc. Join with a sl st.
Finishing the Dress:
Switch back to Olive Green. Round 17: Work one reverse crochet stitch in each stitch around. This creates a lovely rounded edge. Fasten off and weave in ends.
Optional Decoration: Use your needle to sew small French knots onto the dress for a polka-dot effect.
Part 6: Hair and Beanie
To complete her look, we will make a cozy brown beanie with little ears.
The Beanie (Brown Yarn):
- Round 1: 8 hdc in a magic ring. Join with a sl st.
- Round 2: *hdc-inc* repeat 8 times = 16 hdc.
- Round 3: *1 hdc, 1 hdc-inc* repeat 8 times = 24 hdc.
- Round 4: *2 hdc, 1 hdc-inc* repeat 8 times = 32 hdc.
- Round 5: *3 hdc, 1 hdc-inc* repeat 8 times = 40 hdc.
- Round 6: *4 hdc, 1 hdc-inc* repeat 8 times = 48 hdc.
- Rounds 7-12: 1 hdc in each stitch around = 48 hdc.
- Round 13: 1 sc in each stitch around = 48 sc.
Earflaps:
First Earflap: Ch 1, skip one stitch, 10 sc, turn. Repeat decreasing rows (9 sc, 8 sc, 7 sc, 6 sc, 5 sc) until finished. Fasten off.
Second Earflap: Skip 14 stitches from the beanie and repeat the earflap instructions. Secure the edges by working one stitch sideways into the earflaps and the beanie base.
Beanie Ears: Make two small circles. Start with 6 sc in a magic ring. Increase to 12 sc, then to 18 sc. Work 4 rounds of 18 sc. Flatten the top and sew them to the beanie.
Finishing and Assembly
Now comes the most rewarding part: putting all your hard work together!
- Sew the arms: Attach the arms to the body at round 56.
- Attach the ears: Sew the ears onto the beanie.
- Attach the beanie: Place the beanie on the head. You may want to sew the hair bangs (made from your black yarn strands) to the forehead so they peek out from under the beanie. Finally, sew the beanie securely to the head.
- Braids: Take two pieces of black yarn, braid them, and tie them with small ribbons to create Elsie’s hair braids.
- Final Touch: Use a little bit of makeup blush on her cheeks for an extra touch of sweetness!
Pro Tips for a Perfect Doll
- Tight Tension is Key: When making amigurumi, try to use a crochet hook that is slightly smaller than what the yarn label suggests. This ensures your stitches are tight enough so that the stuffing doesn’t peek through the holes.
- Seamless Transitions: When changing colors, try to do so in the last pull of the previous color to make the transition look smoother.
- Eye Placement: Take your time measuring the distance between the eyes. This is the most important part of giving your doll her personality!
- Customization: Don’t be afraid to experiment! You can change the color of her dress, her hair, or even her beanie to make your version of Elsie truly unique.