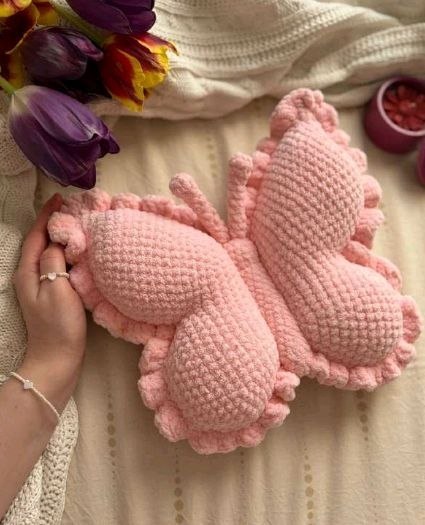
Crochet Butterfly Pillow Pattern: A Cozy DIY Tutorial
Are you looking for a unique, whimsical way to brighten up your home decor? A butterfly pillow is the perfect project for anyone wanting to add a touch of nature-inspired charm to a nursery, bedroom, or living room. This project uses soft, velvet-style yarn to create a chunky, high-texture pillow that is as cuddly as it is beautiful. Whether you are looking for a unique gift or a statement piece for your own sofa, this crochet butterfly pillow is a delightful and rewarding project to tackle.
In this tutorial, we will walk through the process of creating each component—from the large, scalloped wings to the soft body and tiny antennae—and finally assembling them into a stunning, two-sided decorative pillow. Grab your favorite crochet hook and let’s get started!
Materials and Abbreviations
To ensure your pillow turns out the correct size and has that signature soft feel, please use the materials listed below. For this pattern, the finished pillow will be approximately 11 inches tall and 14.5 inches wide.
Materials Needed
- Main Yarn: Velvet or chenille-style yarn (approximately 3 skeins of 100g/74 yards each). Suggested colors: Yellow #13 or Beige #62.
- Assembly Yarn: A matching cotton or acrylic yarn (approximately 1 skein of 50g/175 yards). This will be used to sew the pieces together.
- Stuffing: High-quality polyester fiberfill.
- Crochet Hooks: 5.0 mm (H) and 3.5 mm (E).
- Tools: Scissors, a tapestry needle with a large eye, safety pins, and a piece of contrast yarn to use as a stitch marker.
Crochet Abbreviations (US Terms)
- ch: chain
- sc: single crochet
- dc: double crochet
- sl st: slip stitch
- inc: increase (2 stitches in one stitch)
- dec: decrease (2 stitches worked together as one)
- st(s): stitch(es)
- […]*n: repeat the sequence inside the brackets n times
Step-by-Step Instructions
Creating the Wing Bases
We will begin by creating the foundation for the wings using the main velvet yarn and a 5.0 mm hook. Work in continuous rounds unless otherwise noted.
Foundation: Chain 36. Join with a slip stitch to the first chain to form a ring, making sure the chain is not twisted.
Round 1: Work 36 sc into the ring (36). Place your stitch marker in the first stitch.
Round 2: (5 sc, inc) repeat 6 times (42).
Round 3: 3 sc, inc, (6 sc, inc) repeat 5 times, 3 sc (48).
Round 4: (7 sc, inc) repeat 6 times (54).
Round 5: 54 sc (54).
Round 6: 4 sc, inc, (8 sc, inc) repeat 5 times, 4 sc (60).
Round 7: (9 sc, inc) repeat 6 times (66).
Round 8: 5 sc, inc, (10 sc, inc) repeat 5 times, 5 sc (72).
Do not cut the yarn yet. We will use this base to start the wings.
Crafting the Left Wing
The Top Part of the Left Wing
Round 9: 16 sc, inc, turn. Counting from your marker, work 17 stitches to the right side, then 16 sc, inc (36).
Round 10: 16 sc, 3 inc, 17 sc (39).
Round 11: 39 sc (39).
Round 12: 16 sc, dec, (1 sc, dec) repeat 2 times, 15 sc (36).
Round 13: 36 sc (36).
Round 14: 1 sc, 2 inc, 14 sc, 2 dec, 15 sc (36).
Round 15: 36 sc (36).
Round 16: 1 sc, inc, 16 sc, dec, 16 sc (36).
Round 17: (1 sc, inc) repeat 2 times, 13 sc, 3 dec, 13 sc (35).
Round 18: inc, 1 sc, inc, 4 sc, dec, (1 sc, dec) repeat 8 times, 2 sc (28).
Round 19: 2 sc, 2 inc, 3 sc, dec, (1 sc, dec) repeat 6 times, 1 sc (23).
Round 20: 2 sc, inc, 1 sc, inc, 2 sc, dec, (1 sc, dec) repeat 4 times, 2 sc (20).
Work the necessary amount of sc until you reach the edge of the wing. Fasten off, leaving a tail for sewing. Mark this piece as the “Left Wing” on the back side.
The Bottom Part of the Left Wing
Position the piece so the top wing is to your right. Join the yarn at the edge and make 1 ch.
Round 9: Starting from the chain, 38 sc + 2 sc in the junction of the wings (40). Place a marker.
Round 10: 2 dec, 12 sc, 3 dec, 14 sc, 2 dec (33).
Round 11: 15 sc, dec, 16 sc (32).
Round 12: (1 sc, dec) repeat 2 times, 6 sc, dec, (1 sc, dec) repeat 2 times, 10 sc, dec (26).
Round 13: 26 sc (26).
Round 14: dec, 7 sc, dec, (1 sc, dec) repeat 2 times, 3 sc, (dec, 1 sc) repeat 2 times (20).
Round 15: (1 sc, dec) repeat 2 times, 2 sc, (dec, 1 sc) repeat 4 times (14). Sl st to close. Fasten off and weave in the ends.
Crafting the Right Wing
To make the right wing, follow the same instructions used for the Wing Base and the Top Part of the Left Wing. However, there are slight adjustments in the final rounds of the top part:
Round 14: inc, 1 sc, inc, 14 sc, 2 dec, 15 sc (36).
Round 15: 36 sc (36).
Round 16: 2 sc, inc, 16 sc, dec, 15 sc (36).
Round 17: 2 sc, inc, 1 sc, inc, 12 sc, 3 dec, 13 sc (35).
Round 18: (1 sc, inc) repeat 2 times, 4 sc, dec, (1 sc, dec) repeat 8 times, 1 sc (28).
Round 19: 3 sc, 2 inc, 3 sc, dec, (1 sc, dec) repeat 6 times (23).
Round 20: (2 sc, inc) repeat 2 times, 2 sc, dec, (1 sc, dec) repeat 4 times, 1 sc (20).
Work the necessary amount of sc until the edge, sl st to close, and fasten off.
The Bottom Part of the Right Wing: Follow the same instructions used for the bottom part of the Left Wing, with this slight change in Round 12: 1 sc, dec, 8 sc, dec, (1 sc, dec) repeat 2 times, 8 sc, dec, 1 sc, dec (26).
The Butterfly Body and Antennae
The Body
Use a 3.5 mm hook and the main yarn. Fill with stuffing as you work.
Foundation: Chain 2.
Round 1: 8 sc in the second ch from hook (8).
Round 2: (3 sc, inc) repeat 2 times (10).
Round 3: 2 sc, inc, 4 sc, inc, 2 sc (12).
Round 4: (5 sc, inc) repeat 2 times (14).
Rounds 5-20: 14 sc (14).
Rounds 21-22: 14 sl st (14).
Round 23: (6 sc, inc) repeat 2 times (16).
Rounds 24-26: 16 sc (16).
Round 27: (2 sc, dec) repeat 4 times (12). Sl st to close. Pull the opening tight, fasten off, and hide the tail.
The Antennae (Make 2)
Use a 3.5 mm hook and the main yarn. Do not stuff.
Foundation: Chain 2.
Round 1: 7 sc in the second ch from hook (7).
Round 2: 7 sc (7).
Round 3: 2 sc, dec, 1 sc, dec (5).
Rounds 4-12: 5 sc (5).
Sl st to close. Leave a long tail for sewing.
Adding the Decorative Ruffles
The ruffles give the wings their beautiful, wavy edge. You will work these around the edges of your finished wings.
Ruffles for the Left Wing
Join the yarn under the first row of the left wing and make 1 ch. Work following the pattern below:
Work around the edge using slip stitches for the bottom part. On the sides, work 6 sc for the edges. For the upper edges, skip the first row and continue with slip stitches until you reach the open part. Work 9 sc across the edges. Then, turn and make 3 ch.
The Scallop Pattern: (3 dc in one stitch, 2 dc in one stitch). At the very tip of the wing, work (3 dc in one stitch, 3 ch, sl st in the same stitch). Continue the pattern *(3 dc in one stitch, 2 dc in one stitch)* until you reach the wing junction. Work 2 sc at the junction, then continue the pattern to the end.
Ruffles for the Right Wing
Repeat the same process for the right wing. Ensure you align the ruffles with the shape of the wing for a professional look.
Finishing Touches
Assembly
Now it is time to bring your butterfly to life! Use your matching assembly yarn and a tapestry needle.
- Stuff the Right Wing: Lightly stuff the right wing (the one without the marker) so it remains somewhat flat.
- Pin the Body: Use safety pins to mark a straight line down the butterfly body. The bottom point should be above the third row, and the top point should be below the third row (counting from the head).
- Sew the First Wing: Using your assembly yarn, sew the front part of the right wing to the body along your pinned line.
- Stuff and Finish the Wing: While sewing, add more stuffing to the wing to ensure it is full but stays flat against the body. Once the wing is attached, mark a line 2 stitches away from the seam and continue sewing the rest of the wing.
- Attach the Second Wing: Repeat the process for the left wing. Be careful to align the top and bottom edges of both wings perfectly so the butterfly looks symmetrical.
- Attach Antennae: Secure the antennae to the top of the head using safety pins first to find the perfect spot, then sew them firmly in place.
Expert Tips for Success
- Tension is Key: When working with velvet yarn, try to keep your tension even. If the yarn is too loose, the stuffing might show through.
- Use Markers: Always use a stitch marker when working in rounds. It is very easy to lose your place when working with textured yarn.
- The “Ruffle” Trick: If you find the double crochets are too tight to fit into the stitches during the ruffling process, you can substitute two double crochets with one single crochet to ease the tension.
- Symmetry: When assembling, always use pins. It is much easier to move a pin than to unpick stitches if the wings are crooked!