Easy Crochet Amigurumi Bee Pattern: A Beginner-Friendly Tutorial
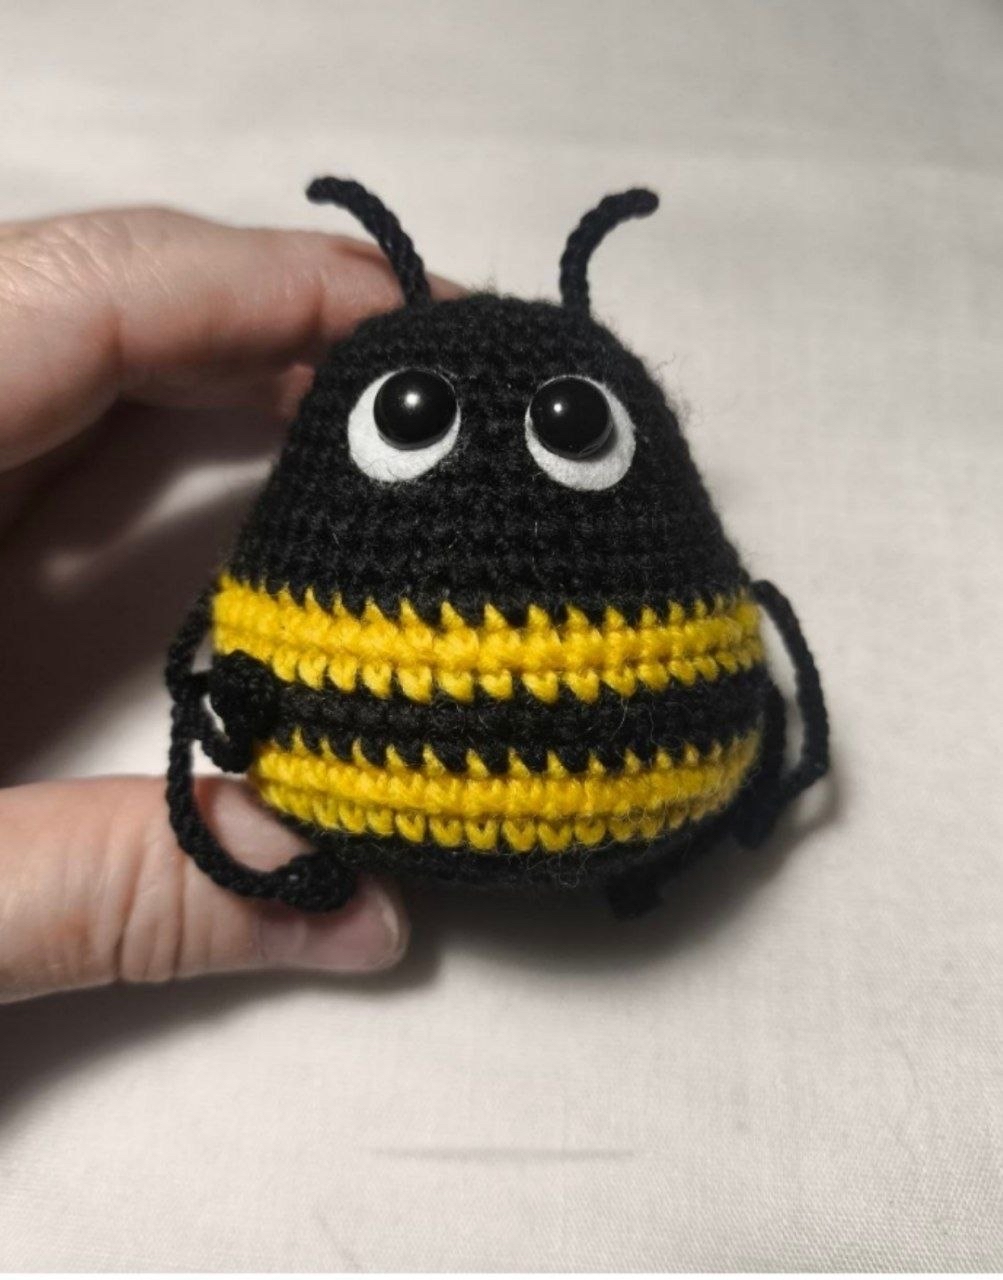
Are you looking for a quick, adorable crochet project that you can whip up in a single afternoon? Whether you want to make a tiny bumblebee to decorate a nursery, a little forest sprite for a terrarium, or a cute desk buddy, this amigurumi pattern is the perfect project for you! This pattern creates a round, chubby, and irresistibly cute creature that is much easier to make than it looks.
What makes this pattern so special is its versatility. While we are focusing on the classic black and yellow bee design, you can easily swap the colors to create little green frogs, forest bugs, or even colorful monsters. This tutorial will guide you through every step, from the first magic ring to those final adorable details.
Materials & Abbreviations
Before we pick up our hooks, let’s make sure you have everything you need. This project is perfect for using up your scrap yarn!
Materials Needed:
- Yarn: Medium weight (Size 4) cotton or acrylic yarn. For the classic bee, you will need Black, Yellow, and White. If you want to make the green forest creatures shown in the photos, grab some Dark Green, White, and Grey.
- Crochet Hook: A hook appropriate for your yarn weight (typically 3.5mm or 4.0mm) to ensure your stitches are tight enough to prevent stuffing from showing through.
- Eyes: 6mm or 8mm plastic safety eyes, or you can crochet white and black circles for a flat look.
- Stuffing: Polyester fiberfill.
- Tools: A tapestry needle for sewing, scissors, and a stitch marker (essential for working in the round!).
Abbreviations (US Terms):
- MR: Magic Ring (or Magic Circle)
- sc: Single crochet
- inc: Increase (2 sc in the same stitch)
- dec: Decrease (sc 2 stitches together)
- st: Stitch
- R: Round
Step-by-Step Instructions
This project is worked in continuous rounds. Do not join at the end of each round; instead, use a stitch marker to keep track of your starting point.
The Body
We will begin with Black yarn to create the top of the head.
- R1: 7 sc in a MR (7)
- R2: 7 inc (14)
- R3: (1 sc, inc) x 7 (21)
- R4: (2 sc, inc) x 7 (28)
- R5: (3 sc, inc) x 7 (35)
- R6: (4 sc, inc) x 7 (42)
- R7: 4 sc, inc, 3 sc, inc, 24 sc, inc, 3 sc, inc, 4 sc (46)
Pro-Tip: Round 7 is what gives our little friend that wide, chubby base. If you want an even wider bottom, you can replace the 4 sc sections with 7 sc before performing the increases.
Now, let’s add the stripes! Switch to Yellow yarn.
- R8-R9: Yellow, 2 rounds (46)
Switch back to Black yarn.
- R10-R11: Black, 2 rounds (46)
Switch back to Yellow yarn for the final stripe.
- R12-R13: Yellow, 2 rounds (46)
Now we begin the shaping process to close the body. Switch back to Black yarn.
- R14: 4 sc, dec, 3 sc, dec, 24 sc, dec, 3 sc, dec, 4 sc (42)
- R15: (5 sc, dec) x 6 (36)
- R16: 2 sc, (dec, 4 sc) x 5, 2 sc (30)
For the final shaping, work the following rounds without increasing or decreasing (straight rounds) to create the height, then begin your decreases.
- R17-R19: Work 3 rounds even in Black (30)
- R20: (dec, 3 sc) x 6 (24)
- R21: 1 sc, (dec, 2 sc) x 6, 1 sc (18)
- R22: (1 sc, dec) x 6 (12)
- R23: 6 dec (6)
Fasten off, leaving a long tail for sewing. Use your tapestry needle to pull the stitches tight to close the hole completely.
Creating the Shape (The “Bottom” Detail)
To get that adorable, slightly indented bottom seen in the photos, you’ll need to do a little bit of “sculpting.” Take your tapestry needle and a piece of black yarn. Thread it through the magic ring at the very beginning and pull it through toward the end of the yellow stripe (between rounds 13 and 14). Pull it slightly to create a subtle indentation. This adds character and makes the bottom look more rounded and “puffy.”
Limbs, Antennae, and Wings
These parts are very simple and are worked using just chains.
For the Bee Version:
- Antennae: Using black yarn, attach to the top of the head. Chain 8-10, then slip stitch back down the chain to make it sturdy. Repeat twice.
- Legs/Arms: Attach black yarn to the sides. Chain 10-12, then slip stitch back. You can make these slightly longer or shorter depending on how “wiggly” you want your bee to look.
For the Green Sprite/Frog Version:
- Wings: Using white yarn, create two small flat circles or ovals. You can do this by making a small magic ring and working 6 sc into it, then a round of increases.
- Nose: Using grey yarn, create a tiny small ball or a small flattened oval to sew onto the face.
- Legs: Use thin black or dark green yarn to chain and slip stitch, similar to the bee antennae.
Finishing
Now comes the most important part: the face! The eyes are what really bring these characters to life.
Assembly Guide:
- Stuffing: Before you close the body completely at Round 23, stuff the body firmly with polyester fiberfill. Make sure you stuff the bottom area well to help maintain that rounded shape.
- Eyes: Insert your safety eyes between rounds 4 and 6. For the classic look, place them slightly wide apart. If you are using felt or crochet circles for eyes, sew them on using black and white yarn.
- Wings/Nose: If you made the green version, sew the white wings to the back and the grey nose to the front.
- Limbs: Carefully sew the antennae to the top of the head and the legs to the sides of the body.
Tips for Success
Crocheting amigurumi can be a bit tricky for absolute beginners, so here are a few tips to make your experience smoother:
- Use Stitch Markers: Since you are working in a continuous spiral, it is incredibly easy to lose your place. Always use a marker to indicate the first stitch of every round.
- Tension is Key: Try to keep your tension even and relatively tight. This ensures that your stuffing stays hidden inside the toy.
- Counting Stitches: Especially during the increase and decrease rounds, count your stitches at the end of every round to ensure you are on track.
- Size Adjustments: This pattern will result in a small creature, roughly 2 to 3 inches tall. If you want a larger version, simply use a thicker yarn and a larger hook!
- Color Changes: To get clean color changes, finish the last stitch of the old color in the last stitch of the round, then join the new color in the next stitch.
Happy crocheting! Once you finish your first little buddy, you’ll find yourself wanting to make a whole army of them!