Crochet Star Girl Doll Pattern: A Whimsical Amigurumi Tutorial
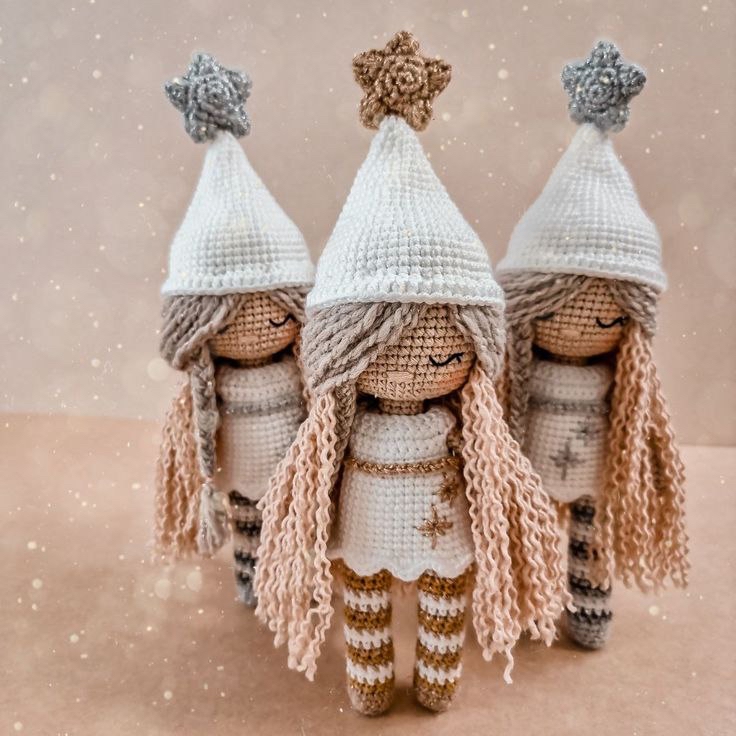
Are you looking for a magical project to brighten up your crochet collection? This Star Girl doll is a celestial dream come true! With her dreamy mohair hair and twinkling star accessory, she makes for a perfect nursery decoration, a unique gift, or a charming companion for any amigurumi lover. This pattern is designed to be beginner-friendly while offering enough interesting details—like striped legs and a wavy-edged dress—to keep you engaged.
In this detailed tutorial, we will walk through every step of creating this adorable character. By the time you finish, you’ll have a beautiful, approximately 8-inch tall doll that looks like she just stepped out of a fairy tale. Grab your favorite hook and let’s get started!
Materials and Abbreviations
Materials Needed
- Crochet Hook: 2.00 mm (US size C)
- Yarn: 100% Mercerized Cotton (standard weight)
- Yarn Colors:
- Skin tone (for the body and arms)
- Gray (for the sock stripes)
- White (for the sock stripes, dress, and hat)
- Yellow (for the star)
- Pink (for embroidery/cheeks)
- Hair Yarn: Mohair yarn in a cream or off-white color.
- Safety Eyes: 6 mm
- Stuffing: High-quality polyester fiberfill
- Tools: Tapestry needle and scissors
Abbreviations (US Terms)
- MR: Magic Ring
- ch: Chain
- sc: Single crochet
- inc: Increase
- dec: Decrease
- hdc: Half double crochet
- dc: Double crochet
- sl st: Slip stitch
- BLO: Back loop only
- FLO: Front loop only
Step-by-Step Instructions
The Legs
We begin by crocheting the legs. Note that the legs are worked in rounds. You will start with gray yarn to create the bottom of the socks.
Leg 1
{Start with gray yarn}
- 6 sc in MR (6)
- 6 inc (12)
- 12 sc in BLO (12)
- Rounds 4-6: 12 sc (12)
- Change to white yarn.
- Rounds 7-8: 12 sc (12)
- Begin stuffing the leg as you work.
- Change to gray yarn.
- Rounds 9-10: 12 sc (12)
- Change to white yarn.
- Rounds 11-12: 12 sc (12)
- Change to gray yarn.
- Rounds 13-14: 12 sc (12)
- Change to white yarn.
- Rounds 15-16: 12 sc (12)
- Change to gray yarn.
- Rounds 17-18: 12 sc (12)
- Change to white yarn.
- Rounds 19-20: 12 sc (12)
- Change to gray yarn.
- Round 21: 12 sc (12)
- Round 22: 5 sc. Leave the remaining stitches unworked. Fasten off and set aside.
Leg 2 and Body Connection
{Start with gray yarn}
- 6 sc in MR (6)
- 6 inc (12)
- 12 sc in BLO (12)
- Rounds 4-6: 12 sc (12)
- Change to white yarn.
- Rounds 7-8: 12 sc (12)
- Begin stuffing the leg as you work.
- Change to gray yarn.
- Rounds 9-10: 12 sc (12)
- Change to white yarn.
- Rounds 11-12: 12 sc (12)
- Change to gray yarn.
- Rounds 13-14: 12 sc (12)
- Change to white yarn.
- Rounds 15-16: 12 sc (12)
- Change to gray yarn.
- Rounds 17-18: 12 sc (12)
- Change to white yarn.
- Rounds 19-20: 12 sc (12)
- Change to gray yarn.
- Round 21: 12 sc (12)
- Round 22: 5 sc. DO NOT CUT THE YARN! We will use this to join the legs and start the body.
Joining the Legs and Starting the Body
This is the most technical part of the pattern. Follow carefully to ensure the body stays symmetrical.
- From the second leg, create a chain of 3 ch.
- Attach this chain to the first leg by crocheting 1 sc into the first stitch of the leg. This counts as your new starting point.
- Place a stitch marker in this first stitch.
- Continue working around the legs: 11 sc along the first leg, 3 sc along the chain bridge, 12 sc along the second leg, and 3 sc along the other side of the chain.
- Total stitches should be 30.
- Rounds 24-28: 30 sc (30)
- Round 29: *3 sc, dec* repeat until the end of the round (24)
- Round 30: 24 sc (24)
- Change to skin tone yarn in BLO.
- Rounds 31-34: 24 sc (24)
- Begin stuffing the body firmly.
- Round 35: *2 sc, dec* repeat until the end of the round (18)
- Rounds 36-37: 18 sc (18)
- Round 38: *1 sc, dec* repeat until the end of the round (12)
- Rounds 39-42: 12 sc (12)
The Head and Hair
The head continues directly from the body. We will increase the stitch count to create the rounded shape of the face.
- Round 43: 12 inc (24)
- Round 44: *1 sc, inc* repeat until the end of the round (36)
- Stuff the neck area firmly.
- Round 45: *5 sc, inc* repeat until the end of the round (42)
- Round 46: *6 sc, inc* repeat until the end of the round (48)
- Rounds 47-59: 48 sc (48)
- Eye Placement: Insert the 6 mm safety eyes between rounds 49 and 50, approximately 10 stitches apart.
- Embroider the nose between the eyes and use pink yarn to stitch small rosy cheeks.
- Round 60: *6 sc, dec* repeat until the end of the round (42)
- Round 61: *5 sc, dec* repeat until the end of the round (36)
- Round 62: *4 sc, dec* repeat until the end of the round (30)
- Begin stuffing the head firmly.
- Round 63: *3 sc, dec* repeat until the end of the round (24)
- Round 64: *2 sc, dec* repeat until the end of the round (18)
- Round 65: *1 sc, dec* repeat until the end of the round (12)
- Round 66: 6 dec (6)
- Fasten off, leaving a long tail for sewing.
Attaching the Hair
To give Rogelia her signature look, we will use mohair yarn to create soft, flowing hair.
- Cut approximately 108 strands of mohair yarn, each about 12 inches (30 cm) long.
- Locate the unworked loops from Round 23 (the BLO section of the hat/head connection).
- Turn the hat slightly inside out. Take 4 strands of mohair, hold them together at the center, and pull them through one of the back loops of Round 23.
- Pull the ends of the strands through the loop and tighten to secure the knot.
- Repeat this process in every second back loop (26 times in total) to complete the hairstyle.
The Arms
{Use skin tone yarn}
- Ch 2. In the second ch from the hook, work 4 sc.
- Round 2: 4 inc (8)
- Rounds 3-19: 8 sc (8)
- Do not stuff the arms.
- Round 20: Flatten the opening and work 4 sc through both layers to close the arm. Fasten off, leaving a long tail for sewing. Attach the arms to the body immediately.
The Starry Dress
{Use white yarn. IMPORTANT: The first part of the dress is worked in rows, not rounds!}
- Leave a long starting tail. Ch 25.
- Starting in the second ch from the hook, work 1 sc in each ch (24 sc total). Ch 1 and turn.
- Round 2: *3 sc, inc* repeat until the end of the round (30), ch 1 and turn.
- Round 3: 4 sc, ch 5, skip 5 stitches, 12 sc, ch 5, skip 5 stitches, 4 sc. Ch 1 and turn.
- Round 4: 4 sc, 5 sc in the first ch-5 space, 12 sc, 5 sc in the second ch-5 space, 4 sc (30)
- Switch to working in rounds: Connect the ends of the piece by working 1 sc into the first stitch of the previous row. Continue with 29 sc around (30).
- Round 6: 30 sc in BLO.
- Round 7: *4 sc, inc* repeat until the end of the round (36)
- Rounds 8-15: 36 sc (36)
- Round 16: *8 sc, inc* repeat until the end of the round (40)
- Round 17 (Wavy Edge): *sl st, 1 sc, 1 hdc, 1 dc, 1 hdc, 1 sc, 1 sl st in the same stitch, 1 sc, sl st* repeat until the end of the round.
- Fasten off and weave in ends.
To assemble: Pull the dress over the doll’s legs, thread the arms through the armholes, turn the doll around, and use a tapestry needle to sew the back of the dress closed.
The Starry Hat and Star Accessory
The Hat
{Use white yarn}
- 6 sc in MR (6)
- 6 sc (6)
- 6 inc (12)
- Rounds 4-5: 12 sc (12)
- Round 6: *1 sc, inc* repeat until the end of the round (18)
- Round 7: 18 sc (18)
- Round 8: *2 sc, inc* repeat until the end of the round (24)
- Round 9: 24 sc (24)
- Round 10: *3 sc, inc* repeat until the end of the round (30)
- Round 11: 30 sc (30)
- Round 12: *4 sc, inc* repeat until the end of the round (36)
- Round 13: 36 sc (36)
- Round 14: *5 sc, inc* repeat until the end of the round (42)
- Round 15: 42 sc (42)
- Round 16: *6 sc, inc* repeat until the end of the round (48)
- Round 17: *7 sc, inc* repeat until the end of the round (54)
- Rounds 18-22: 54 sc (54)
- Round 23: 54 sc in BLO.
- Round 24: 54 sc (54)
- Fasten off, leaving a long tail for sewing the hat to the head.
The Star
{Make two stars using yellow yarn}
- 5 sc in MR (5)
- 5 inc (10)
- Round 3: *1 sc, inc* repeat until the end of the round (15)
- Round 4: *1 sc, 1 hdc, 1 dc, 1 hdc, 1 sc in the next stitch, then 1 sl st in each of the following 2 stitches* repeat until the end of the round to create 5 points.
- Fasten off, leaving a long tail.
To assemble: Place the two stars together with the wrong sides facing each other. Using a tapestry needle, sew them together through both layers. Finally, sew the star to the tip of the hat.
Finishing
Once all components are crocheted, it is time for assembly! Carefully sew the head to the body, the hat to the head, and the arms to the sides of the torso. Use your tapestry needle to hide all loose yarn ends inside the doll. If you want a little extra personality, you can even add a tiny bit of blush to the cheeks using a pink marker or actual cosmetic blush.
Tips for Success
- Color Changes: When changing colors for stripes, always perform the color change on the last stitch of the previous row to ensure a clean line.
- Symmetry: When joining the legs, pay close attention to the direction of the color changes. Ensure the color transition points are facing the back of the doll for a professional look.
- Tight Tension: For amigurumi, it is best to maintain slightly tighter tension to prevent the stuffing from peeking through the stitches.
- The “Bridge” Trick: When connecting the legs, using a stitch marker is essential. Without it, you may lose count of the 30 stitches required to form the base of the body.