Adorable Crochet Horsehead Ornament Pattern: A Step-by-Step Tutorial
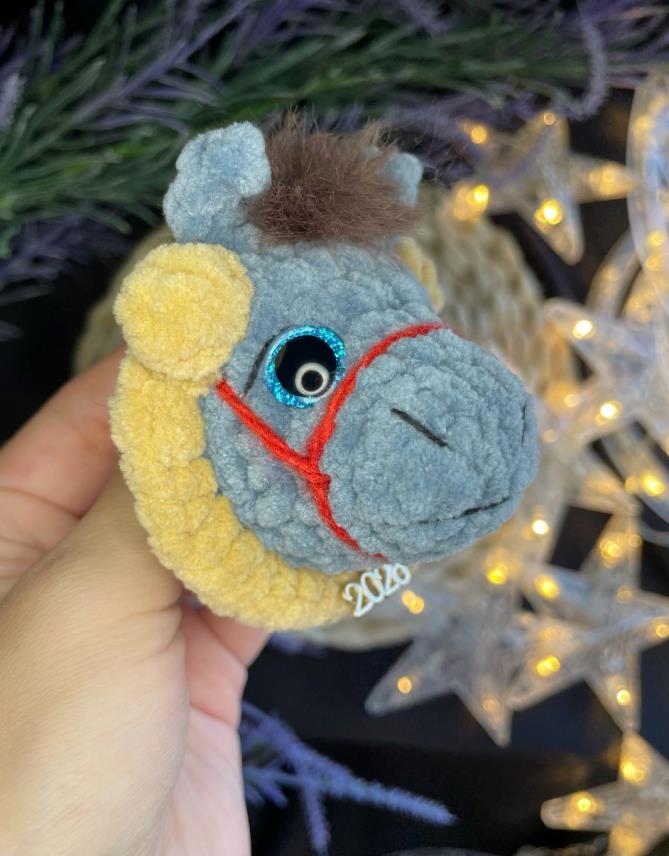
Are you looking for a quick, unique, and incredibly cute crochet project? This Crochet Horsehead Ornament is the perfect solution! Shaped like a charming horseshoe, this tiny amigurumi horse makes for a wonderful Christmas tree decoration, a whimsical bag charm, or a thoughtful handmade gift for animal lovers. This project is designed to be worked in one continuous piece, meaning you won’t have to worry about sewing multiple parts together, making it a fantastic project for both beginners and seasoned crafters alike.
In this tutorial, we will walk you through creating a plush, textured little horse. Using velvet or plush yarn gives it that extra “squishy” factor that makes amigurumi so lovable. Whether you want to make a classic brown horse or a colorful rainbow version, this pattern is highly customizable!
Materials & Abbreviations
To ensure your horsehead turns out perfectly, gather the following supplies. Because we are using plush yarn, your tension might be a little looser than usual, so keep a close eye on your stitch count.
Materials Needed
- Plush/Velvet Yarn: Approximately 3.5 oz (100g) of a soft plush yarn (like Wolans Bunny Baby or similar).
- Faux Fur Yarn: A small amount of “funky” or faux fur yarn for the mane.
- Embroidery Yarn: Black yarn or embroidery floss for the facial details (nostrils, smile, and bridle).
- Crochet Hook: 3.5mm (approx. US E/4 or F/2.25).
- Safety Eyes: 12mm (approx. 1/2 inch) safety eyes.
- Fiberfill: Soft polyester stuffing.
- Optional: A small charm or pendant to attach to the bottom.
Abbreviations (US Terms)
- ch: chain
- sc: single crochet
- hdc: half double crochet
- dc: double crochet
- inc: increase (2 sc in the same stitch)
- dec: decrease (sc 2 stitches together)
- FLO: front loop only
- BLO: back loop only
- (…) *X: repeat the instructions within the parentheses X times
Step-by-Step Instructions
Pro Tip: If you want a two-tone horse, use your secondary/accent color for the first two rounds before switching to your main color.
The Main Body (The Horseshoe Shape)
We will begin by creating an oval base to establish the horseshoe silhouette.
Round 1: Start with a magic ring or chain 5. From the 2nd chain from your hook: 1 inc, 2 sc, and in the very last chain, work 4 sc. Now, turn to work along the other side of your initial chain: 2 sc, 1 inc. (Total: 12 stitches)
Round 2: 5 sc, 1 inc, 2 sc, 1 inc, 2 sc, 1 inc. (Total: 15 stitches)
Round 3: 15 sc, then 4 sc in the remaining space to complete the oval. Place a stitch marker in this new starting stitch. (Total: 19 stitches)
Round 4: 3 sc, 8 inc working in FLO (front loops only), 3 sc, 1 inc. (Total: 24 stitches)
Round 5: 24 sc in both loops. (Total: 24 stitches)
Creating Ears and the Texture Detail
This round is where the character really comes to life! We will add the ears and a “bobble” to create a textured effect.
Round 6: 10 sc.
Adding the First Ear
Work the ear by chaining 4. From the 2nd chain from the hook: 1 sc, 2 hdc. Join this back to the base with 4 sc.
Continuing the Round
Continue around the base with 1 sc.
The Horseshoe Accent
Switch to your accent color (the “horseshoe” color). Work a bobble stitch (or popcorn stitch): 3 dc in the same stitch with a shared top.
Adding the Second Ear
Work in FLO (front loops only): 8 hdc.
Work the second ear exactly like the first (ch 4, from 2nd ch: 1 sc, 2 hdc), then continue with 1 sc. (Total: 24 stitches)
Round 7: Working in BLO (back loops only): 8 hdc, the bobble stitch, then switch back to your main color. Work 7 sc (place 1 sc before the ear, 4 sc between the ears, and 2 sc after the ear). Finish the round with 8 sc in BLO. (Total: 24 stitches)
Round 8: 24 sc in BLO. (Note: Ensure you have 24 stitches to make the decreases work correctly in the next step).
Assembly and Closing
Before we close the piece, we need to add the eyes and stuffing.
Inserting Eyes: Place your 12mm safety eyes between rounds 4 and 5. Ensure they are level and centered.
Round 9: (1 sc, 1 dec) * 8. (Total: 16 stitches)
Stuffing: Now is the time to stuff your horsehead firmly with fiberfill. Make sure the stuffing reaches into the ear areas so they hold their shape.
Round 10: 8 dec. Fasten off, leaving a long tail for sewing. Weave the tail through the remaining stitches, pull tight to close the hole, and hide the tail inside the piece.
Finishing Touches
This is where your little horse gets its personality! Don’t rush this part—the details make the difference.
The Mane
To create the fluffy mane, take your faux fur yarn. Attach it to the back of the head. Using your crochet hook, work single crochet stitches from the back up toward the top (crown) of the head. Once you’ve covered the back area, fasten off and weave in your ends.
Facial Embroidery
Using your black embroidery yarn, carefully stitch the following features onto the face:
- Nostrils: Two small vertical lines or dots.
- Smile: A gentle curved line under the snout.
- Bridle: You can stitch a line that runs across the snout and around the head to mimic a harness.
The Final Accessory
Since this is a horseshoe-shaped ornament, attaching a small gold charm, a star, or a number (like a year charm) to the bottom adds a professional, boutique-style finish!
Tips for Success
- Tension Control: Plush yarn can be tricky. If you find your stitches are too loose and you can see the stuffing, try using a slightly smaller hook.
- Stitch Markers are Essential: Because you are working in rounds and often switching between loops (FLO/BLO), always use a marker to keep track of your start.
- Safety First: If you are making this for a small child, instead of plastic safety eyes, consider embroidering the eyes with black yarn to prevent any choking hazards.
- Color Play: Don’t be afraid to experiment! A pink horse with a white horseshoe is just as cute as a traditional brown one.