Crochet Little Dolphin Pattern: A Cute and Easy Amigurumi Tutorial
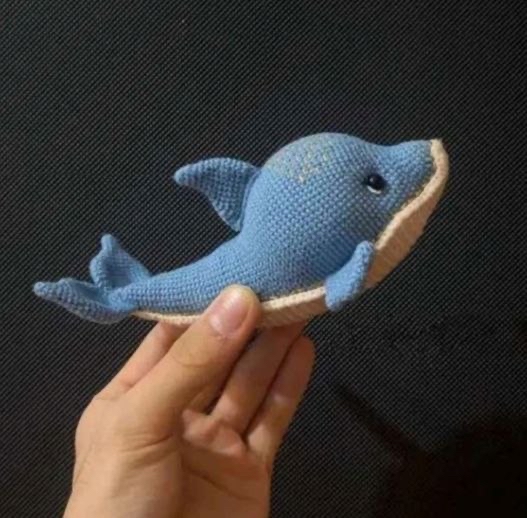
Are you looking for a quick, adorable project to add to your crochet collection? This Little Dolphin Amigurumi is the perfect solution! Whether you are looking to create a tiny ocean friend for a nursery, a keychain accessory, or just a sweet little desk companion, this pattern is designed to be easy, engaging, and incredibly rewarding. This tutorial will guide you through every stitch, ensuring that even beginners can walk away with a finished dolphin that looks professional and whimsical.
Crocheting ocean creatures is one of the most relaxing ways to practice your amigurumi skills. The repetitive motions and the satisfying way a small ball of yarn transforms into a character make this project a joy from start to finish. Let’s dive right into the wonderful world of crochet dolphins!
Materials & Abbreviations
Before we pick up our hooks, let’s make sure you have everything you need. Because this is a small project, you won’t need a massive amount of supplies, but having the right tools will make the assembly much easier.
What You Will Need
- Yarn/Thread: You will need fine crochet thread or lightweight yarn in four colors: Blue (for the main body and fins), Skin/Cream (for the belly), White (for eye details), and Black (for the pupils).
- Crochet Hook: A small hook appropriate for your thread size (typically 1.5mm to 2.5mm for thread work).
- Safety Eyes or Eye Accessories: Small black beads or safety eyes that fit your dolphin’s scale.
- Toy Stuffing: High-quality polyester fiberfill to give your dolphin its shape.
- Yarn Needle: A blunt-tipped needle for sewing the parts together and weaving in ends.
- Optional: Gold embroidery thread to add decorative texture at the seams.
Abbreviations (US Terms)
This pattern uses standard US crochet terminology. Please ensure you are following US terms to achieve the correct results.
- MR: Magic Ring
- sc: Single crochet
- inc: Increase (2 sc in one stitch)
- dec: Decrease (sc two stitches together)
- ch: Chain
- sl st: Slip stitch
- st(s): Stitch(es)
- BLO: Back loop only (optional, for texture)
Step-by-Step Instructions
Making the Body
The body is the core of your dolphin. It is worked in continuous rounds, starting from a magic ring. We will work in blue yarn.
Round 1: Start with a Magic Ring and work 6 sc into the ring. (6)
Round 2: 6 inc. (12)
Round 3: (1 sc, 1 inc) repeat 6 times. (18)
Round 4: (2 sc, 1 inc) repeat 6 times. (24)
Rounds 5-8: sc in each stitch around. (24)
Round 9: (1 sc, 1 inc) repeat 8 times, then 8 sc. (32)
Round 10: (2 sc, 1 inc) repeat 8 times, then 8 sc. (40)
Round 11: sc in each stitch around. (40)
Round 12: 14 sc, 8 inc, 18 sc. (48)
Round 13: sc in each stitch around. (48)
Round 14: 15 sc, (1 sc, 1 inc) repeat 7 times, 19 sc. (55)
Round 15: 17 sc, (2 sc, 1 inc) repeat 6 times, 20 sc. (61)
Round 16: 18 sc, (3 sc, 1 inc) repeat 5 times, 23 sc. (66)
Round 17: sc in each stitch around. (66)
Round 18: (10 sc, 1 inc) repeat 6 times. (72)
Rounds 19-20: sc in each stitch around. (72)
Round 21: (11 sc, 1 inc) repeat 6 times. (78)
Rounds 22-33: sc in each stitch around. (78)
Round 34: 13 sc, (7 sc, 1 dec) repeat 6 times, 11 sc. (72)
Rounds 35-36: sc in each stitch around. (72)
Round 37: 13 sc, (6 sc, 1 dec) repeat 6 times, 11 sc. (66)
Rounds 38-39: sc in each stitch around. (66)
Round 40: 13 sc, (5 sc, 1 dec) repeat 6 times, 11 sc. (60)
Rounds 41-42: sc in each stitch around. (60)
Round 43: 13 sc, (4 sc, 1 dec) repeat 6 times, 11 sc. (54)
Rounds 44-45: sc in each stitch around. (54)
Stop here to stuff the body firmly with your toy stuffing.
Round 46: (7 sc, 1 dec) repeat 6 times. (48)
Rounds 47-51: sc in each stitch around. (48)
Round 52: 2 sc, 3 dec, 40 sc. (45)
Round 53: sc in each stitch around. (45)
Round 54: 1 sc, 3 dec, 38 sc. (42)
Round 55: sc in each stitch around. (42)
Round 56: 3 dec, 36 sc. (39)
Round 57: sc in each stitch around. (39)
Round 58: 2 dec, 33 sc, 1 dec. (36)
Round 59: sc in each stitch around. (36)
Round 60: 2 dec, 30 sc, 1 dec. (33)
Round 61: sc in each stitch around. (33)
Round 62: 2 dec, 27 sc, 1 dec. (30)
Round 63: sc in each stitch around. (30)
Round 64: 2 dec, 24 sc, 1 dec. (27)
Round 65: sc in each stitch around. (27)
Round 66: 2 dec, 21 sc, 1 dec. (24)
Round 67: sc in each stitch around. (24)
Round 68: 2 dec, 18 sc, 1 dec. (21)
Round 69: sc in each stitch around. (21)
Round 70: 2 dec, 15 sc, 1 dec. (18)
Round 71: sc in each stitch around. (18)
Round 72: 2 dec, 12 sc, 1 dec. (15)
Stuff the tail section as you go.
Round 73: sc in each stitch around. (15)
Round 74: 2 dec, 9 sc, 1 dec. (12)
Round 75: sc in each stitch around. (12)
Round 76: 6 dec. (6)
Fasten off and weave in your ends securely.
Creating the Belly
The belly is worked in rows rather than rounds using a skin-colored yarn. This creates a flat, realistic shape for the underside of the dolphin.
Row 1: Chain 7. Starting from the second chain from the hook, work 6 sc. Ch 1, turn.
Rows 2-4: 6 sc, ch 1, turn.
Row 5: 1 sc, 1 inc, 2 sc, 1 inc, 1 sc, ch 1, turn. (8)
Row 6: 8 sc, ch 1, turn.
Row 7: 2 sc, 1 inc, 2 sc, 1 inc, 2 sc, ch 1, turn. (10)
Row 8: 10 sc, ch 1, turn.
Row 9: 2 sc, 1 inc, 4 sc, 1 inc, 2 sc, ch 1, turn. (14)
Row 10: 12 sc, ch 1, turn.
Row 11: 2 sc, 1 inc, 6 sc, 1 inc, 2 sc, ch 1, turn. (14)
Row 12: 14 sc, ch 1, turn.
Row 13: (2 sc, 1 inc) repeat 4 times, 2 sc, ch 1, turn. (18)
Row 14: 18 sc, ch 1, turn.
Row 15: (2 sc, 1 inc) repeat 6 times, ch 1, turn. (24)
Rows 16-46: 24 sc, ch 1, turn.
Row 47: (6 sc, 1 dec) repeat 3 times, ch 1, turn. (21)
Rows 48-52: 21 sc, ch 1, turn.
Row 53: (2 sc, 1 dec) repeat 5 times, 1 sc, ch 1, turn. (16)
Rows 54-58: 16 sc, ch 1, turn.
Row 59: 1 sc, 1 dec, 10 sc, 1 dec, 1 sc, ch 1, turn. (14)
Row 60: 14 sc, ch 1, turn.
Row 61: 2 sc, 1 dec, 6 sc, 1 dec, 2 sc, ch 1, turn. (12)
Row 62: 12 sc, ch 1, turn.
Row 63: 2 sc, 1 dec, 4 sc, 1 dec, 2 sc, ch 1, turn. (10)
Rows 64-67: 10 sc, ch 1, turn.
Row 68: 2 sc, 1 dec, 2 sc, 1 dec, 2 sc, ch 1, turn. (8)
Row 69: 1 sc, 1 dec, 2 sc, 1 dec, 1 sc, ch 1, turn. (6)
Row 70: 6 sc, ch 1, turn.
Row 71: 1 sc, 2 dec, 1 sc, ch 1, turn. (4)
Rows 72-73: 4 sc, ch 1, turn.
Final Step: Using your blue yarn, crochet a single crochet stitch around the entire perimeter of the belly to create a clean edge. Note the length of the belly to ensure it fits perfectly against the body.
Crafting the Fins
Caulking (Side) Fins – Make 2
These are the side fins. Use blue yarn.
Round 1: MR, 6 sc. (6)
Round 2: 4 sc, 2 inc. (8)
Round 3: 6 sc, 2 inc. (10)
Round 4: 8 sc, 2 inc. (12)
Round 5: 4 sc, 1 inc, 5 sc, 2 inc. (14)
Round 6: 5 sc, 1 inc, 7 sc, 2 inc. (16)
Round 7: 6 sc, 1 inc, 9 sc, 2 inc. (18)
Round 8: 7 sc, 1 inc, 11 sc, 2 inc. (20)
Round 9: 8 sc, 1 inc, 13 sc, 2 inc. (22)
Round 10: 9 sc, 1 inc, 15 sc, 2 inc. (24)
Rounds 11-13: sc in each stitch around. (30—adjusting to reach total count)
Round 14: 9 sc, 1 dec, 15 sc, 2 dec. (24)
Round 15: 8 sc, 1 dec, 13 sc, 2 dec. (22)
Round 16: 7 sc, 1 dec, 11 sc, 2 dec. (20)
Round 17: 6 sc, 1 dec, 9 sc, 2 dec. (18)
Round 18: 5 sc, 1 dec, 7 sc, 2 dec. (16)
Round 19: 4 sc, 1 dec, 5 sc, 2 dec. (14)
Fold the fin in half and crochet 6 sc through both layers to close it. Leave a long end for sewing.
Side Fins – Make 2
Use blue yarn.
Round 1: MR, 6 sc. (6)
Round 2: 2 inc, 4 sc. (8)
Round 3: 2 inc, 6 sc. (10)
Round 4: 2 inc, 8 sc. (12)
Round 5: 2 inc, 4 sc, 2 inc, 4 sc. (16)
Round 6: 2 inc, 6 sc, 2 inc, 6 sc. (18)
Round 7: 2 inc, 8 sc, 2 inc, 8 sc. (20)
Round 8: 2 inc, 10 sc, 2 inc, 10 sc. (24)
Rounds 9-10: sc in each stitch around. (28)
Round 11: 2 dec, 10 sc, 2 dec, 10 sc. (24)
Round 12: 2 dec, 8 sc, 2 dec, 8 sc. (20)
Rounds 13-14: sc in each stitch around. (20)
Fold in half and crochet 10 sc through both layers. Leave a long end for sewing.
Dorsal Fin – Make 1
Use blue yarn.
Round 1: MR, 6 sc. (6)
Round 2: 4 sc, 2 inc. (8)
Round 3: 6 sc, 2 inc. (10)
Round 4: 8 sc, 2 inc. (12)
Round 5: 10 sc, 2 inc. (14)
Round 6: 12 sc, 2 inc. (16)
Round 7: 14 sc, 2 inc. (18)
Round 8: 16 sc, 2 inc. (20)
Round 9: 18 sc, 2 inc. (22)
Round 10: 20 sc, 2 inc. (24)
Round 11: 22 sc, 2 inc. (26)
Rounds 12-13: sc in each stitch around. (26)
Fold in half and crochet 13 sc through both layers. Leave a long end for sewing.
Finishing & Assembly
Now comes the most exciting part: bringing your dolphin to life! Assembly requires a bit of patience to ensure everything is symmetrical.
Step 1: Attach the Belly
Pin the skin-colored belly to the underside of the blue body. Sew it securely using your yarn needle. For a professional look, you can use a gold thread to embroider a decorative texture at the seam where the head, body, and belly meet.
Step 2: Attach the Fins
Sew the side fins to the mid-section of the body and the dorsal fin to the top of the back. The caulking fins should be placed toward the front/middle. Ensure they are balanced on both sides.
Step 3: The Eyes and Face
This is the most important step for personality! To get the perfect “look,” position your eyes between rows 15 and 17 of the body. They should be placed approximately 4 to 5 stitches away from the lower edge of the belly. After installing the safety eyes or beads, use black thread to embroider small eyelashes or the white of the eyes for an extra touch of cuteness.
Expert Crochet Tips
To make your dolphin look as polished as possible, keep these tips in mind:
- Tension is Key: Since amigurumi is worked in rounds, try to keep your tension consistent so there are no visible gaps where the stuffing might peek through.
- Use Stitch Markers: In amigurumi, it is very easy to lose track of where your round starts. Always use a stitch marker at the beginning of every round.
- Stuffing Strategy: Don’t just shove the stuffing in! Work it into the corners and ends of the body to ensure there are no lumps. This will give your dolphin that smooth, professional shape.
- Hide Your Ends: When weaving in your ends, don’t just pull them tight. Weave them through the stitches of the body to ensure they don’t pop out later during play.