How to Crochet a Cute Plush Bear: An Easy Amigurumi Pattern
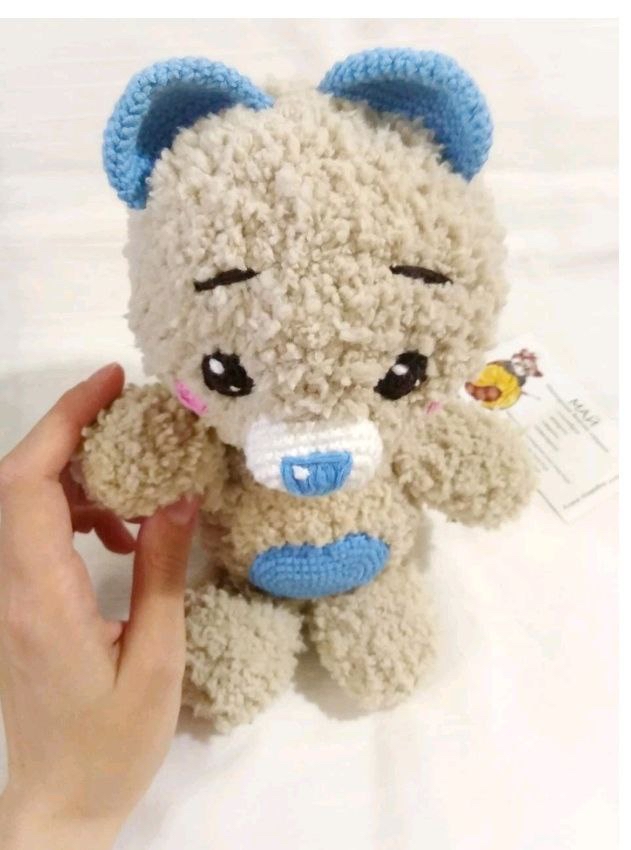
There is nothing quite as heartwarming as a handmade plushie. If you are looking for your next crochet project, this adorable, squishy plush bear is the perfect choice! Whether you are making a gift for a child or adding a new friend to your own collection, this bear is designed to be irresistibly soft and cuddly. Because we are using chenille-style plush yarn, the finished result is incredibly tactile and looks professionally made.
This pattern is beginner-friendly, focusing on basic stitches like the single crochet. By following this step-by-step tutorial, you will learn how to construct a complex-looking toy using simple shapes. Grab your hook and some cozy yarn, and let’s get started on creating your very own teddy bear friend!
Materials & Abbreviations
To ensure your bear turns out just like the one in the photos, I recommend using a plush, velvet-style yarn. This type of yarn hides your stitches well, which is especially helpful if you are new to amigurumi.
What You Will Need:
- Plush Yarn (Main Color): A beige or tan chenille-style yarn (such as Vita Plush, color 5324).
- Plush Yarn (Accent Colors): Light blue yarn for the ears, tail, and belly, and white yarn for the muzzle.
- Crochet Hook: 1.9 mm (or the size recommended by your yarn manufacturer to achieve a tight tension).
- Stuffing: High-quality polyester fiberfill.
- Safety Eyes or Embroidery Thread: For the eyes.
- Embroidery Needle: For sewing the pieces together and detailing the face.
Finished Size: The completed bear will stand approximately 9.5 inches tall (24 cm), including the ears.
US Crochet Abbreviations:
- ch: chain
- sc: single crochet
- inc: increase (2 sc in the same stitch)
- dec: decrease (invisible decrease is recommended for a cleaner look)
- mr: magic ring (or magic circle)
- st(s): stitch(es)
Step-by-Step Instructions
Head and Body
Note: We will work the head and body as one continuous piece to give the bear a chunky, seamless look. Use your main beige plush yarn for this entire section.
Start by making a magic ring and working 6 sc into the ring (6). If you aren’t comfortable with a magic ring, you can chain 2 and work 5 sc into the first chain.
- R1: 6 sc in magic ring (6)
- R2: 6 inc (12)
- R3: (1 sc, inc) repeat 6 times (18)
- R4: (2 sc, inc) repeat 6 times (24)
- R5: (3 sc, inc) repeat 6 times (30)
- R6: (4 sc, inc) repeat 6 times (36)
- R7: (5 sc, inc) repeat 6 times (42)
- R8: (6 sc, inc) repeat 6 times (48)
- R9: (7 sc, inc) repeat 6 times (54)
- R10: (8 sc, inc) repeat 6 times (60)
- R11-15: sc in each st around (60)
- R16: (8 sc, dec) repeat 6 times (54)
- R17: (7 sc, dec) repeat 6 times (48)
- R18: (6 sc, dec) repeat 6 times (42)
- R19: (5 sc, dec) repeat 6 times (36)
- R20: (4 sc, dec) repeat 6 times (30)
- R21: (3 sc, dec) repeat 6 times (24)
- R22: sc in each st around (24). Begin stuffing the head firmly.
- R23: (3 sc, inc) repeat 6 times (30)
- R24: sc in each st around (30)
- R25: (4 sc, inc) repeat 6 times (36)
- R26: sc in each st around (36)
- R27: 12 sc, (1 sc, inc) repeat 6 times, 12 sc (42)
- R28: 12 sc, (2 sc, inc) repeat 6 times, 12 sc (48)
- R29-35: sc in each st around (48)
- R36: (6 sc, dec) repeat 6 times (42)
- R37: (5 sc, dec) repeat 6 times (36)
- R38: (4 sc, dec) repeat 6 times (30)
- R39: (3 sc, dec) repeat 6 times (24)
- R40: (2 sc, dec) repeat 6 times (18). Continue stuffing the body.
- R41: (1 sc, dec) repeat 6 times (12)
- R42: 6 dec (6). Fasten off, leaving a long tail for sewing.
Ears (Make 2)
Use the light blue accent yarn.
- R1: 6 sc in magic ring (6)
- R2: 6 inc (12)
- R3: (1 sc, inc) repeat 6 times (18)
- R4: (2 sc, inc) repeat 6 times (24)
- R5: (3 sc, inc) repeat 6 times (30)
- R6: (4 sc, inc) repeat 6 times (36)
- R7-10: sc in each st around (36)
Fasten off, leaving a long tail for sewing to the top of the head.
Tail (Make 1)
Use the light blue accent yarn.
- R1: 6 sc in magic ring (6)
- R2: 6 inc (12)
- R3: (1 sc, inc) repeat 6 times (18)
- R4: (2 sc, inc) repeat 6 times (24)
- R5: (3 sc, inc) repeat 6 times (30)
- R6-7: sc in each st around (30)
Fasten off, leaving a long tail for sewing to the bottom of the body.
Legs/Paws (Make 4)
Use the main beige plush yarn.
- R1: 3 ch, then work 6 sc into the second ch from the hook (6)
- R2: 6 inc (12)
- R3: (1 sc, inc) repeat 6 times (18)
- R4-10: sc in each st around (18)
Note on Shaping: After R10, stuff the leg lightly. To flatten the bottom, fold the last row in half and sc through both layers to close the leg. Fasten off, leaving a long tail.
Belly Patch
Use the light blue accent yarn. This creates a cute oval shape for the bear’s tummy.
Start by chaining 10. Work in rows to create an oval shape, increasing at the ends of the rows to expand the width, following the provided grid pattern until you have 6 rows total. This will create a soft blue oval that you can sew onto the front of the body.
Muzzle
Use the white accent yarn.
- R1-3: Chain 7. Work in rows following an oval expansion pattern (similar to the belly, but smaller) for the first 3 rows.
- R4-6: sc in each st around the edge to create a finished oval.
Fasten off, leaving a long tail for sewing.
Finishing
This is where your bear truly comes to life! Assembly requires a bit of patience, but it is very rewarding.
Step 1: The Face
First, sew the white muzzle onto the center of the head. You can gently pinch and pull the stuffing inside the muzzle to give it a more rounded, “snout” look. Once the muzzle is secure, sew your eyes above the muzzle. If you are using safety eyes, ensure they are securely fastened. After the eyes are in place, use black embroidery thread to stitch a small nose and some cute eyebrows. You can also use a little pink blush or pink embroidery thread to add tiny cheeks just below the eyes.
Step 2: The Body Parts
Sew the blue ears to the top of the head. Position them so they sit wide on the sides. Next, sew the blue belly patch onto the front of the body. Attach the tail to the rear. Finally, sew the four legs to the bottom of the body. For a more natural look, place the legs slightly toward the front so the bear can sit upright.
Step 3: Final Touches
Check all your seams to ensure there are no gaps where stuffing might leak out. If you find a small hole, use a tiny bit of yarn to stitch it closed. Give your bear a final squeeze to redistribute the stuffing, and your new friend is ready for hugs!
Tips
- Tension is Key: When working with plush yarn, it is easy to accidentally pull too hard. Try to keep your tension even so that the stuffing doesn’t show through the stitches.
- Invisible Decreases: For amigurumi, I highly recommend learning the “invisible decrease” technique. It prevents large gaps and makes the toy look much more professional.
- Stuffing: Don’t be afraid to stuff your bear firmly! A well-stuffed amigurumi holds its shape much better and feels more substantial. Just be careful around the neck area to ensure the head stays upright.
- Safety First: If you are making this for a very young child, please use embroidery for the eyes and nose instead of plastic safety eyes to prevent any choking hazards.