How to Crochet the Cutest Cat Buns: An Easy Amigurumi Tutorial
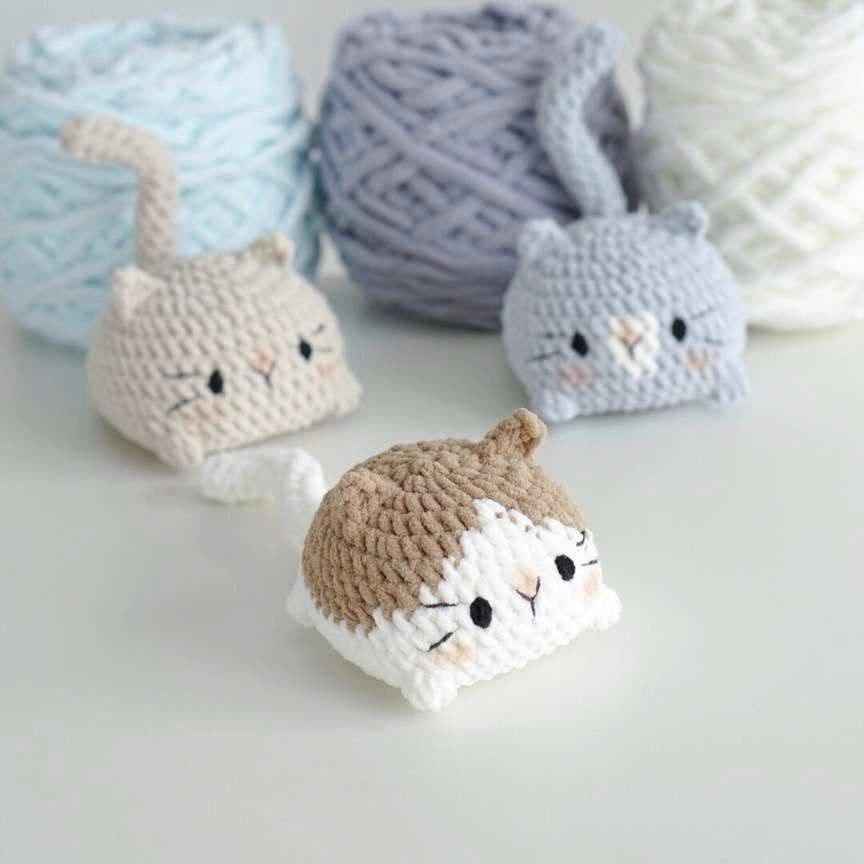
If you are looking for your next adorable crochet project, look no further! These “Cat Buns” are essentially tiny, squishy, round cats that look just like little loaves of bread. They are incredibly cute, making them the perfect gift for cat lovers, a charming addition to a nursery, or even a sweet desk companion.
Because we are using super-plush yarn, these little guys work up incredibly fast. You can whip up a whole collection in just one afternoon! In this tutorial, I will walk you through three different color variations: a classic beige and white, a cozy brown and white, and a soft grey and white. Whether you are a beginner looking to practice your tension or an experienced amigurumi artist wanting a quick win, this pattern is for you.
Materials and Tools
To achieve that signature “squishy” look, you will need specific materials. The key to these cat buns is the thickness of the yarn.
- Yarn: Super bulky/chenille plush yarn (approx. 3.5–4 oz / 100g per ball, with roughly 400 yards / 365 meters per 100g). Popular choices include Himalaya Dolphin Baby or Velvet yarn. You will need your primary color, a secondary color (white or another shade), and a small amount of black embroidery thread for the face.
- Crochet Hook: 4 mm (G/6) hook.
- Safety Eyes: 7 mm (approx. 1/4 inch).
- Stuffing: Polyester fiberfill.
- Other Essentials: A yarn needle, stitch markers, scissors, and optional 4-inch (10 cm) craft wire (2 mm diameter) if you want a poseable tail.
Abbreviations
This pattern uses standard US crochet terms. Please ensure you are familiar with these before beginning:
- MR: Magic Ring
- sc: Single crochet
- inc: Increase (2 sc in one stitch)
- dec: Decrease (sc 2 together)
- ch: Chain
- hdc: Half double crochet
- dc: Double crochet
- sl st: Slip stitch
- R: Round
- st(s): Stitch(es)
- Special Bobble Stitch: Work 4 dc into the same stitch, then instead of removing the loop, pull it through all loops on your hook to create a single, unified bobble with a shared top and base.
Step-by-Step Instructions
All three variations follow the same basic structure. We will start with the tail, then move to the body/head, and finally add the ears and facial features.
The Tail (Common for all variations)
The tail is worked in a continuous spiral. You can use beige, white, or grey yarn depending on which cat you are making.
R1: 6 sc in MR [6]
R2-19: 6 sc [6]
R20: (sc, dec) x 2 [4]
Note: Do not stuff the tail. Fasten off, leaving a long tail for sewing. Optional: Insert a 4-inch piece of 2 mm wire into the tail now if you want it to be bendable.
Variation 1: The Classic Beige Cat
For this version, use beige yarn for the main body and white yarn for the face markings.
R1: 8 sc in MR [8]
R2: 8 inc [16]
R3: (sc, inc) x 8 [24]
R4: sc, inc, (2 sc, inc) x 7, sc [32]
R5: (3 sc, inc) x 8 [40]
R6: 40 sc [40]
R7: (9 sc, inc) x 4 [44]
R8: 44 sc [44]
R9: 5 sc, inc, (10 sc, inc) x 3, 5 sc [48]
R10: 48 sc [48]
R11 (Connecting the Tail): This is the trickiest part! To join the tail to the body, fold the tail opening so it sits flat against the body. Insert your hook through both layers of the tail and into one stitch of the body, then work 1 sc. Repeat this 2 times. Then continue: 5 sc, Special Bobble Stitch, (11 sc, Special Bobble Stitch) x 3, 4 sc [48].
R12: 5 sc, 2 dec, (8 sc, 2 dec) x 3, 3 sc [40]
R13: 4 sc, 2 dec, (6 sc, 2 dec) x 3, 2 sc [32]
R14: 3 sc, 2 dec, (4 sc, 2 dec) x 3, sc [24]
Stuff the cat firmly with fiberfill at this stage.
R15: 2 sc, 2 dec, (2 sc, 2 dec) x 3 [16]
R16: 8 dec [8]
Fasten off, leaving a long tail to close the hole with a needle.
Variation 2: The Brown and White Cat
This version uses color changes to create a beautiful patterned look.
R1: 8 sc in MR [8]
R2: 8 inc [16]
R3: (sc, inc) x 8 [24]
R4 (Brown): (inc, 2 sc) x 4. (Switch to White) inc, (Brown) 2 sc, (inc, 2 sc) x 3 [32]
R5 (Brown): (3 sc, inc) x 3, 3 sc. (Switch to White) inc, 3 sc. (Switch to Brown) inc, (3 sc, inc) x 3 [40]
R6: (Brown) 17 sc, (White) 8 sc, (Brown) 15 sc [40]
R7: (Brown) 9 sc, inc, 6 sc. (White) 3 sc, inc, 6 sc. (Brown) 3 sc, inc, 9 sc, inc [44]
R8: (Brown) 15 sc, (White) 15 sc, (Brown) 14 sc [44]
R9 (Switch to White): 5 sc, inc, (10 sc, inc) x 3, 5 sc [48]
R10: 48 sc [48]
From R11 onwards, follow the same instructions as Variation 1.
Variation 3: The Grey and White Cat
For a modern look, use grey and white yarn.
R1: 8 sc in MR [8]
R2: 8 inc [16]
R3: (sc, inc) x 8 [24]
R4: sc, inc, (2 sc, inc) x 7, sc [32]
R5: (3 sc, inc) x 8 [40]
R6: 40 sc [40]
R7: (Grey) 4 sc, inc, 9 sc, inc, 4 sc. (White) 3 sc. (Grey) 2 sc, inc, 9 sc, inc, 5 sc [44]
R8: (Grey) 21 sc, (White) 3 sc, (Grey) 20 sc [44]
R9: (Grey) 5 sc, inc, 10 sc, inc, 5 sc. (White) 2 sc. (Grey) 3 sc, inc, 10 sc, inc, 5 sc [48]
R10: 48 sc [48]
From R11 onwards, follow the same instructions as Variation 1.
Making the Ears
You will need to make two ears. Use the color that matches the top of your cat’s head (Beige, Brown, or Grey).
First, use stitch markers to mark the specific stitches on the head where the ears will be attached: mark one stitch in Round 3, one in Round 4, and one in Round 5.
Ear Instructions:
- Insert your hook into the first marked stitch.
- Chain 4.
- Skip 2 chains on the hook.
- In the 3rd chain from the hook, work 1 sc.
- In the next chain, work 1 hdc.
- Skip the second marked stitch on the head.
- Work 1 sc into the third marked stitch.
- Fasten off and weave in ends. Repeat for the second ear.
Finishing
This is where your little cat comes to life!
Eyes: Using black embroidery thread, sew the eyes onto the body. Position them in Round 8, ensuring they are approximately 6 stitches apart.
Face: Embroider a small nose and thin whiskers using black thread.
Blush: For that extra “kawaii” look, take a bit of pink powder blush and lightly tap it onto the nose and the cheeks where the whiskers start.
Tips
To ensure your Cat Buns turn out perfectly, keep these beginner-friendly tips in mind:
- Watch Your Tension: With super bulky yarn, it is easy to accidentally make stitches too loose. Try to keep your tension consistent so the stuffing doesn’t peek through the holes.
- Use Markers: Amigurumi is worked in continuous rounds. Always use a stitch marker to identify the beginning of your round so you don’t lose count.
- Count Your Stitches: Especially during the “increase” and “decrease” rounds, it is very easy to miss a stitch. Double-check your total stitch count at the end of every round.
- Invisible Decreases: For a much cleaner look, I highly recommend using “invisible decreases” (inserting the hook through the front loops only of the next two stitches) rather than standard decreases. This prevents large gaps in your work.
- Don’t Be Afraid to Unravel: If you realize you made a mistake three rows back, don’t panic! It is much easier to “frog” (rip out) those rows and try again than to try and fix it later.