How to Crochet a Cute Black and White Amigurumi Cat: Free Step-by-Step Pattern
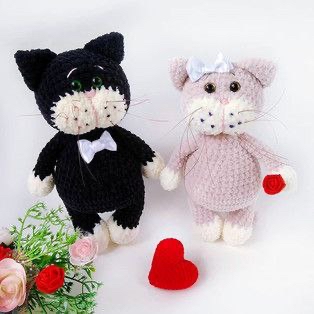
Looking for a charming new project to add to your crochet collection? There is nothing quite as classic as a tuxedo cat! This adorable amigurumi black and white cat is the perfect project for those who love creating cuddly companions. Whether you are a seasoned pro or a beginner looking to practice your shaping and color changes, this pattern is designed to be accessible and fun.
This little kitty features a round, expressive head, tiny paws, and a sweet little tail. Because we use basic amigurumi stitches, you can easily customize your cat by changing the colors—perhaps a ginger tabby or a grey kitty? Let’s dive into the details and get stitching!
Materials & Abbreviations
To create your crochet cat, you will need a few basic supplies. While the pattern is adaptable, we recommend using a cotton or acrylic blend yarn for a clean, sturdy finish.
Materials Needed
- Yarn: Medium weight (4) yarn in Black and White.
- Crochet Hook: 2.5mm or 3.0mm (or a size that ensures your stitches are tight so the stuffing doesn’t show).
- Safety Eyes: 8mm or 10mm green or yellow safety eyes.
- Stuffing: Polyester fiberfill.
- Tools: Yarn needle, stitch markers, and scissors.
- Embroidery Thread: Pink for the nose and black for the whiskers.
Abbreviations (US Terms)
- MR: Magic Ring
- sc: Single crochet
- inc: Increase (two single crochets in one stitch)
- dec: Decrease (invisible decrease preferred)
- ch: Chain
- st: Stitch
- ( ): Repeat the instructions inside the parentheses the specified number of times
Step-by-Step Instructions
The Head
We start with the head, beginning with white to create the cat’s muzzle area, then transitioning to black for the rest of the face.
Using White Yarn:
Round 1: 6 sc in MR (6)
Round 2: inc in every st (12)
Round 3: (1 sc, inc) x 6 (18)
Round 4: (2 sc, inc) x 6 (24)
Round 5: (3 sc, inc) x 6 (30)
Round 6: (4 sc, inc) x 6 (36)
Change to Black Yarn:
Round 7: sc in each st around (36)
Round 8: (5 sc, inc) x 6 (42)
Round 9-12: sc in each st around (42)
Round 13: (5 sc, dec) x 6 (36)
Round 14: (4 sc, dec) x 6 (30)
Round 15: (3 sc, dec) x 6 (24)
Round 16: (2 sc, dec) x 6 (18)
Round 17: (1 sc, dec) x 6 (12)
Round 18: dec x 6 (6)
Fasten off and weave in the ends. Stuff the head firmly.
The Ears (Make 2)
Using Black Yarn:
Round 1: 3 sc in MR (3)
Round 2: inc in every st (6)
Round 3: (1 sc, inc) x 3 (9)
Round 4: (2 sc, inc) x 3 (12)
Round 5: (3 sc, inc) x 3 (18)
Round 6: sc in each st around (18)
Fasten off, leaving a long tail for sewing.
The Tail
Using Black Yarn:
Round 1: 4 sc in MR (4)
Round 2: inc in every st (8)
Round 3-17: sc in each st around (8)
Fasten off and leave a tail for sewing. Lightly stuff the base of the tail.
The Arms (Make 2)
Using White Yarn:
Round 1: 6 sc in MR (6)
Round 2: inc in every st (12)
Round 3-4: sc in each st around (12)
Round 5: (1 sc, dec) x 4 (8)
Change to Black Yarn:
Round 6-14: sc in each st around (8)
Fasten off the first arm. For the second arm, leave a tail for sewing.
The Legs (Make 2)
Using White Yarn:
Round 1: 6 sc in MR (6)
Round 2: inc in every st (12)
Round 3: (1 sc, inc) x 6 (18)
Round 4-5: sc in each st around (18)
Round 6: (1 sc, dec) x 6 (12)
Change to Black Yarn:
Round 7-11: sc in each st around (12)
Fasten off the first leg. For the second leg, do not fasten off, as we will use it to start the body.
The Body
Now we will join the legs together to create the torso.
From the second leg, ch 6. Join to the first leg with a sc.
Round 1: 12 sc around the first leg, 6 sc across the chain, 12 sc around the second leg, and 6 sc across the opposite side of the chain (36). Place a marker here.
Round 2: sc in each st around (36)
Round 3: 12 sc, inc x 6, 18 sc (42)
Round 4: 12 sc, (1 sc, inc) x 6, 18 sc (48)
Round 5-7: sc in each st around (48)
Round 8: 12 sc, (1 sc, dec) x 6, 18 sc (42)
Round 9: sc in each st around (42)
Round 10: (5 sc, dec) x 6 (36)
Round 11: sc in each st around (36)
Round 12: (4 sc, dec) x 6 (30)
Round 13: sc in each st around (30)
Round 14: (3 sc, dec) x 6 (24)
Round 15-16: sc in each st around (24)
Round 17: (2 sc, dec) x 6 (18)
Round 18-19: sc in each st around (18)
Fasten off and weave in the ends. Stuff the body firmly as you go.
Finishing & Assembly
Now comes the magic part where your cat comes to life!
Assembling the Body
- Head: Sew the head to the top of the body. Make sure it is centered and secure.
- Ears: Attach the ears to the top of the head between rounds 2 and 6.
- Arms: Sew the arms to the sides of the body, just below the neck.
- Tail: Attach the tail to the lower back of the body.
Creating the Face
- Eyes: Place the safety eyes in the center of the face, slightly above the white muzzle area.
- Nose: Using pink embroidery thread, stitch a small triangle or a horizontal line to create a cute kitty nose.
- Whiskers: Use black thread to stitch 3 long whiskers on each side of the muzzle.
- Eyebrows: Add two small curved lines above the eyes with black thread to give the cat an expressive look.
Tips for Success
- Invisible Decrease: To avoid gaps in your work, use the invisible decrease (sc into the front loops only of the next two stitches) instead of a standard decrease.
- Tension: Keep your tension consistent. If you see holes where the stuffing is peeking through, try dropping down a hook size.
- Stuffing: Stuff your pieces firmly but not so tight that the fabric stretches. Use a chopstick or a crochet hook to push stuffing into the legs and arms.
- Color Changes: When changing from white to black, do the final pull-through of the white stitch with the black yarn to ensure a clean seam.