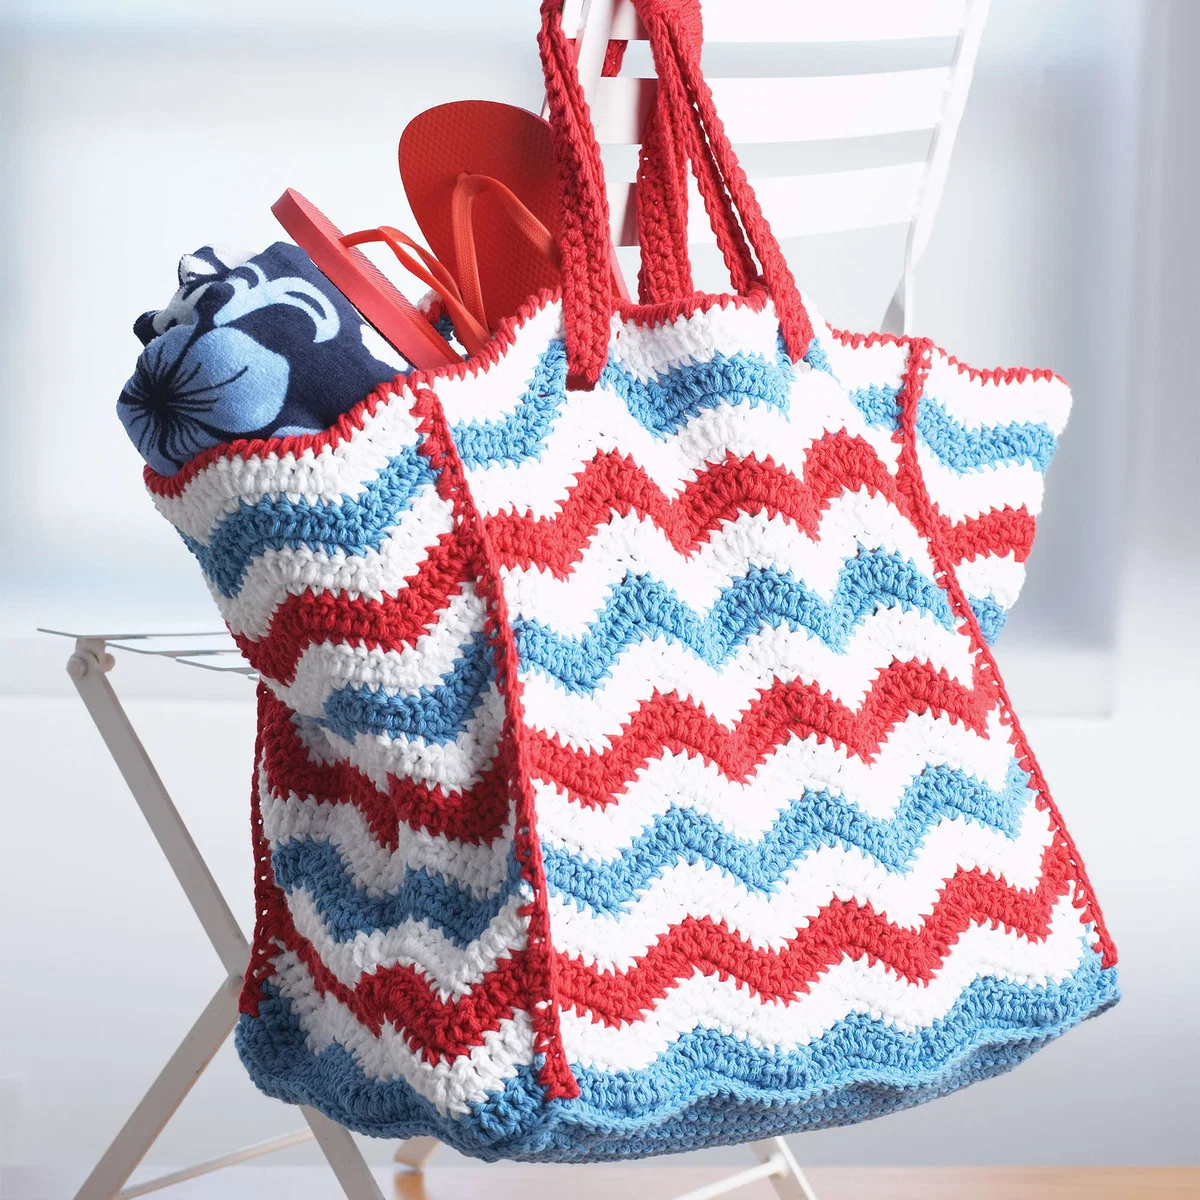
Patriotic 4th of July Crochet Beach Bag Pattern
Are you getting ready for summer sunshine, backyard barbecues, and fireworks displays? There is no better way to celebrate Independence Day than with a handmade, patriotic accessory! This 4th of July Crochet Beach Bag is the perfect project for any maker looking to whip up something festive, functional, and incredibly stylish.
This bag features a classic red, white, and blue stripe pattern that screams summer celebration. Because it is worked using two strands of yarn held together, it results in a sturdy, thick fabric that is perfect for carrying beach towels, sunscreen, snacks, and all your summer essentials. Whether you are heading to the pool or a local parade, this bag will be your go-to companion.
While the pattern involves some shaping to create a structured look, the rhythmic stripe pattern makes it a relaxing project once you get into the groove. Grab your favorite patriotic colors and let’s dive into this summer essential!
Materials and Abbreviations
Before you pick up your hook, make sure you have everything you need. This pattern is designed to be worked with two strands of yarn held together simultaneously to create a thicker, more durable textile.
Yarn Requirements
You can use solid colors or ombre yarns. If using solid colors, follow the ball counts below. If using ombre yarns, note the slightly different quantities required.
Option 1: Solid Colors
- Contrast A (White): 6 balls
- Contrast B (Red): 5 balls
- Contrast C (Delft Blue): 6 balls
Option 2: Ombre Colors
- Contrast A: 7 balls
- Contrast B: 6 balls
- Contrast C: 7 balls
Note: Each solid ball is approximately 2.5 oz (120 yards), while ombre balls are approximately 2 oz (95 yards).
Tools and Gauge
- Crochet Hook: 5 mm (U.S. size H/8) or the size needed to obtain your gauge.
- Gauge: 12 double crochet (dc) and 6 rows using 2 strands of yarn held together equals 4 inches.
Abbreviations (U.S. Terms)
- ch: chain
- sc: single crochet
- hdc: half double crochet
- dc: double crochet
- sl st: slip stitch
- dc2tog: double crochet two together (decrease)
- sc2tog: single crochet two together (decrease)
- tog: held together (working with two strands at once)
- RS: right side
- WS: wrong side
Step-by-Step Instructions
Understanding the Stripe Pattern
The visual appeal of this bag comes from its repeating stripe sequence. You will repeat this 8-row cycle throughout the main body of the panels. To change colors, work your last two loops of the final stitch of the previous row, draw the new color through those two loops, and then continue your stitch with the new color.
The 8-Row Stripe Sequence:
- Rows 1 & 2: Work with Color A (White)
- Rows 3 & 4: Work with Color B (Red)
- Rows 5 & 6: Work with Color A (White)
- Rows 7 & 8: Work with Color C (Blue)
Creating the Front and Back Panels
Make 2 identical panels.
Start with 2 strands of Color C held together. Chain 49.
Row 1: 1 sc in the 2nd ch from hook. 1 sc in each of the next 3 ch. *1 hdc in the next ch. 1 dc in each of the next 2 ch. 1 hdc in the next ch. 1 sc in each of the next 8 ch. Repeat from * to the last 8 ch. 1 hdc in the next ch. 1 dc in each of the next 2 ch. 1 hdc in the next ch. 1 sc in each of the next 4 ch. Turn.
Row 2: Ch 3 (counts as 1 dc). 1 dc in the first sc. *1 dc in each of the next 3 sc. Perform a dc2tog (Yoh, pull up a loop, yoh, pull through 2 loops, yoh, pull through 2 loops). Perform another dc2tog over the next 2 stitches. 1 dc in each of the next 3 sc. (2 dc in the next sc) twice. Repeat from * to the end, finishing with 2 dc in the next sc. Join Color A and turn.
Row 3: With Color A, ch 1. 2 sc in the first dc. *1 sc in each of the next 3 dc. Perform an sc2tog (draw up a loop in each of the next 2 stitches, yoh, and pull through all three loops). Perform another sc2tog over the next 2 stitches. 1 sc in each of the next 3 dc. (2 sc in the next dc) twice. Repeat from * to the end, finishing with 2 sc in the turning ch. Turn.
Complete the first three rows of the Stripe Pattern. Continue repeating the 8-row stripe sequence until the work measures approximately 14 inches from the beginning, ending with 2 rows of Color B.
Shaping Row (Color A): Ch 1. 2 sc in the first dc. *1 sc in each of the next 3 dc. (Sc2tog over the next 2 sts) twice. 1 sc in each of the next 3 dc. Ch 4, skip the next 2 dc. 1 sc in each of the next 3 dc. (Sc2tog over the next 2 sts) twice. 1 sc in each of the next 3 dc. * 2 sc in each of the next 2 dc. Repeat from * to * once more. 2 sc in the top of the turning ch. Turn.
Shaping Row (Color C): Ch 3 (counts as 1 dc). *1 dc in each of the next 3 sc. (Dc2tog over the next 2 sts) twice. 1 dc in each of the next 2 sts. 6 dc in the ch-4 space. 1 dc in each of the next 2 sts. (Dc2tog over the next 2 sts) twice. 1 dc in each of the next 3 sc. * 2 dc in each of the next 2 sc. Repeat from * to * once more. 2 dc in the last sc. Join Color C and turn.
Work 2 more rows in the pattern. Fasten off.
Making the Side Panels
Make 2 identical side panels.
Start with 2 strands of Color C held together. Chain 37.
Follow the instructions for Rows 1, 2, and 3 provided in the Front and Back Panels section. Once those are complete, continue with the 8-row Stripe Pattern until the piece measures 16 inches from the beginning. Fasten off.
Crafting the Base
Start with 2 strands of Color C. Chain 49.
Row 1: 1 sc in the 2nd ch from hook. 1 sc in each ch to the end. Turn. (48 sc total)
Row 2: Ch 1. 1 sc in each sc across. Turn.
Repeat the last row until the base measures 12 inches, ending with a WS row. Do not fasten off.
Joining the Panels and Base
This is where your bag starts to take shape! Arrange your Front and Back panels so they are opposite each other. Place the lower edge of the joined panels behind the Base, with the WS of the panels touching the WS of the base. Align the corners of the Base with the joining rows of the panels.
Joining Round: Ch 1. Working through both thicknesses, work 1 round of sc evenly around all 4 sides of the Base. Join with a sl st to the first sc. Fasten off.
Top Edging and Handles
Top Edging: With the RS of your work facing you, join 2 strands of Color B with a sl st to any corner of the top edge. Ch 1. Working from left to right (instead of the usual right to left), work 1 round of reverse sc evenly around the top edge. Join with a sl st to the first sc. Fasten off.
Handles: Make 2.
With 2 strands of Color B, ch 95 loosely. Row 1: 1 sc in the 2nd ch from hook. 1 sc in each ch to the end. Turn. (94 sc total). Row 2: Ch 1. 1 sc in each sc to the end. Turn. Repeat the last row once more. Fasten off.
Attaching Handles: With the RS of the tote facing you, push the ends of the handle through the slits in the Front Panel to the WS. Sew the ends together. To add a decorative touch, bring the two halves of the handle together and, using 2 strands of Color A, wrap the center 4 inches of the handle. Fasten the ends securely. Repeat this process for the Back Panel.
Finishing
Once your handles are securely attached and the wrapping is complete, give your bag a good shake to ensure everything is sturdy. If you have any loose ends, weave them in carefully using a tapestry needle to ensure they don’t pop out during your summer adventures.
Tips for a Perfect Bag
- Tension is Key: Since you are holding two strands of yarn together, ensure your tension remains consistent. If one strand is tighter than the other, it can cause the fabric to pull unevenly.
- Master the Color Change: The cleanest color changes happen when you change on the last two loops of the stitch. This prevents “gaps” in your stripes.
- Blocking: For a professional look, consider wet-blocking your finished panels before assembly. This will even out your stitches and make the stripes look incredibly sharp.
- Sturdy Handles: When sewing the handles, make sure you are sewing through enough layers of the panel to ensure the weight of the bag doesn’t pull the stitches apart.