Adorable Crochet Bull Amigurumi Pattern: A Step-by-Step Beginner Guide
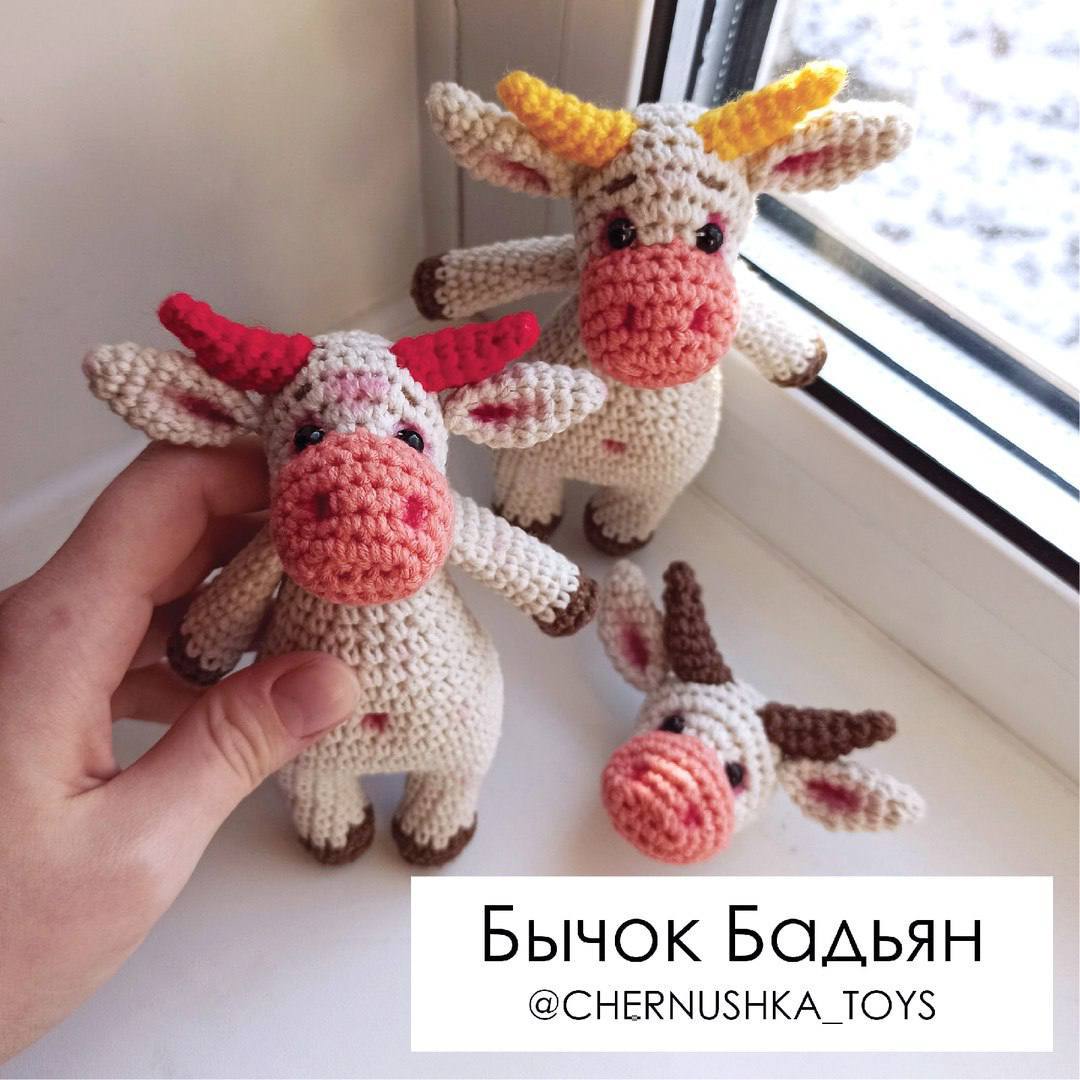
Are you looking for your next cozy crochet project? There is nothing quite as charming as a tiny, wide-eyed animal to brighten up a nursery or sit on your desk as a little companion. Today, I am sharing a detailed tutorial for this incredibly cute, small crochet bull! This little guy is full of character, thanks to some clever sculpting techniques that give him a realistic, expressive face.
Whether you are looking to make a unique gift for a baby shower or simply want to practice your amigurumi skills, this pattern is a fantastic choice. It is designed to be approachable for beginners, but the results look professional and high-end. Grab your favorite soft yarn and let’s get started on this little bovine friend!
Materials & Abbreviations
Before we dive into the stitches, let’s make sure you have everything you need. For a project of this size, I recommend using a medium-weight (worsted) cotton or acrylic blend to ensure the stitches are tight and the stuffing doesn’t show through.
What You Will Need:
- Yarn: Medium weight (Size 4) yarn in white or cream (main body), brown (hooves/horns/ears), pink or peach (muzzle/ears), and a bright accent color like red or yellow for the horns.
- Crochet Hook: A 3.5mm (E) or 4.0mm (G) hook. Using a slightly smaller hook than recommended for your yarn helps keep the amigurumi dense.
- Safety Eyes: 6mm to 8mm black safety eyes.
- Stuffing: High-quality polyester fiberfill.
- Tools: Tapestry needle, scissors, and stitch markers.
- Optional: Pink or brown pastel chalk or eye shadow for “toning” the face.
US Crochet Abbreviations:
- MR: Magic Ring
- ch: Chain
- sc: Single crochet
- inc: Increase (2 sc in one stitch)
- dec: Decrease (sc 2 stitches together)
- BLO: Back loops only
- st(s): Stitch(es)
- rep: Repeat
Step-by-Step Instructions
Note: For all rounds, please work in a continuous spiral. Use a stitch marker to keep track of the beginning of each round.
The Head (Starting from the Snout)
The head is unique because it starts with a chain to create that adorable, rounded snout shape.
- Ch 5. In the 2nd ch from the hook, work 1 inc. Work 2 sc in the next ch. Work 4 sc in the very last ch. Now, working along the other side of the chain, work 2 sc in the next ch, 1 sc in the next, and 1 inc in the last. (12)
- (1 inc, 5 sc) rep 2 times. (14)
- (1 sc, inc) rep 7 times. (21)
- Rnds 4-5: 21 sc.
- 1 sc, dec, 2 sc, dec, 1 sc, dec, 2 sc, dec, 1 sc, dec, 2 sc, dec. (15)
- Work 5 sc, shifting your position to the center of the chin. On the 5th sc, change your yarn color to the muzzle color.
- (2 sc, inc) rep 5 times. (20)
- 8 sc, 4 inc, 8 sc. (24)
- 7 sc, inc, (2 sc, inc) rep 3 times, 7 sc. (28)
- Rnds 11-13: 28 sc.
- (2 sc, dec) rep 7 times. (21)
- (1 sc, dec) rep 7 times. (14)
- 7 dec. (You may do one more dec if you want a tighter closure). Fasten off, leaving a long tail for sewing.
The Horns (Make 2)
- 6 sc in a MR.
- 4 sc.
- (1 sc, inc) rep 2 times. (6)
- (2 sc, inc) rep 2 times. (8)
- Rnds 5-7: dec, 2 sc, inc, 3 sc.
- Fasten off, leaving a tail for sewing.
The Ears (Make 2)
You can choose between “Folded Ears” for a more stylized look or “Straight Ears” for a classic appearance.
- 6 sc in a MR.
- 6 sc.
- (1 sc, inc) rep 3 times. (9)
- (2 sc, inc) rep 3 times. (12)
- 12 sc.
- (2 sc, dec) rep 3 times. (9)
For Folded Ears: Rnds 7-8: 9 sc. Fold the ear in half, then fold it again. Crochet 3 sc through both layers to close. Fasten off.
For Straight Ears: Rnd 7: 9 sc. Rnd 8: (1 sc, dec) rep 3 times. (6). Fold the ear and crochet 3 sc through both sides. Fasten off.
The Muzzle (Lip)
- Ch 2. In the 1st ch from hook, work 3 sc.
- inc, 1 sc, inc. (5)
- Fasten off.
The Arms (Make 2)
- 6 sc in a MR.
- 6 inc. (12)
- 12 sc in BLO. Change color to brown for the hooves.
- (4 sc, dec) rep 2 times. (10)
- Rnds 5-13: 10 sc (9 rounds).
- Fold the arm and crochet 4 sc through both sides to close the tube. Fasten off.
The Legs (Make 2)
- 6 sc in a MR.
- 6 inc. (12)
- 12 sc in BLO.
- 12 sc. Change color to brown for the hooves.
- (4 sc, dec) rep 2 times. (10)
- Rnds 6-9: 10 sc.
- (1 sc, inc, 2 sc, inc) rep 2 times. (14)
- 14 sc.
Note: For the first leg, fasten off and weave in the ends. For the second leg, do NOT fasten off. You will continue working directly into the body from the second leg.
The Body
Starting from the second leg, ch 1.
- 14 sc along the first leg, 1 inc in the ch, 14 sc along the second leg, 1 inc in the ch. (32)
- (7 sc, inc) rep 4 times. (36)
- Rnds 3-6: 36 sc.
- (4 sc, dec) rep 6 times. (30)
- Rnds 8-9: 30 sc.
- (3 sc, dec) rep 6 times. (24)
- Rnds 11-12: 24 sc.
- (2 sc, dec) rep 6 times. (18)
- Rnds 14-16: 18 sc.
- (1 sc, dec) rep 6 times. (12)
- 12 sc. Fasten off and weave in ends.
Finishing & Assembly
This is where the magic happens! The assembly process is what transforms these shapes into a character with a personality.
Sculpting the Face
To get that cute, stuffed muzzle look, we will use “tensioning”:
- The Eyes: Before stuffing the head, insert your safety eyes. To create the eye sockets, take a piece of thread and pull it from the color-change point (where the snout begins) toward the position of the eyes. Pull firmly to create a slight indentation, then knot it inside.
- The Nose: Using a different color thread, pull from the color-change point toward the nostrils to create that cute snout shape.
- The Muzzle: Sew the muzzle (the “Lip” piece) over the tensioned area to hide the knots and finish the snout.
- The Details: Embroider small eyebrows above the eyes.
Final Assembly
- Attach Ears and Horns: Sew the horns and ears to the top of the head. Make sure they are pulled tight so they don’t “flop” around. If the ears feel loose, you can hide a small stitch through the base of the horn to anchor them.
- Attach Head to Body: Sew the head onto the body using the remaining yarn tail.
- Belly Button: To make a tiny belly button, go to the back of the body. Using the same color as the body, pull a thread from a single stitch to create a small “cross” indentation.
- The Tail: You can make a small simple tail using the leftover yarn to match the character.
Toning for Realism
For a professional touch, use a bit of pink or peach blush (or eye shadow) on a small brush. Lightly apply it to the ears, around the eyes, the nostrils, the muzzle, and the belly button. This adds warmth and depth to your little bull!
Tips for Success
- Tight Stitches are Key: When working amigurumi, keep your tension relatively tight. This prevents the white stuffing from peeking through your stitches, which can be distracting.
- Use a Stitch Marker: Because you are working in continuous rounds, it is very easy to lose your place. Always use a marker!
- Stuffing Technique: Stuff your pieces firmly but not so much that they become hard as a rock. You want them to be soft enough to squeeze but firm enough to hold their shape.
- Color Changes: When changing colors for the hooves or muzzle, try to change on the last pull of the previous color to ensure a clean transition.
Happy crocheting! I can’t wait to see your adorable little bulls!