Easy Crochet Gingerbread House Blanket Pattern
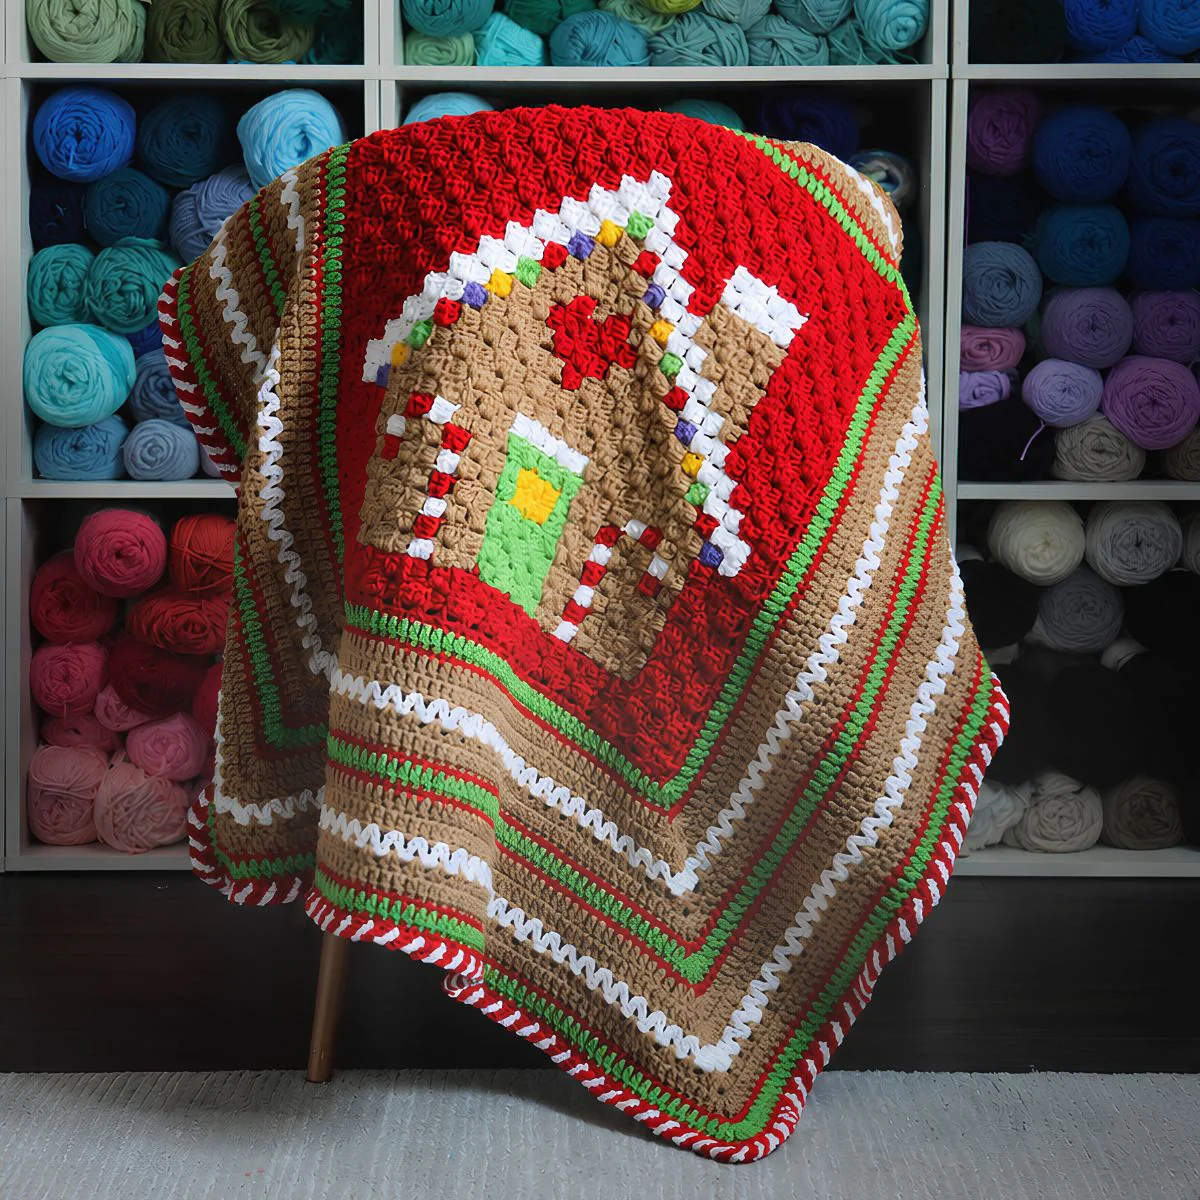
There is nothing quite like a cozy, handmade blanket to bring the holiday spirit into your home. If you are looking for a festive project that looks intricate but is surprisingly beginner-friendly, this Gingerbread House Blanket is the perfect choice. Using the Corner-to-Corner (C2C) crochet technique, you can “paint” a darling gingerbread house right into your fabric, creating a whimsical heirloom that your family will love for years to come.
Whether you are a seasoned pro or just starting your crochet journey, this tutorial will guide you through every step. We will start with a colorful pixel-graph center and finish with a classic striped border that frames the house beautifully. Let’s grab our hooks and get started!
Materials & Abbreviations
To create this blanket, you will need a variety of colors to capture the magic of a gingerbread house. We recommend using a medium-weight (worsted) acrylic yarn for durability and ease of care.
Yarn Requirements
- Brown (Topaz): 1 ball (used for the house structure and border)
- Cherry Red: 2 balls (used for the background and border)
- White: 1 ball (used for the frosting and border)
- Spring Green: 1 ball (used for the door and border)
- Lavender: 1 ball (used for candy accents)
- Saffron: 1 ball (used for candy accents)
Tools Needed
- Crochet Hook: Size H/8 (5mm)
- Tapestry Needle: For weaving in ends
- Pixel Graph: A 25×25 grid to track your color changes
- Scissors
Abbreviations (US Terms)
- ch: chain
- sc: single crochet
- hdc: half double crochet
- dc: double crochet
- st: stitch
- v-stitch: (dc, ch 1, dc) worked into the same stitch
- C2C: Corner-to-Corner
Step-by-Step Instructions
The Center Gingerbread Square
The heart of this blanket is the Gingerbread House square. This section is worked using the Corner-to-Corner (C2C) technique. Instead of working in traditional rows from one side to the other, you will work diagonally from one corner to the opposite corner.
Understanding the C2C Pixel: In this pattern, one “pixel” on your graph represents a specific block of stitches. For this project, one pixel equals chain 2 + 3 HDC stitches. Note that we are using half double crochet (HDC) instead of the traditional double crochet to create a denser, more solid fabric that keeps the image crisp.
Start at the bottom-left corner of your graph and work your way up diagonally. Follow the colors indicated on your pixel graph carefully. As you progress, you will create a square that measures approximately 18 x 18 inches. Because of the C2C method, your work will be reversible, creating a mirror image on the back!
The Decorative Border
Once your center square is complete, it is time to frame your gingerbread house with a colorful, festive border. We will work in rounds, starting from the edge of the center square.
Rounds 1 & 2: The Red Frame
Round 1: Using cherry red yarn, work one single crochet (sc) into the spaces between each “pixel square” around the perimeter. Chain 2 between each sc. When you reach the four corners, work (sc, ch 2, sc) in each corner stitch. Join with a slip stitch to the first sc.
Round 2: Continuing with cherry red, work 2 sc into every chain-2 space from the previous round. In the corners, work (sc, ch 2, sc). Join with a slip stitch.
Rounds 3 & 4: The Green and Red Contrast
Round 3: Switch to spring green yarn. Work one double crochet (dc) in every stitch around. In the corners, work (2 dc, ch 2, 2 dc). Join with a slip stitch.
Round 4: Switch back to cherry red yarn. Work one sc in every stitch around. In the corners, work (sc, ch 2, sc). Join with a slip stitch.
Rounds 5 & 6: The Brown Base
Rounds 5 & 6: Switch to topaz (brown) yarn. Work one dc in every stitch around for both rounds. In the corners, work (2 dc, ch 2, 2 dc). Join with a slip stitch at the end of each round.
Rounds 7 through 10: The Frosting and Final Trim
Round 7: Switch to white yarn. Chain 4 (counts as first dc) and work one dc in the first stitch. Skip the next stitch. *Work a v-stitch (dc, ch 1, dc) into the next stitch, skip one stitch; repeat from * all the way around. In the corners, work (2 dc, ch 2, 2 dc). Join to the 3rd chain of your starting chain 4.
Round 8: Switch to topaz (brown) yarn. Chain 2. Work 2 dc into every v-stitch chain space from the previous round. In the corners, work (2 dc, ch 2, 2 dc). Join and chain 2.
Round 9: Continuing with topaz yarn, work one dc in every stitch around. In the corners, work (2 dc, ch 2, 2 dc). Join with a slip stitch.
Round 10: Switch to cherry red yarn. Work one sc in every stitch around. In the corners, work (sc, ch 2, sc). Join with a slip stitch.
Expanding the Blanket
If you would like a larger blanket, you can simply repeat the sequence of Rounds 3 through 10 as many times as you wish. This will continue to grow the border while maintaining the festive striped pattern. The standard finished size is approximately 40 x 40 inches.
Finishing Your Blanket
Once you have reached your desired size, fasten off your yarn. Use your tapestry needle to weave in all the loose ends securely. Because C2C and color-work patterns involve many yarn changes, you will have several ends to hide. To ensure a professional look, weave the ends back and forth through the stitches of the same color.
Optional Edging: For an extra touch of holiday magic, you can add a candy cane-style twisted edge or a scallop border to the final round to give it a finished, boutique feel.
Tips for Success
Manage Your Yarn
When working on the small color changes for the “gumdrops” and candies in the center square, it can be tedious to keep switching whole balls of yarn. To save time, pre-cut small strands of lavender, saffron, and green yarn (approximately 40 inches each). You can crochet across the pixel using these smaller lengths and weave them in as you go.
Fixing Gaps
Since C2C is worked diagonally, sometimes small gaps can appear in the corners or where color changes occur. The best time to fix these is while you are weaving in your ends. Use your tapestry needle and a bit of leftover yarn to “fill in” any holes, ensuring the blanket is snug and warm.
Tension Matters
To keep your gingerbread house from looking skewed, try to maintain consistent tension. If you notice the square is becoming too stretched, check your HDC stitches to ensure they aren’t too loose. A tight, consistent stitch helps the pixel art pop!