Cute Amigurumi Bee Crochet Pattern: A Beginner-Friendly Tutorial
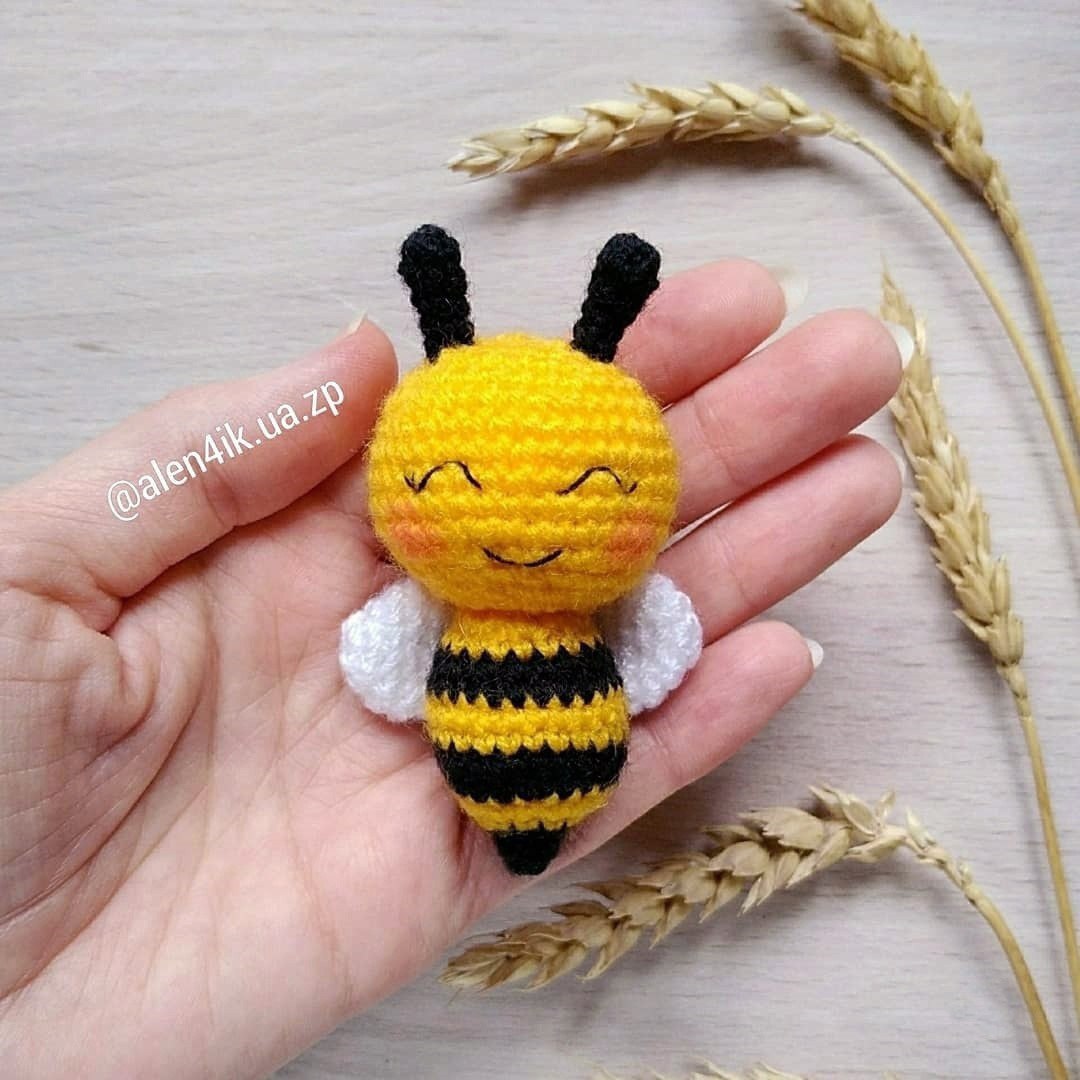
Are you looking for a quick, adorable, and rewarding crochet project? Look no further! This tiny amigurumi bee is the perfect addition to your crochet collection. Whether you want to make a cute keychain, a little desk companion, or a sweet gift for a friend, this little bumblebee is sure to bring a smile to everyone’s face. This pattern is designed to be small—reaching about 2.5 inches from top to bottom—making it a fantastic “scrap buster” project that you can finish in just one sitting.
In this tutorial, we will walk you through every single step, from creating the magic ring to the final adorable blush on the cheeks. This pattern is written with beginners in mind, using standard US crochet terminology. Grab your hook, pick out your favorite bright colors, and let’s get buzzing!
Materials & Abbreviations
Materials Needed
To ensure your bee turns out looking just like the one in the photos, I recommend using a smaller hook than usual to keep your stitches tight. This prevents the stuffing from peeking through the gaps.
- Yarn: Medium weight or fingering weight cotton or acrylic yarn. You will need three colors: Bright Yellow, Solid Black, and Pure White.
- Crochet Hook: 1.5 mm (or the closest size you have that produces a very tight fabric).
- Stuffing: Polyester fiberfill (often called polyfill or holofiber).
- Yarn Needle: A blunt-tipped needle for sewing the pieces together.
- Black Sewing Thread: For embroidering the tiny facial features.
- Stitch Marker: A scrap piece of contrasting yarn or a dedicated crochet marker to keep track of your rounds.
- Pink Dry Pastel or Chalk: To give your bee those adorable rosy cheeks.
- Scissors: For clean yarn cuts.
Abbreviations (US Terms)
If you are new to amigurumi, please familiarize yourself with these terms before starting:
- MR: Magic Ring (or Magic Circle)
- ch: Chain
- sl st: Slip stitch
- sc: Single crochet
- inc: Increase (2 single crochets worked into the same stitch)
- dec: Decrease (2 single crochets worked together as one)
- st(s): Stitch(es)
Note: For the body section, we will work in rounds but finish each round with a slip stitch and start the next with a chain. For all other parts, we will work in a continuous spiral.
Step-by-Step Instructions
The Body
The body is worked from the bottom (the stinger) up toward the neck. As you work, remember to stuff the body firmly with fiberfill to give it a nice rounded shape.
Start with Black Yarn:
- Round 1: 4 sc in a MR (4)
- Round 2: (1 sc, inc) repeat 2 times (6)
- Round 3: (1 sc, inc) repeat 3 times (9)
Switch to Yellow Yarn:
- Round 4: (2 sc, inc) repeat 3 times (12)
- Round 5: (1 sc, inc) repeat 6 times (18)
Switch back to Black Yarn:
- Round 6: (2 sc, inc) repeat 6 times (24)
- Round 7: 24 sc (24)
Switch back to Yellow Yarn:
- Rounds 8–9: 24 sc (24)
Switch back to Black Yarn:
- Round 10: 24 sc (24)
- Round 11: (dec, 2 sc) repeat 6 times (18)
Fasten off the black yarn and join the yellow yarn to continue.
Finish with Yellow Yarn:
- Round 12: 18 sc (18)
- Round 13: (dec, 1 sc) repeat 6 times (12)
Fasten off, leaving a long tail for sewing to the head.
The Head
The head is worked in a continuous spiral using yellow yarn. Do not forget to stuff the head as you go!
Yellow Yarn:
- Round 1: 6 sc in a MR (6)
- Round 2: 6 inc (12)
- Round 3: (1 sc, inc) repeat 6 times (18)
- Round 4: (2 sc, inc) repeat 6 times (24)
- Round 5: (3 sc, inc) repeat 6 times (30)
- Round 6: (4 sc, inc) repeat 6 times (36)
- Rounds 7–11: 36 sc (5 rounds total) (36)
- Round 12: (dec, 4 sc) repeat 6 times (30)
- Round 13: (dec, 3 sc) repeat 6 times (24)
- Round 14: (dec, 2 sc) repeat 6 times (18)
- Round 15: (dec, 1 sc) repeat 6 times (12)
Fasten off, leaving a long tail for sewing.
The Wings (Make 2)
The wings are worked in a continuous spiral using white yarn. Do not stuff the wings.
White Yarn:
- Round 1: 6 sc in a MR (6)
- Round 2: 6 inc (12)
- Round 3: (3 sc, inc) repeat 3 times (15)
- Rounds 4–5: 15 sc (15)
- Round 6: (dec, 3 sc) repeat 3 times (12)
- Round 7: 12 sc (12)
- Round 8: (dec, 2 sc) repeat 3 times (9)
- Round 9: (1 sc, dec) repeat 3 times (6)
Fasten off, leaving a long tail for sewing.
The Antennae (Make 2)
The antennae are worked in a continuous spiral using black yarn. Do not stuff the antennae.
Black Yarn:
- Round 1: 6 sc in a MR (6)
- Round 2: 6 sc (6)
- Round 3: (dec, 1 sc) repeat 2 times (4)
- Rounds 4–5: 4 sc (4)
Fasten off, leaving a long tail for sewing.
Finishing & Assembly
Now comes the fun part—bringing your bee to life! Take your time with the assembly to ensure everything is symmetrical.
- Attach the Head: Use your yarn needle and the tail from the head to sew the head onto the top of the body. Ensure it is centered and secure.
- Embroider the Face: Using black sewing thread, embroider two small curved lines for closed, happy eyes. Below the eyes, embroider a small, simple smile.
- Attach the Antennae: Sew the two black antennae onto the top of the head, positioned between the eyes.
- Assemble the Wings: This is a special step! Take your two white wings and sew them together along the back edge (the side that will face the bee’s body). Once they are joined into a “butterfly” shape, sew the center of the wings to the back of the bee’s body.
- Add the Blush: For that extra dose of cuteness, take a small amount of pink dry pastel on a brush or your fingertip and gently dab it onto the area just below the eyes to create rosy cheeks.
Pro Tips for Success
To make your amigurumi look professional, keep these tips in mind:
Master the Color Change
When switching between black and yellow for the body stripes, try to change colors on the last pull-through of the stitch before the color change. This creates a much cleaner line between the stripes and prevents “lumpy” transitions.
Tension is Key
Amigurumi requires much tighter tension than a standard scarf or blanket. If you see bits of white stuffing poking through your black or yellow stitches, try dropping down half a hook size. A tight fabric is the secret to a high-quality plushie.
Stuffing Technique
Don’t just shove a large clump of fiberfill into the bee. Instead, pull small pieces off the main mass and push them in bit by bit. This allows you to mold the shape and prevents hard lumps from forming inside the head or body.
The “Closed Eye” Look
When embroidering the eyes, don’t make them too large. Small, delicate “u” shaped lines create that sleepy, adorable aesthetic that makes amigurumi so charming.