Crochet Striped Drawstring Tote Pattern: A Colorful DIY Guide
Looking for a fun, vibrant project to add to your crochet collection? This Striped Drawstring Tote is the perfect blend of style and functionality. Whether you need a cute bag for the farmer’s market, a beach accessory, or a unique handmade gift, this colorful tote is a fantastic choice. Using a sturdy cotton yarn ensures the bag holds its shape while remaining breathable and washable.
This pattern is designed to be beginner-friendly, though it introduces a few wonderful techniques like the reverse single crochet (also known as the crab stitch) and simple appliques. By the time you finish this project, you’ll have a professional-looking bag with a whimsical, bohemian vibe. Let’s dive into the details and start stitching!
Materials & Abbreviations
To get started, gather your supplies. We recommend using a 100% cotton yarn for this project because it provides the structure needed for a tote bag and doesn’t stretch as much as acrylic.
Materials Needed
- Yarn: Medium weight (4) cotton yarn in four colors:
- Main Color (MC): Blue (Approx. 2 balls)
- Contrast Color A: Green (1 ball)
- Contrast Color B: Orange (1 ball)
- Contrast Color C: Pink (1 ball)
- Hook: Size 4.5 mm (U.S. 7) crochet hook
- Notions: Yarn needle, scissors, and stitch markers
Abbreviations (US Terms)
- ch: chain
- sc: single crochet
- dc: double crochet
- sl st: slip stitch
- st(s): stitch(es)
- sp: space
- rnd: round
- RS: right side
- rep: repeat
Gauge: 14 sc and 16 rows = 4 inches. If your gauge differs, your bag may be slightly larger or smaller than the finished measurements of approximately 7 inches wide and 11.5 inches high.
Step-by-Step Instructions
Pro Tip for Color Changes: When changing colors, work the last stitch of the previous color until there are only two loops left on your hook. Pull the new color through those final two loops to create a seamless transition.
The Base
The base is worked in the round to create a flat, circular bottom for the bag.
- Round 1: Using MC, ch 2. Work 6 sc in the 2nd chain from the hook. Join with a sl st to the first sc.
- Round 2: Ch 3 (counts as dc). Work 2 dc in the same space as the last sl st. Work 3 dc in each sc around. Join with a sl st to the top of the ch 3. (18 dc total)
- Round 3: Ch 3 (counts as dc). Work 1 dc in the same space as the last sl st. *Work 1 dc in the next dc, then 2 dc in the following dc. Repeat from * around to the last dc. Work 1 dc in the last dc. Join with a sl st to the top of the ch 3. (27 dc total)
- Round 4: Ch 3 (counts as dc). Work 1 dc in the same space as the last sl st. *Work 2 dc in the next dc. Repeat from * around. Join with a sl st to the top of the ch 3. (54 dc total)
- Round 5: Ch 3 (counts as dc). Work 1 dc in the same space as the last sl st. *Work 1 dc in each of the next 3 dc, then 2 dc in the next dc. Repeat from * to the last dc. Work 1 dc in the last dc. Join with a sl st to the top of the ch 3. (68 dc total)
- Round 6: Ch 3 (counts as dc). Work 1 dc in the same space as the last sl st. *Work 1 dc in each of the next 4 dc, then 2 dc in the next dc. Repeat from * to the last 2 dc. Work 1 dc in each of the last 2 dc. Join with a sl st to the top of the ch 3. (82 dc total) Fasten off.
The Body of the Bag
The body is worked in rows and then seamed together to form a cylinder. This creates a striking vertical stripe pattern.
Using MC, ch 33.
- Row 1 (RS): Work 1 dc in the 4th ch from hook (counts as 2 dc), then 1 dc in each ch across. (31 sts). Join Color A. Turn.
- Row 2: With Color A, ch 1. Work 1 sc in each dc across. Join MC. Turn.
- Row 3: With MC, ch 3 (counts as dc). Work 1 dc in each sc across. Join Color A. Turn.
- Row 4: Repeat Row 2. Join Color B. Turn.
- Row 5: With Color B, repeat Row 3. Join Color C. Turn.
- Row 6: With Color C, repeat Row 2. Join Color B. Turn.
- Row 7: Repeat Row 5.
- Row 8: With Color C, repeat Row 2. Join Color A. Turn.
- Row 9: With Color A, repeat Row 3. Join MC. Turn.
- Row 10: With MC, repeat Row 2. Join Color A. Turn.
- Row 11: Repeat Row 9.
- Row 12: With MC, repeat Row 2. Join Color C. Turn.
- Row 13: With Color C, repeat Row 3. Join Color B. Turn.
- Row 14: With Color B, repeat Row 2. Join Color C. Turn.
- Row 15: Repeat Row 13.
- Row 16: With Color B, repeat Row 2. Join MC. Turn.
- Row 17: With MC, repeat Row 3. Join Color A. Turn.
Now, repeat Rows 2 through 17 until your work measures approximately 22 inches from the beginning, ending on a Row 16. Fasten off. Fold the piece in half and sew the first row to the last row to create a center back seam. This will result in vertical stripes!
Top Edging and Assembly
Top Edging: With the right side facing, join MC with a sl st to the center back seam. Work 72 sc evenly around the top edge. Join with a sl st to the first sc.
- Eyelet Round: Ch 3 (counts as dc). Work 1 dc in the next sc. *Ch 1, skip next sc, 1 dc in each of the next 2 sc. Repeat from * to the last st. Ch 1, skip the last st. Join with a sl st to the top of the ch 3.
- Round 3: Ch 3 (counts as dc). Work 1 dc in each stitch or ch-1 space around. Join with a sl st to the top of the ch 3.
- Round 4: Ch 1. Working from left to right (reverse single crochet), work 1 reverse sc in each stitch around. Join with a sl st to the first sc. Fasten off.
Joining the Body to the Base: Pin the body of the bag to the base. With the right side facing, join MC with a sl st at the center back seam. Work 1 row of sc evenly around the edge to join the body to the base. Join with a sl st to the first sc. For a finished look, work one final round of reverse sc (left to right) around the join. Fasten off.
Straps (Make 2)
Using MC, ch 72.
- Row 1 (RS): 1 sc in 2nd ch from hook and each ch across. (71 sc). Turn.
- Rows 2-3: Ch 1, 1 sc in each sc across. Turn.
- Row 4: Ch 1, 1 sc in each sc across. Do not turn.
- Row 5: Ch 1, working from left to right, work 1 reverse sc in each stitch across. Fasten off.
- Edge: Join MC to the last remaining loop of the foundation chain. Ch 1, work 1 reverse sc in each remaining loop across. Fasten off.
Applique Flowers (Make 4)
Follow these general instructions for each flower, changing colors as specified below.
- Center: With Color 1, ch 2. Work 6 sc in 2nd ch from hook. Join with sl st. Ch 1, work 2 sc in each sc around. Join and fasten off. (12 sc)
- Petals: Join Color 2 with a sl st to the front loop of any sc. *Ch 1, 2 sc in same space, 2 sc in front loop of next sc (4 sc per petal). Turn. Work 3 rows of sc (ch 1, 1 sc in each st). In the final row, ch 1, and work sc2tog twice across the petal. Fasten off.*
- Complete the Flower: Repeat the petal process 5 more times around the center for a total of 6 petals.
Flower Combinations:
- Flower A: Color 1 (MC), Color 2 (Contrast A)
- Flower B: Color 1 (Contrast C), Color 2 (Contrast B)
- Flower C: Color 1 (Contrast A), Color 2 (MC)
- Flower D: Color 1 (Contrast B), Color 2 (Contrast C)
Finishing
Now it’s time to put everything together!
- Attach Straps: Sew the top ends of the straps to either side of the back seam, just under the top edging. Sew the bottom ends of the straps to the back seam at the base, approximately 3 inches from the center.
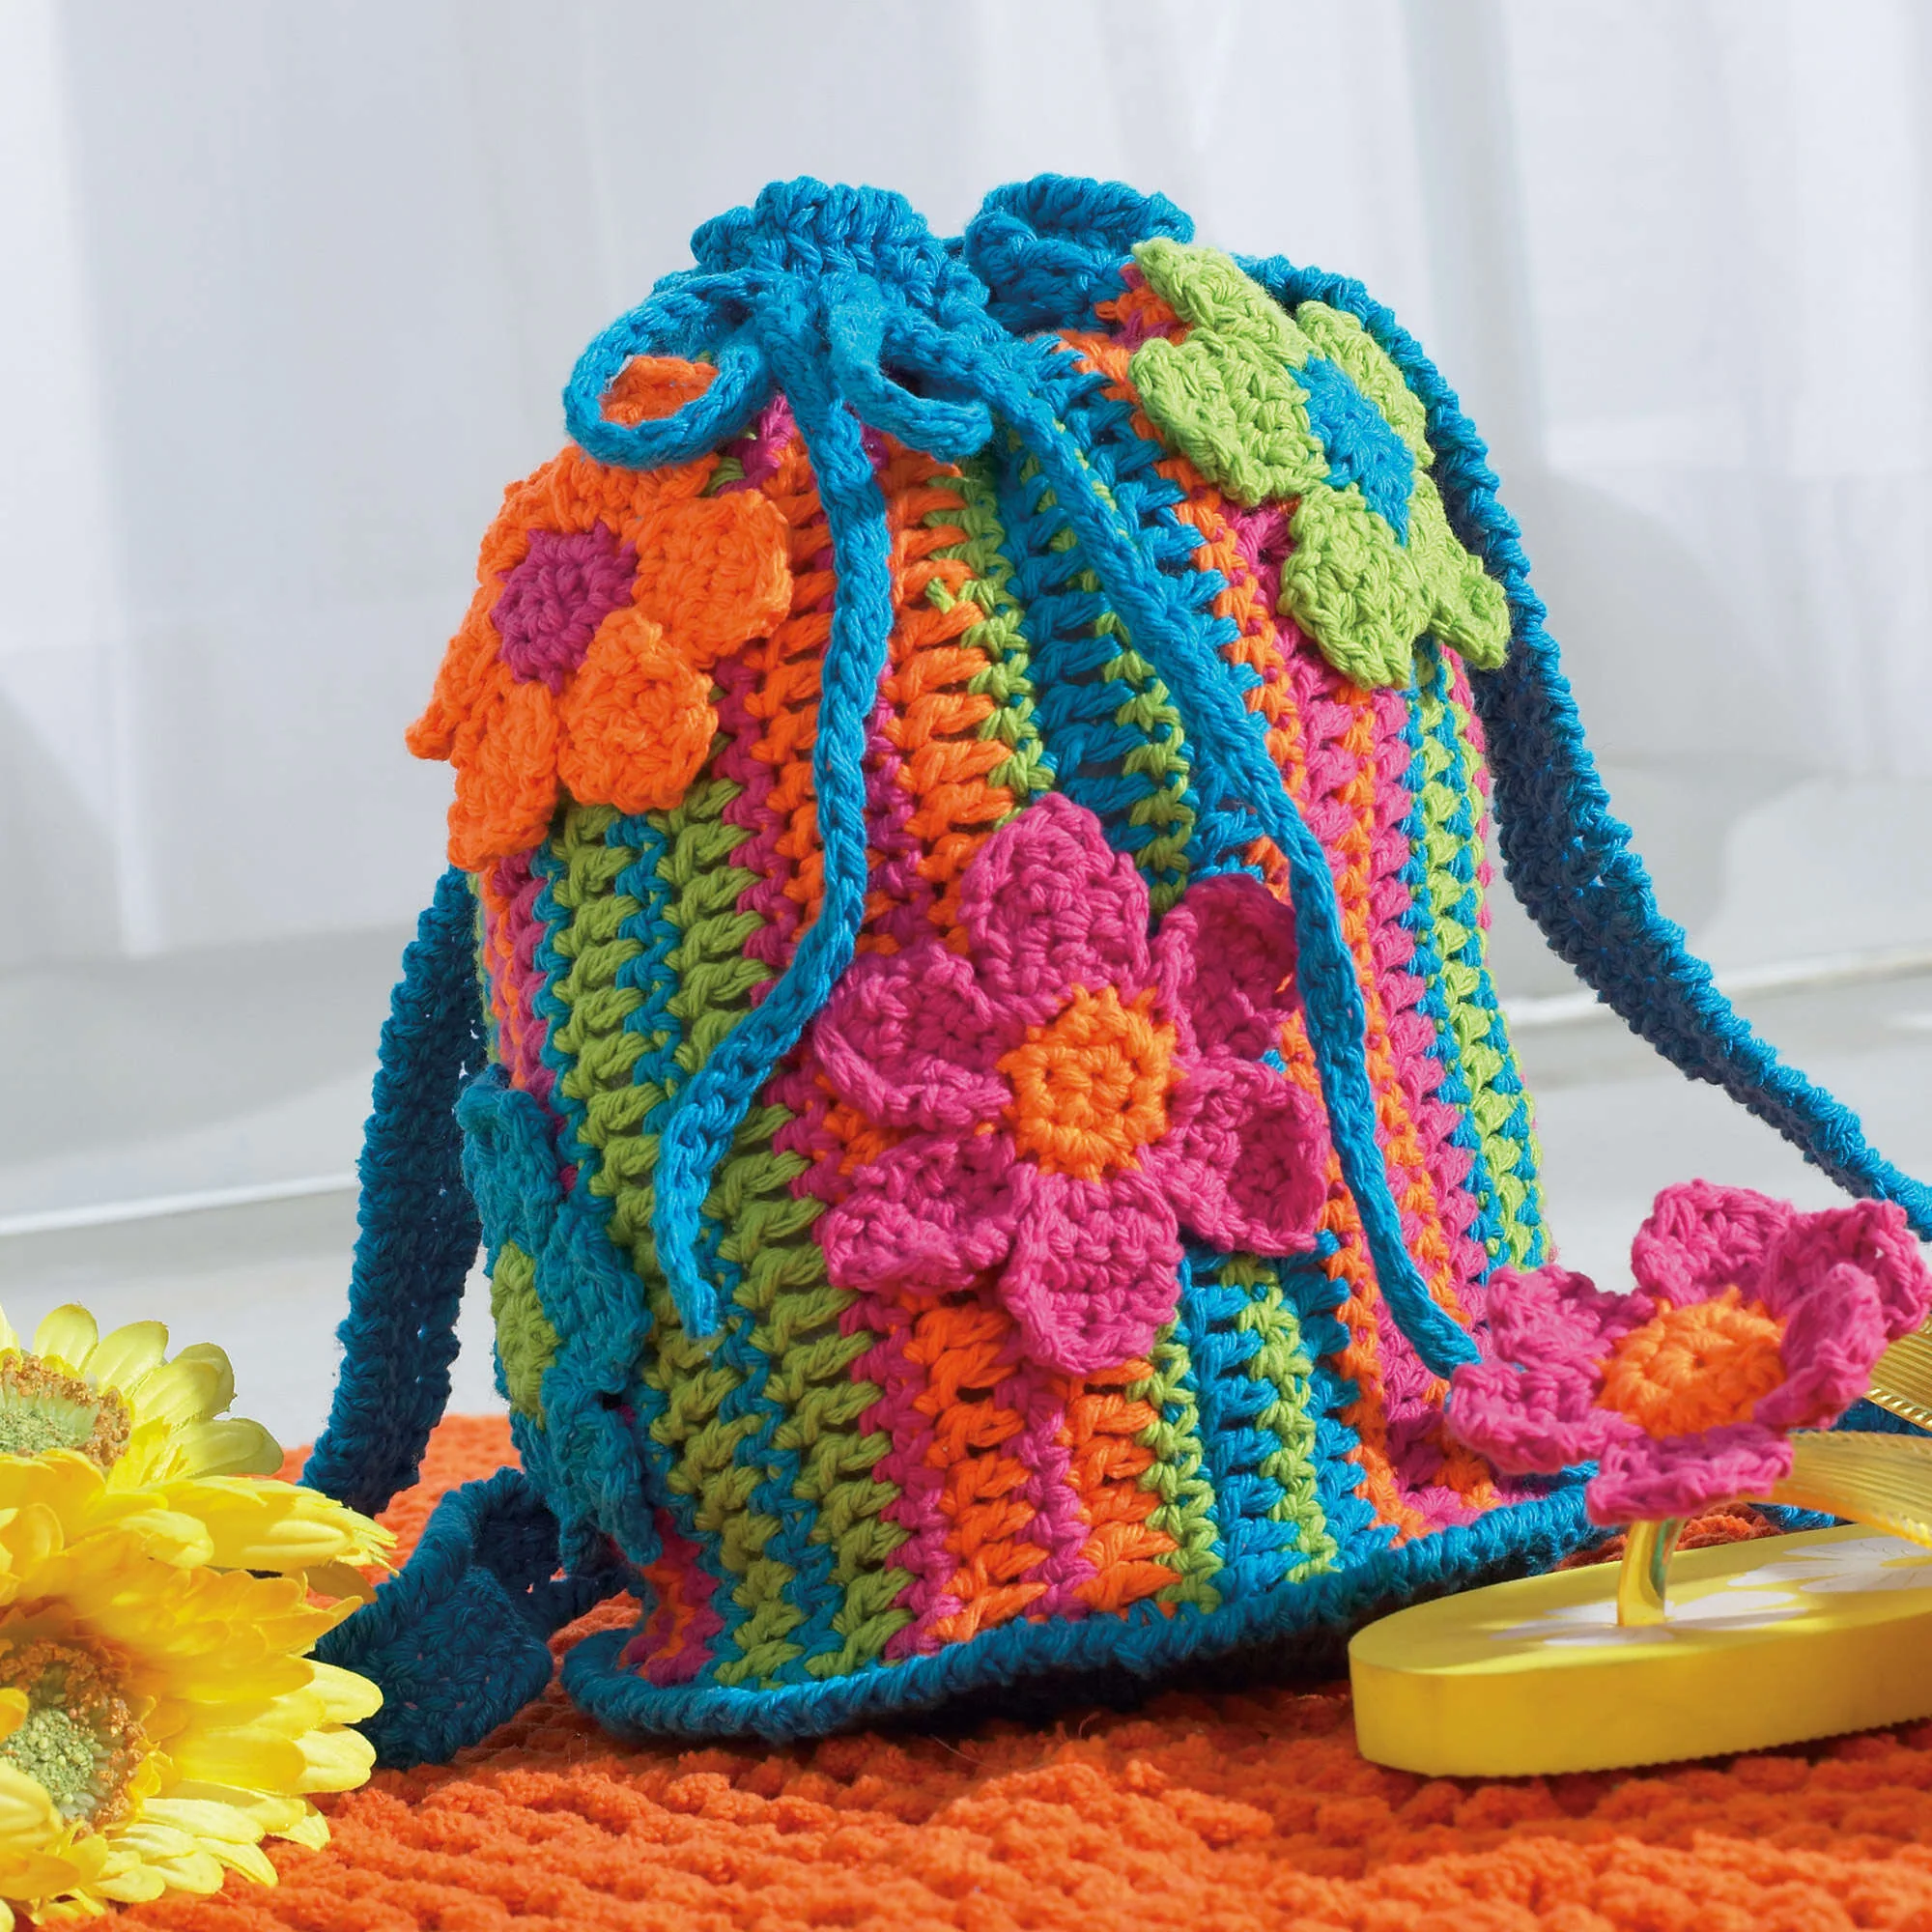
- Add Flowers: Pin your four applique flowers randomly on the bag to match the photo. Sew them securely in place.
- The Drawstring: With MC, ch 42 inches. Turn the chain sideways and work a sl st into each “bump” along the side of the chain. Fasten off.
- Final Step: Weave the drawstring through the eyelet round at the top of the bag. Pull the ends to the center front and tie a secure knot.
Tips for Success
Mastering the Reverse Single Crochet
The reverse single crochet (crab stitch) is what gives the edges of this bag its professional, cord-like finish. Because you are working “backward” (from left to right), it can feel strange at first. Just remember to insert your hook into the stitch to the right of your current position and pull the yarn through as you normally would for a single crochet.
Keeping Your Stripes Even
When working the body of the bag, be careful not to pull your stitches too tight during color changes. This prevents the edges of the bag from curving inward and ensures your vertical stripes look straight and uniform.
Yarn Choice
While we suggest cotton, you can use a cotton-acrylic blend if you want a slightly softer bag. Avoid using 100% acrylic, as the weight of the items you put in the tote may cause the bag to stretch significantly over time.