Adorable Crochet Sloth Amigurumi Pattern: A Step-by-Step Tutorial
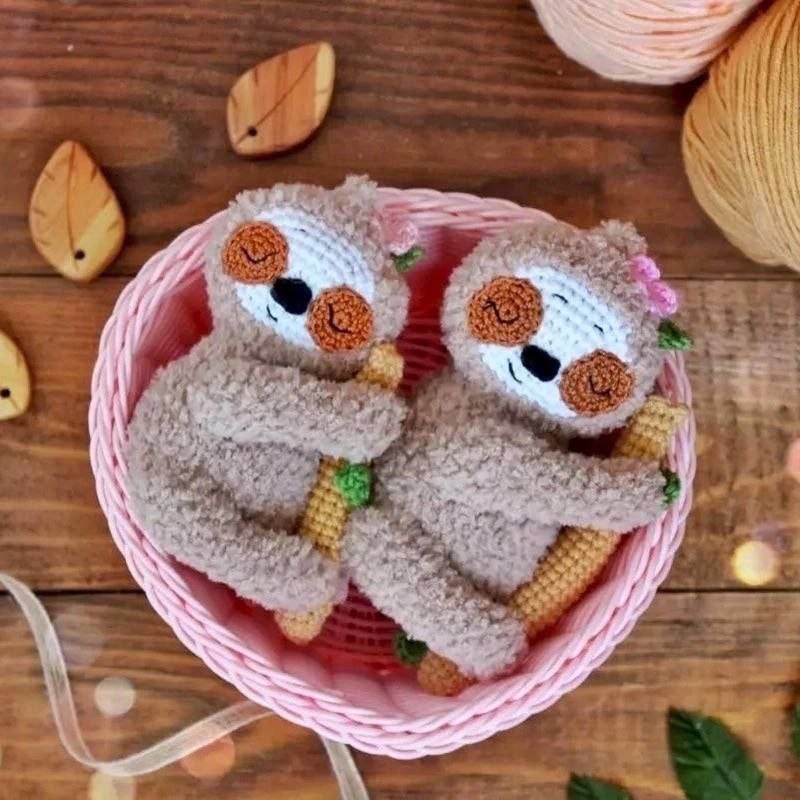
There is something incredibly soothing about a sloth. Their slow, relaxed pace is the perfect inspiration for a cozy crochet project. In this tutorial, we are going to create an adorable, palm-sized crochet sloth that is perfect for nursery decor, a desk companion, or a sweet gift for a friend. This pattern uses a combination of soft chenille-style yarn for a “fluffy” feel and smooth cotton for the delicate facial details.
Whether you are a beginner looking to practice your amigurumi skills or an experienced maker wanting a quick weekend project, this sloth is designed to be accessible and fun. By the end of this guide, you will have a charming little character complete with a tiny butterfly and a little branch to hold!
Materials & Abbreviations
To ensure your sloth turns out looking just like the photos, it is important to use the right materials. We are using a “chenille” or “velvet” style yarn for the body to give it that signature huggable texture, paired with fine cotton for the facial features.
Materials Needed
- Main Body Yarn: One skein of beige chenille/velvet yarn (often called “Softi” style).
- Detail Yarn (Cotton): Small amounts of white, beige, green, black, and pink cotton yarn.
- Eye Yarn: Very fine brown cotton yarn.
- Crochet Hooks: 2.25 mm (approx. 3.5 mm equivalent in feel) for the body, and a 1.5 mm hook for the delicate facial pieces.
- Other Essentials: Polyester fiberfill stuffing, scissors, a yarn needle, and stitch markers.
US Crochet Abbreviations
Please ensure you are using US terms throughout this pattern:
- ch: chain
- sc: single crochet
- hdc: half double crochet
- dc: double crochet
- tr: treble crochet
- sl st: slip stitch
- inc: increase (2 sc in the same stitch)
- dec: decrease (invisible decrease recommended)
- picot: picot stitch
- MR: magic ring (amigurumi ring)
Step-by-Step Instructions
The Head
The head is worked in two parts: a white facial mask made of cotton, which is then joined to the beige fuzzy head.
Part 1: The White Face (Use white cotton and a 1.5 mm hook)
- Start with a magic ring: ch 6 + 1 ch to join.
- In the 2nd ch from the hook, work: 2 sc, 4 sc, 3 sc in the last ch. Working on the other side of the foundation chain: 4 sc, 1 sc in the last ch (14 stitches).
- 2 inc, 4 sc, 3 inc, 4 sc, 1 inc (20 stitches).
- (1 sc, inc) x2, 4 sc, (1 sc, inc) x3, 5 sc, inc (26 stitches).
- (2 sc, inc) x2, 4 sc, (2 sc, inc) x3, 6 sc, inc (32 stitches).
- (7 sc, inc) x4 (36 stitches).
Part 2: The Beige Head (Switch to beige chenille yarn)
- Rounds 7–11: 36 sc.
- Round 12: (4 sc, dec) x6 (30 stitches).
- Round 13: 30 sc.
- Round 14: (3 sc, dec) x6 (24 stitches).
- Round 15: (2 sc, dec) x6 (18 stitches).
- Round 16: (1 sc, dec) x6 (12 stitches).
- Round 17: 6 dec (6 stitches).
- Fasten off and pull the hole tight.
The Body
The body is worked entirely in the beige chenille yarn.
- Round 1: 6 sc in a magic ring (6).
- Round 2: 6 inc (12).
- Round 3: (1 sc, inc) x6 (18).
- Round 4: (2 sc, inc) x6 (24).
- Round 5: (3 sc, inc) x6 (30).
- Round 6: (4 sc, inc) x6 (36).
- Rounds 7–11: 36 sc.
- Round 12: (4 sc, dec) x6 (30).
- Round 13: 30 sc.
- Round 14: (3 sc, dec) x6 (24).
- Round 15: 24 sc.
- Round 16: (2 sc, dec) x6 (18).
- Round 17: 18 sc.
- Finish with a slip stitch and leave a long tail for sewing the head to the body. Remember to stuff the body firmly!
The Limbs (Make 4)
These will serve as the arms and legs. Use the beige chenille yarn.
- Round 1: 6 sc in a magic ring (6).
- Round 2: (2 sc, inc) x2 (8).
- Rounds 3–9: 8 sc.
- Round 10: 2 inc, 6 sc (10).
- Rounds 11–14: 10 sc.
- Round 15: 5 dec (5).
- Fasten off, leave a long tail for sewing, and stuff lightly.
Face Details & Accessories
The Eyes
Use the fine brown cotton yarn and a 1.5 mm hook. If you are using a thicker cotton, you may need to decrease the number of stitches to keep the eyes small.
- Round 1: 6 sc in a magic ring (6).
- Round 2: 6 inc (12).
- Round 3: (3 sc, inc) x3 (15).
- Round 4: 4 inc (19).
- Fasten off, leaving a long tail for sewing. Embroider the eye shapes onto the white face part before attaching.
The Nose
Use black or dark brown cotton yarn.
- Ch 4.
- In the 2nd ch from the hook: 3 sc.
- On the other side of the chain: 1 sl st.
- In the last ch: 1 sl st.
- Fasten off, leaving a tail for sewing.
Hair Tuft
To add a little personality, create a tiny tuft of hair on the top center of the head.
- Attach yarn to the center of the head.
- Ch 4 and join back to the same starting stitch.
- Fasten off and hide the yarn tails inside the head.
Butterfly Accessory
Use your choice of pink or colored cotton yarn.
- Start with a magic ring: 4 ch, 1 tr, 2 dc, 2 sc, 1 dc, 2 ch, 1 sl st, 2 ch, 1 dc, 2 sc, 2 dc, 1 tr, 4 ch, 1 sl st.
- Pull the ring tight to close the center.
Leaves
Use green cotton yarn.
- Ch 4.
- In the 2nd ch from hook: 1 sc, 2 hdc in the next stitch, 1 sc.
- In the next stitch: 1 ch, work a picot, then 1 sc in that same stitch.
- On the other side of the chain: 1 sc, 2 hdc in the next stitch, 1 sc.
- Sl st to finish and leave a tail for sewing.
The Branch
Use beige cotton or tan yarn.
- Round 1: 5 sc in a magic ring (5).
- Round 2: 5 inc (10).
- Rounds 3–19: 10 sc.
- Round 20: 1 dec, 8 sc (9).
- Rounds 21–23: 9 sc.
- Round 24: 1 dec, 7 sc (8).
- Rounds 25–26: 8 sc.
- In the very next stitch, work 1 inc.
- Fold the piece in half and sc through both layers to create a flat, sturdy branch.
Finishing
Now comes the best part: assembly! Taking your time here will make the difference between a lumpy toy and a professional-looking amigurumi.
- The Face: Embroider the eyes onto the white face part. Sew the nose onto the face, and add small stitches for the eyebrows and a tiny mouth. Sew the completed white face onto the beige head.
- The Body: Sew the head onto the body. Position the four limbs so the sloth looks like it is hugging the branch.
- The Accessories: Sew the butterfly onto the head and the leaves onto the branch. Finally, sew the branch into the sloth’s arms.
Your finished sloth should be approximately 4 inches (10 cm) tall.
Tips for Success
Working with chenille/velvet yarn can be a bit tricky because the stitches can be hard to see. Here are a few pro-tips:
- Use Stitch Markers: Because the fuzzy yarn hides the “V” of the stitch, always use a marker to keep track of your rounds.
- Tension is Key: Try to keep your tension consistent. If your stitches are too loose, the stuffing will peek through the gaps. If they are too tight, the toy might look distorted.
- Invisible Decreases: When working the rounds with decreases (dec), use the invisible decrease method (working through the front loops only) to avoid visible holes in your plushie.
- Stuffing: Stuff the head and body firmly, but leave the limbs slightly softer so they are easier to pose.