Tiny Crochet Yorkshire Terrier Amigurumi Pattern: A Beginner-Friendly Tutorial
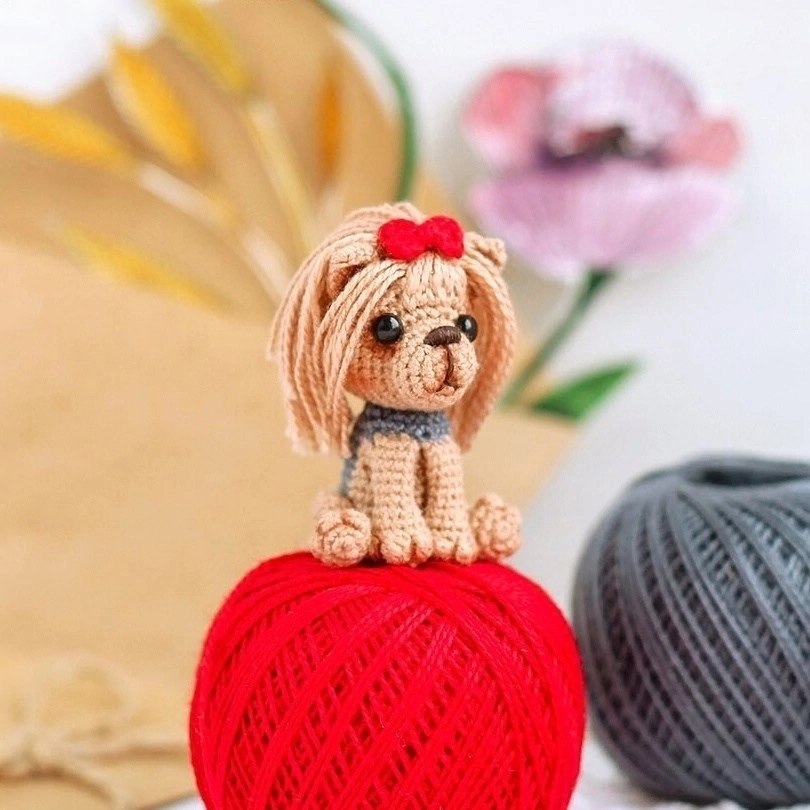
Are you looking for a sweet, pocket-sized project to add to your crochet collection? There is nothing quite as charming as a tiny animal, and this miniature Yorkshire Terrier (or “Yorkie”) is the perfect example! This amigurumi project is small enough to be a wonderful keychain or a desk companion, yet detailed enough to showcase your skills in shaping and colorwork.
In this tutorial, we will guide you through creating a tiny, adorable Yorkie. Whether you are a seasoned amigurumi artist or a beginner looking for a fun challenge, this pattern is designed to be accessible and rewarding. We will cover everything from creating tiny “toes” to working with hair strands and assembling the perfect little face.
Materials and Abbreviations
To achieve the tiny, detailed look seen in the photos, you will need to use very fine materials. Using a smaller hook helps keep the stitches tight, ensuring that your stuffing stays hidden inside the toy.
Materials Needed:
- Fine Crochet Thread or Thread-Weight Yarn: Use a light tan/sand color for the main body, a charcoal gray for the coat detail, a bright red for the bow, and a light brown/tan for the hair.
- Crochet Hook: 1.00 mm (or the closest size available to you).
- Stuffing: High-quality polyester fiberfill.
- Safety Eyes: Very small black beads or safety eyes (approximately 3mm to 5mm).
- Embroidery Needle: For sewing pieces together and hiding ends.
- Optional: A small amount of dry pastel for shading the muzzle and paws.
Abbreviations (US Terms):
- MR: Magic Ring
- ch: Chain
- sc: Single Crochet
- inc: Increase (2 sc in the same stitch)
- dec: Decrease (sc 2 together)
- sl st: Slip Stitch
- dc: Double Crochet
- st(s): Stitch(es)
- [ ] * #: Repeat the instructions inside the brackets the specified number of times.
Step-by-Step Instructions
The Front Legs (Make 2)
The front legs are worked in rounds. To give them a realistic look, we will use a special “finger” technique to create tiny toes.
The “Finger” Technique: To make a toe, yarn over and pull up a loop for a double crochet, but do not finish the stitch. In that same stitch, yarn over and pull up a second loop. Finally, yarn over and pull up a third loop. Instead of finishing each stitch individually, pull the yarn through all three loops at once with a single “common top loop.” This creates a cute, tiny bump.
- 6 sc in MR (6)
- 6 inc (12)
- 3 sc, finger*, 1 sc, finger, 1 sc, finger, 4 sc (12)
- 12 sc
- 12 sc
- (dec, 1 sc) * 4 (8)
- 7-12. 8 sc
*Use the “Finger” technique described above.
Fasten off, leaving a tail for sewing. Do not stuff the entire leg; only fill the very bottom portion to give it a little weight and shape.
The Back Legs (Make 2)
The back legs are slightly different to allow for a sturdier sitting position. These should be stuffed fully.
- 6 sc in MR (6)
- 6 inc (12)
- 3 sc, finger, 1 sc, finger, 1 sc, finger, 4 sc (12)
- 12 sc
- 12 sc
- (dec, 2 sc) * 3 (9)
- 9 sc
- 3 sc, 3 inc, 3 sc (12)
- 9-13. 12 sc
- 14. 6 dec
Fasten off and stuff the legs firmly during the process.
The Tail
- Leave a long starting tail. Chain 7.
- In the 2nd chain from the hook, work 6 sc.
- Fasten off, leaving a long tail for sewing.
The Body
The body introduces color changes. We will start with the sand color and then transition to gray.
- Starting with Sand Color: 6 sc in MR (6).
- 6 inc (12).
- (1 sc, inc) * 6 (18).
- 1 sc, inc, (2 sc, inc) * 5, 1 sc (24).
- Switch to Gray Color: 14 sc in gray, 10 sc in sand (24).
- Repeat Row 5. At this stage, sew the tail to the body using the tails left from the tail construction.
- 7-11. 14 sc in gray, 10 sc in sand (24).
- Continue with Gray Color only: At this stage, attach the front legs. Insert your hook through both sides of the leg and through the body wall, then work sc through all layers (leg + body) to join them (24).
- 24 sc.
- (dec, 2 sc) * 6 (18).
- Work 5 more sc so the tail end rests on the back.
Fasten off with a slip stitch, leaving a long tail for sewing the head on. Stuff the body firmly.
The Ears (Make 2)
The ears are worked in rows (flat) rather than rounds to create a specific shape.
- 2 ch. In the 2nd ch from hook, work 2 sc (2).
- 2 inc (4).
- 4 sc.
- Edge Work: Ch 1, 3 sc along one side, inc in the top corner loop, 3 sc along the other side. For the final sc, work it into the very last stitch of the previous row to close the shape.
Fasten off, leaving a long tail for sewing.
The Head and Hair
The head is a large round piece, but we will add a “snout” area and hair strands to bring the Yorkie to life.
- 6 sc in MR (6).
- 6 inc (12).
- (1 sc, inc) * 6 (18).
- 4-5. 18 sc.
- 6-7. 4 sc, 10 sl st, 4 sc (The slip stitches create a flat snout area. Do not pull the slip stitches too tight!)
- 8. 3 sc, (1 sc, inc) * 6, 3 sc (24).
- 9. 4 sc, inc, (2 sc, inc) * 5, 4 sc (30).
- 10. 8 sc, inc, (3 sc, inc) * 3, 9 sc (34).
- 11. 8 sc, inc, (4 sc, inc) * 3, 10 sc (38).
- 12-17. 38 sc.
Adding the Hair
Before finishing the head, we will add the hair. This is done by inserting long strands of yarn directly into the stitches.
- Insert long strands of yarn into the stitches in two rows along the center of the snout area. I recommend inserting 5 strands in each of the two rows for a full look.
- To secure them, fold the yarn in half, insert the hook into a stitch, pull the loop through, and then pull the ends of the yarn through that loop.
- Continue the head rounds:
- 18. (dec, 17 sc) * 2 (36).
- 19. 2 sc, dec, (4 sc, dec) * 5, 2 sc (30).
- 20. (3 sc, dec) * 6 (24).
- 21. 1 sc, dec, (2 sc, dec) * 5, 1 sc (18).
- 22. (1 sc, dec) * 6 (12).
- 23. 6 dec.
Fasten off and leave a long tail for sewing.
The Cute Little Bow
- Leave a long starting tail. Chain 3. In the 1st ch from hook, work 2 dc, 2 ch, and 1 sl st in the same stitch.
- 2 ch, 2 dc in the 1st ch, 2 ch, 1 sl st in the same stitch.
- Fasten off and wrap the long tail around the center of the bow to secure the shape.
Finishing and Assembly
This is where your little Yorkie truly comes to life! Follow these steps carefully to ensure a professional finish.
- Face Details: Sew or glue your safety eyes into place. Use your embroidery needle and dark thread to embroider a small nose on the snout area.
- Attach the Head: Sew the head onto the body.
- Attach the Ears: Sew the ears to the top of the head.
- Attach the Back Legs: Sew the back legs to the sides of the body.
- Style the Hair: Take the hair strands and arrange them. Place the bottom two rows of hair toward the back. Secure the hair in place by sewing the bow over it. Thread the bow ends through the head and tie them off inside to hide the tails.
- Final Touches: For a realistic look, use a bit of dry pastel on a brush to lightly shade the muzzle and the tips of the paws. This adds depth and a soft, lifelike quality to your amigurumi.
Tips for Success
- Tension is Key: When working with such fine thread and a small hook, try to keep your tension consistent. If your stitches are too loose, the stuffing will show through.
- Color Changes: When changing colors in the body, try to pull the new color through the final loop of the previous stitch to ensure a seamless transition.
- The “Finger” Technique: Don’t be discouraged if the toes look a little tricky at first. Practice on a scrap piece of crochet to get the “common top loop” right.
- Stuffing: Always stuff your pieces firmly, but be careful not to overstuff the small legs, or they might lose their shape.
Congratulations! You have completed your very own Crochet Yorkshire Terrier. This little pup is ready to find a forever home!