Crochet Dice Pattern: A Step-by-Step Guide to Making Amigurumi Dice
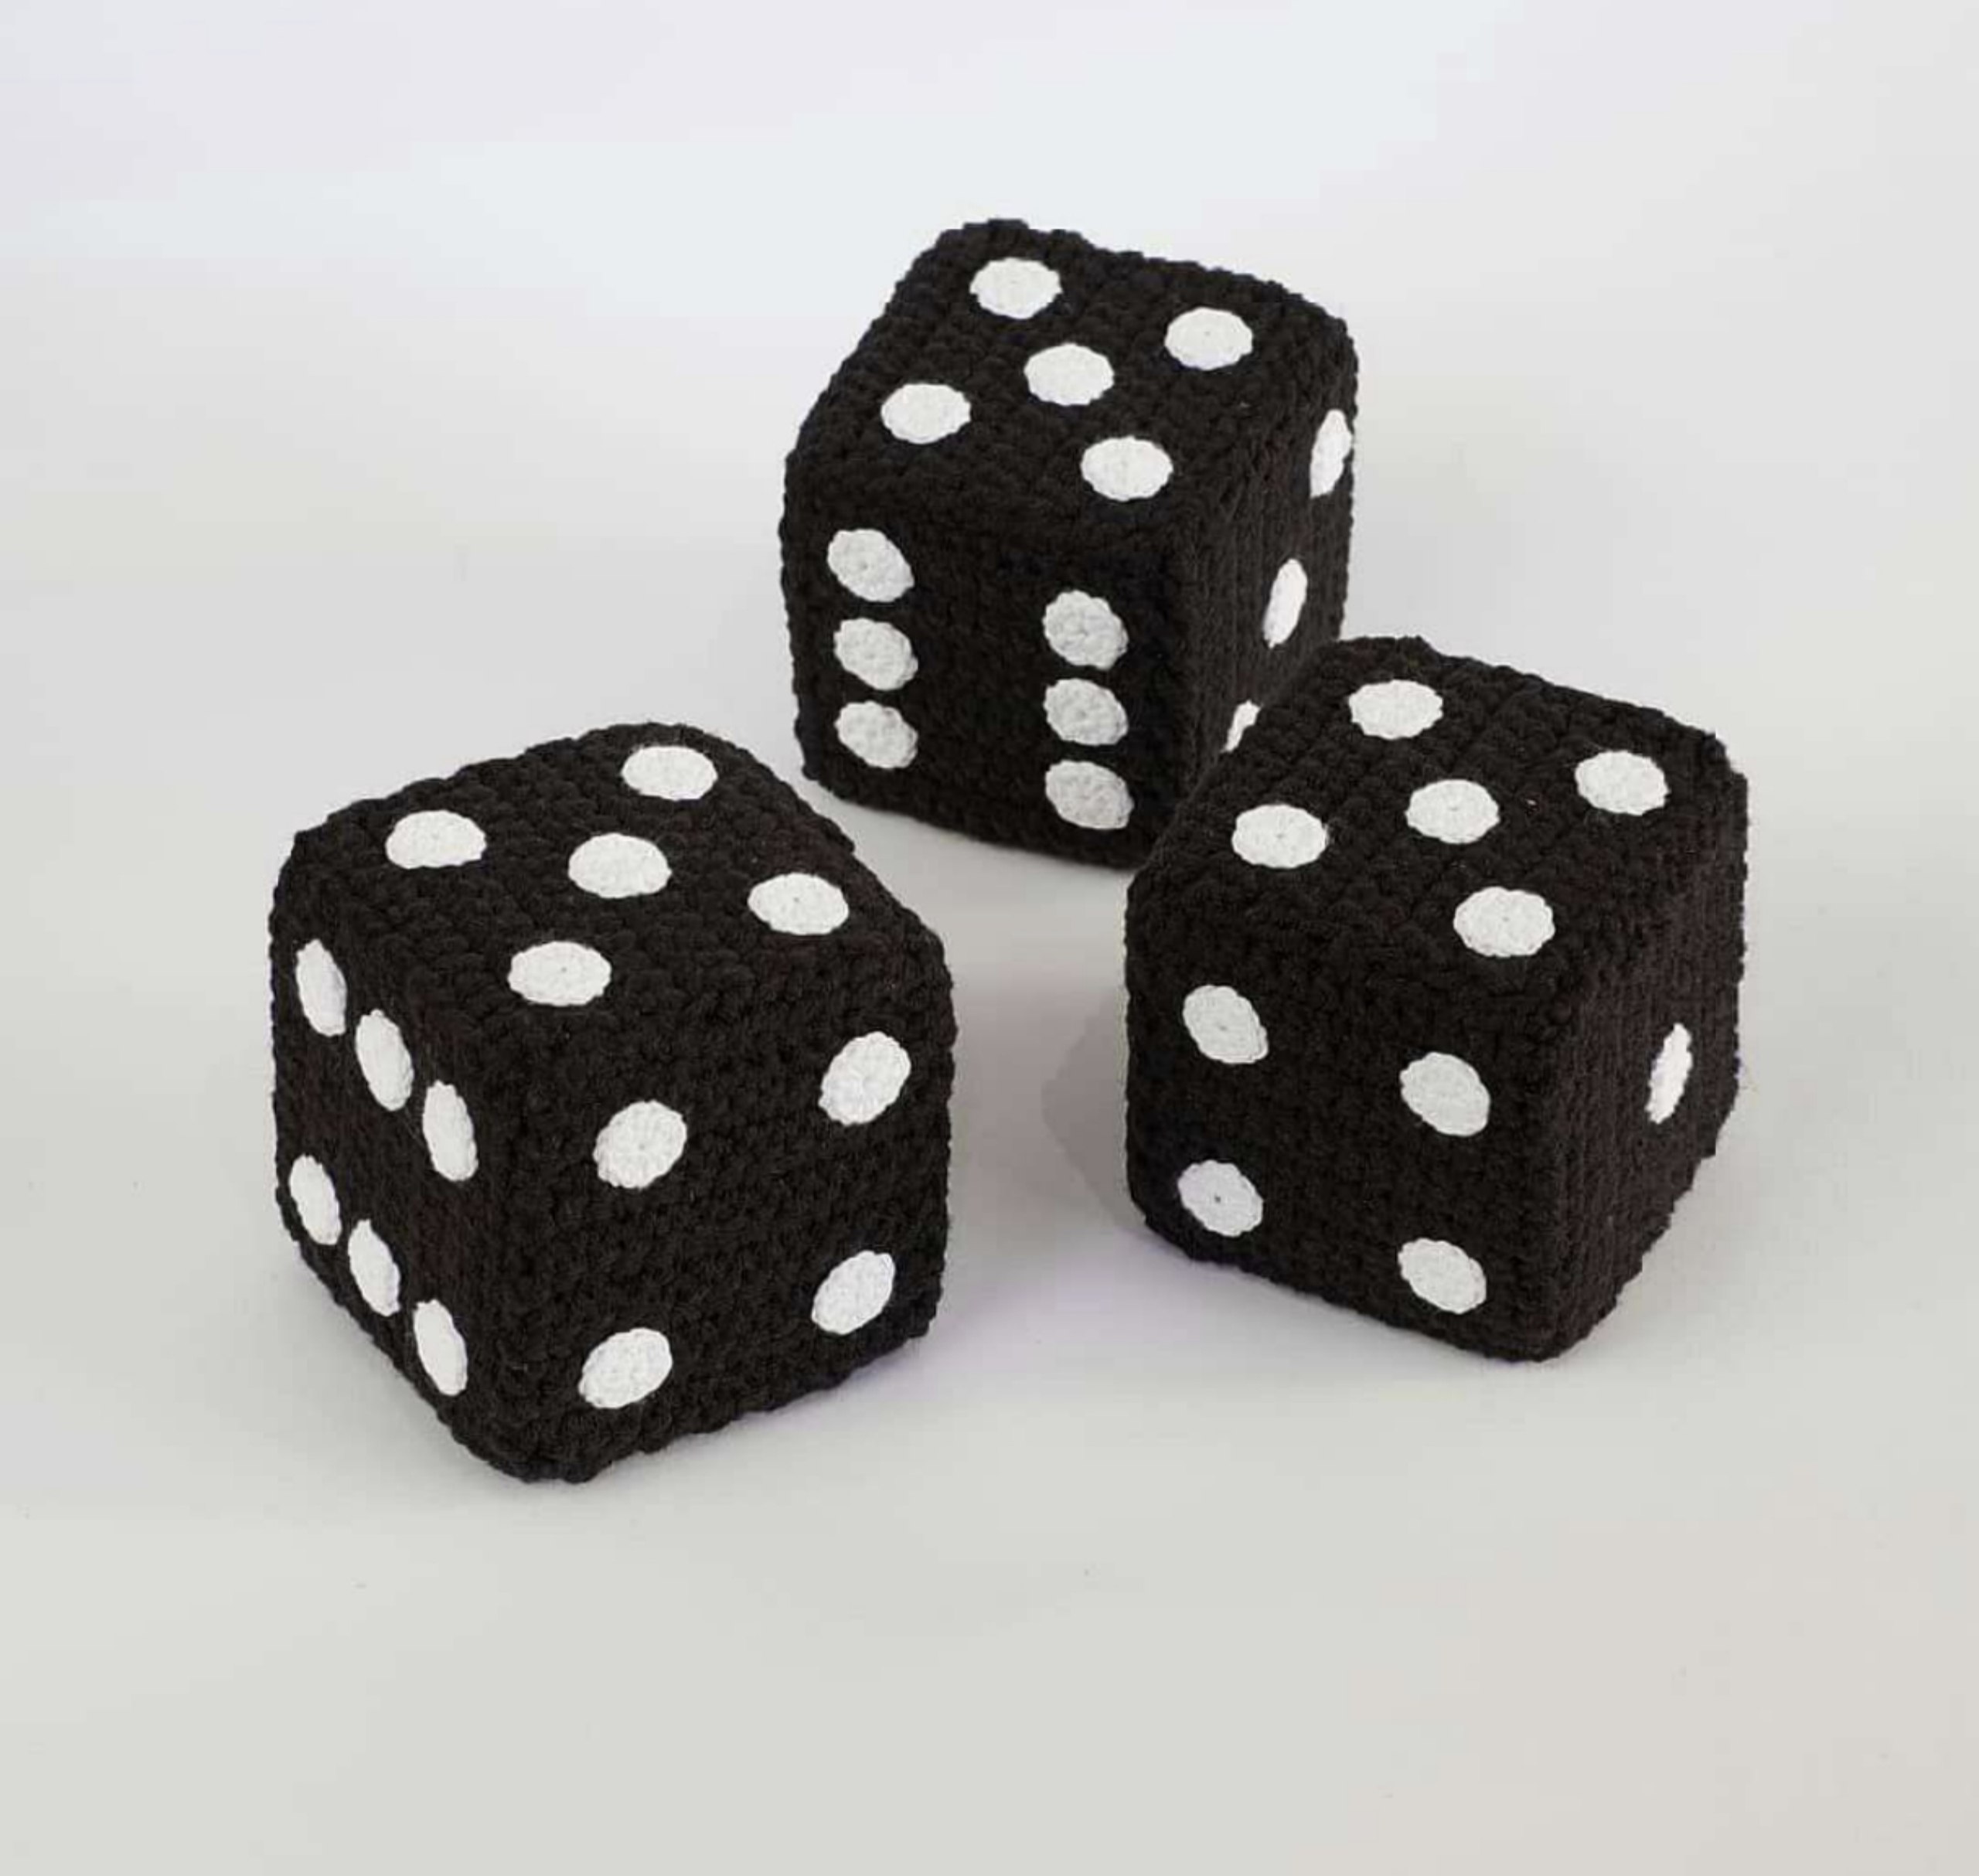
Are you looking for a fun, unique, and quick crochet project? Whether you want to add a handmade touch to your next tabletop game night, create a whimsical nursery decoration, or craft a sensory toy for a child, these crocheted dice are the perfect project! These adorable dice can be made in two different styles: a soft, squishy plush version or a classic, textured cotton version. This tutorial will walk you through everything you need to know to create your own set of custom dice from scratch.
Crocheting geometric shapes like cubes can sometimes feel intimidating for beginners, but this pattern is broken down into simple, manageable steps. By the end of this guide, you will have mastered the art of making small amigurumi components and assembling them into a perfect 3-inch cube. Let’s grab our hooks and get started!
Materials & Abbreviations
Before we dive into the stitches, it is important to choose the right materials. This pattern is versatile, allowing you to choose between a “Plush Style” (great for kids and soft decor) or a “Cotton Style” (great for a more traditional look).
Materials Needed
For the Plush Style Dice:
- Black Plush Yarn: A bulky chenille or velvet-style yarn (such as YarnArt Dolce).
- White Cotton Yarn: A thinner weight yarn for the dots (such as YarnArt Jeans).
- Crochet Hook: 3.5mm (E).
- Stuffing: Polyfill or any soft fiberfill.
For the Cotton Style Dice:
- Black Cotton Blend Yarn: A standard DK or worsted weight cotton (such as YarnArt Jeans).
- White Thread: A very fine white sewing thread or thin embroidery floss for the dots.
- Crochet Hook: 2mm (H).
- Stuffing: Polyfill or any soft fiberfill.
General Supplies:
- Fabric scissors.
- A tapestry needle for sewing.
- Fabric glue (optional, for attaching dots).
- Cardboard or stiff felt (optional, for squaring the edges).
Abbreviations (US Terms)
Please ensure you are using US crochet terminology to follow this pattern accurately:
- MR: Magic Ring
- ch: Chain
- sc: Single Crochet
- dc: Double Crochet
- sl st: Slip Stitch
- inc: Increase (2 stitches in one stitch)
Step-by-Step Instructions
To make one complete die, you will need to create 6 square faces and 21 small dots (pips). We recommend making all your dots first, then your squares, and finally assembling everything together.
Creating the Dice Dots (Pips)
You will need a total of 21 dots. Depending on the style of dice you are making, follow the appropriate instructions below.
For the Cotton Style (Using thin thread)
1. Start with a Magic Ring (MR).
2. Ch 3, then work 15 double crochets (dc) into the ring (Total: 16 stitches).
3. Join with a slip stitch (sl st) to the first dc to close the circle.
For the Plush Style (Using cotton yarn)
1. Start with a Magic Ring (MR).
2. Work 8 single crochets (sc) into the ring (Total: 8 stitches).
3. Join with a slip stitch (sl st) to close the circle.
Tip: You can either sew these dots onto your squares with a needle or use a small amount of fabric glue to secure them. If you choose to sew them, remember to leave a small tail of thread to make attaching them easier!
Crocheting the Dice Faces (Squares)
You will need to crochet 6 identical squares. For both styles, we will be working in rows. Remember to start every new row with a turning chain to ensure your edges stay neat.
For the Cotton Style (Black Cotton Yarn)
1. Ch 17.
2. Work 1 sc in the second chain from the hook and in each of the remaining 15 chains (Total: 16 stitches).
3. Row 2-16: Ch 1, turn, and work 16 sc in each row.
4. Fasten off, leaving a long tail for sewing the sides together.
For the Plush Style (Black Plush Yarn)
1. Ch 10.
2. Work 1 sc in the second chain from the hook and in each of the remaining 8 chains (Total: 9 stitches).
3. Row 2-7: Ch 1, turn, and work 9 sc in each row.
4. Fasten off, leaving a long tail for sewing the sides together.
Finishing
The assembly phase is where your hard work comes together! Follow these steps carefully to ensure your dice look professional and function correctly.
1. Attach the Dots
Before sewing the cube together, attach your 21 dots to the 6 squares. It is much easier to do this while the squares are flat. Arrange the dots so they represent the numbers 1 through 6. Crucial Rule: In standard dice, the opposite sides must always add up to 7 (1 is opposite 6, 2 is opposite 5, and 3 is opposite 4).
2. Assembly and Sewing
Layout your 6 squares in a “cross” shape (one center square with four squares attached to its sides, and one final square attached to one of the outer edges).
Using your tapestry needle and the yarn tail, sew the edges of the squares together using a whip stitch or an edge-to-edge stitch. As you sew, begin stuffing the center of the cross with your fiberfill. Be sure to stuff it firmly so the cube maintains its shape, but don’t overstuff to the point where the seams might pop!
3. Closing the Cube
Once the cube is fully stuffed and holds its shape, sew the final opening closed. Ensure your stitches are tight so no stuffing peeks through the seams.
Tips
To take your crochet dice to the next level, keep these expert tips in mind:
- Achieving Sharp Edges: If you find that your plush dice are looking a bit too “round” and you want them to look like perfect, sharp-edged cubes, you can cut small squares of cardboard or stiff felt and glue them to the inside of each face before you finish stuffing. This provides a structural skeleton for your dice. Note: If you use cardboard, the dice will no longer be washable!
- Washing Instructions: If you make the soft plush version without cardboard, you can hand wash your dice in cool water with a mild detergent to keep them clean.
- Color Variations: While black and white is classic, don’t be afraid to get creative! You can make neon dice, pastel dice, or even multicolored dice for a fun themed party.
- Scale: This pattern creates a dice approximately 3 inches (8cm) in size. If you want larger dice, simply increase your starting chain and row counts proportionally.