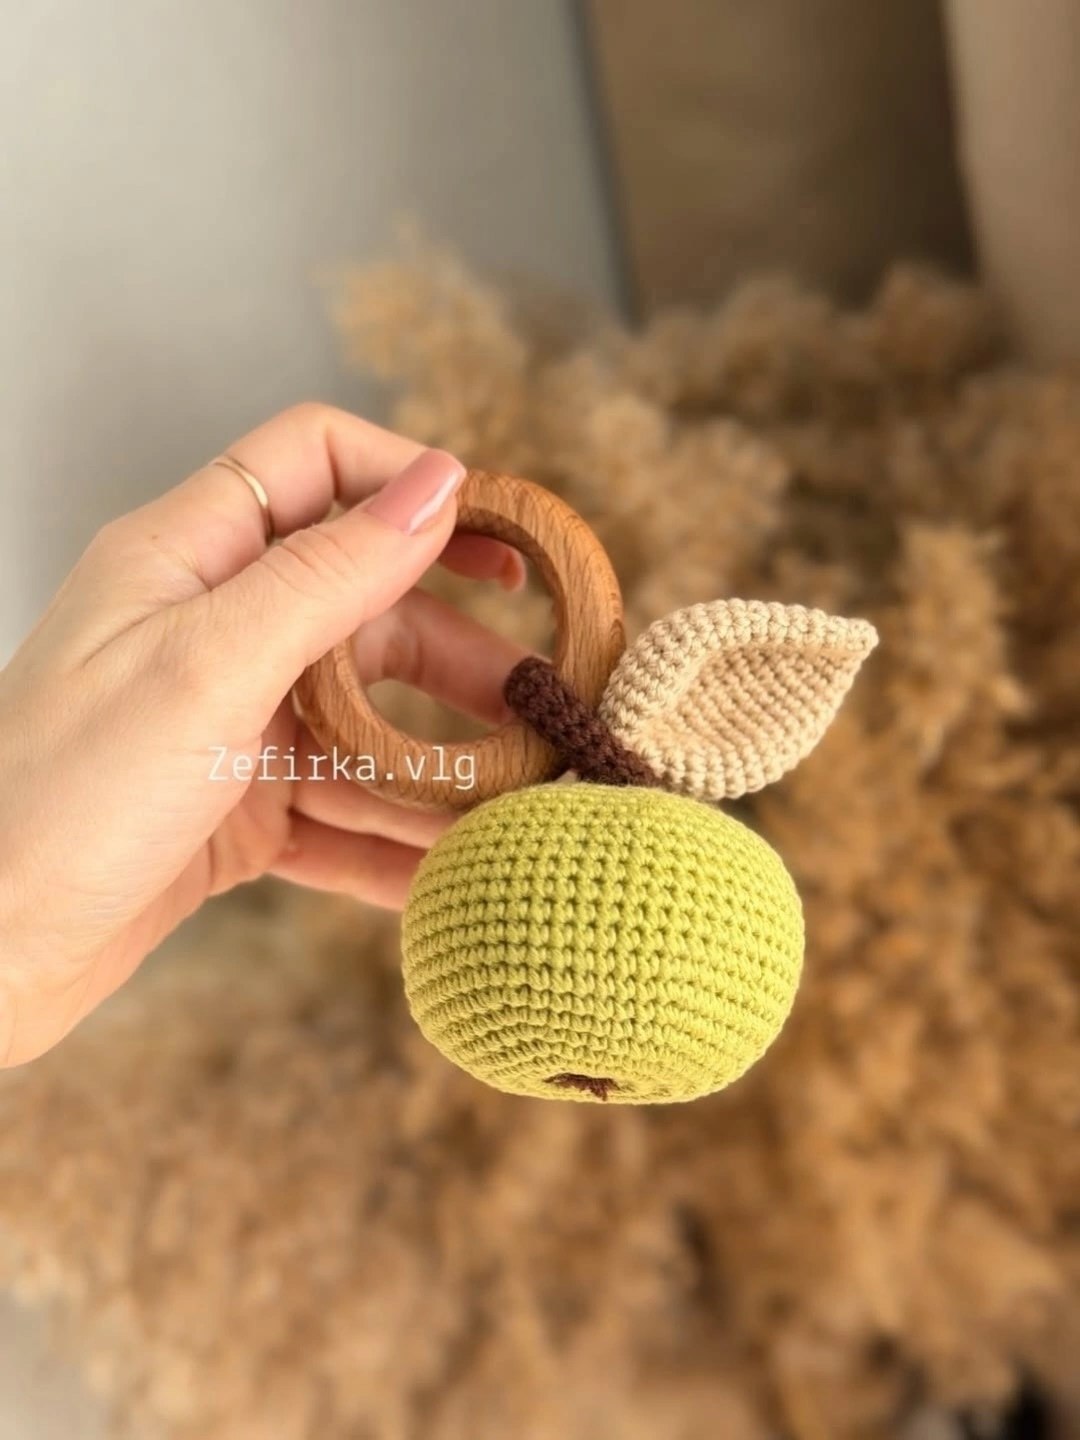
Crochet Apple Baby Rattle Pattern: A Cute Amigurumi Tutorial
Introduction
Are you looking for the perfect, handmade gift for a baby shower or a new arrival? There is something incredibly special about a handmade toy. It carries a warmth and thoughtfulness that store-bought plastic items simply cannot match. Today, I am thrilled to share a pattern for this adorable Crochet Apple Baby Rattle. This project combines the classic, charming aesthetic of woodland-themed nursery decor with the functional, sensory needs of a developing infant.
This little apple is designed to be more than just a decoration. By incorporating a wooden teething ring and a hidden rattle, it becomes a multi-sensory tool. The smooth wood provides a natural texture for teething, the bright colors catch a baby’s eye, and the gentle sound of the rattle encourages auditory development. Whether you are an experienced amigurumi artist or a beginner looking to practice your shaping skills, this pattern is a joy to work through.
The design is clever and efficient. Instead of crocheting separate pieces for the apple, the stem, and the leaf and then sewing them together, this pattern utilizes a continuous construction method. You will crochet the apple base, transition into a narrow stem, and then expand into a beautiful leaf—all in one piece! This minimizes sewing time and results in a much sturdier, professional-looking toy.
Materials & Abbreviations
What You Will Need
To ensure this toy is safe and durable for little hands, I highly recommend using high-quality, natural fibers. Cotton or bamboo yarns are excellent choices because they are soft, breathable, and hold their shape well.
- Yarn: Medium weight (Size 4 / Worsted) cotton yarn in three colors: Light Green (for the apple), Dark Brown (for the stem), and Cream or Beige (for the leaf). You will need approximately 75–100 yards total.
- Crochet Hook: A 3.25mm (D) or 3.5mm (E) crochet hook. Using a slightly smaller hook than the yarn suggests helps keep your stitches tight, which prevents the stuffing from peeking through.
- Stuffing: High-quality polyester fiberfill.
- Rattle Insert: A standard plastic rattle bell.
- Teething Ring: One 2-inch to 3-inch smooth, natural wooden ring. Ensure it is sanded smooth and free of any splinters.
- Extras: A tapestry needle for weaving in ends and a pair of sharp scissors.
Crochet Abbreviations
This pattern uses standard US crochet terms. If you are new to amigurumi, please ensure you are familiar with these basics:
- MR: Magic Ring (or Magic Circle)
- sc: Single crochet
- inc: Increase (2 sc in the same stitch)
- dec: Decrease (Invisible decrease is highly recommended for a smooth look)
- st(s): Stitch(es)
- rnd(s): Round(s)
Step-by-Step Instructions
Phase 1: The Green Apple Base
We begin with the main body of the apple using your light green yarn. We will start from the very bottom and work our way up to the stem.
Rnd 1: Create a magic ring and work 6 sc into the ring. (6 sts)
Rnd 2: 6 inc in each st around. (12 sts)
Rnd 3: (1 sc, 1 inc) repeat 6 times. (18 sts)
Rnd 4: (2 sc, 1 inc) repeat 6 times. (24 sts)
Rnd 5: (3 sc, 1 inc) repeat 6 times. (30 sts)
Rnd 6: (4 sc, 1 inc) repeat 6 times. (36 sts)
Rnd 7: (5 sc, 1 inc) repeat 6 times. (42 sts)
Rnd 8: (6 sc, 1 inc) repeat 6 times. (48 sts)
Rnd 9: (7 sc, 1 inc) repeat 6 times. (54 sts)
Rnd 10–19: sc in each st around for 10 rounds. (54 sts)
Rnd 20: (7 sc, 1 dec) repeat 6 times. (48 sts)
Rnd 21: (6 sc, 1 dec) repeat 6 times. (42 sts)
Rnd 22: (5 sc, 1 dec) repeat 6 times. (36 sts)
Rnd 23: (4 sc, 1 dec) repeat 6 times. (30 sts)
Rnd 24: (3 sc, 1 dec) repeat 6 times. (24 sts)
Note: At this stage, begin stuffing the apple firmly with fiberfill.
Rnd 25: (2 sc, 1 dec) repeat 6 times. (18 sts)
Note: Now, insert your rattle bell into the center of the stuffing. Ensure it is positioned securely so it won’t shift too much. Add a little more stuffing around the bell to keep it in place.
Rnd 26: (1 sc, 1 dec) repeat 6 times. (12 sts)
Rnd 27: 6 dec. (6 sts)
Phase 2: The Stem and Leaf
Now, we will transition from the apple to the stem. Fasten off the green yarn and join your dark brown yarn to the remaining 6 stitches.
Rnd 28–57: sc in each st around for 30 rounds. This creates the long, narrow neck of the stem. (6 sts)
Note: This is where the shape begins to change into the leaf. We will now expand the stitches.
Rnd 58: 6 inc. (12 sts)
Rnd 59: 12 inc. (24 sts)
Rnd 60: (3 sc, 1 inc) repeat 6 times. (30 sts)
Rnd 61: (4 sc, 1 inc) repeat 6 times. (36 sts)
Rnd 62–65: sc in each st around for 4 rounds. (36 sts)
Rnd 66: (4 sc, 1 dec) repeat 6 times. (30 sts)
Rnd 67: sc in each st around. (30 sts)
Rnd 68: (3 sc, 1 dec) repeat 6 times. (24 sts)
Rnd 69: sc in each st around. (24 sts)
Rnd 70: (2 sc, 1 dec) repeat 6 times. (18 sts)
Rnd 71: sc in each st around. (18 sts)
Rnd 72: (1 sc, 1 dec) repeat 6 times. (12 sts)
Rnd 73: sc in each st around. (12 sts)
Rnd 74: 6 dec. (6 sts)
Finishing
Once you have completed the final round, fasten off the yarn, leaving a small tail. Using your tapestry needle, weave the tail through the remaining stitches to close the hole completely. Tuck the end into the inside of the leaf.
The final step is attaching the wooden ring. You can do this in two ways:
- Direct Attachment: Carefully thread the green apple piece through the wooden ring before you finish the final closing stitches, or use a sturdy piece of cotton cord to tie the apple to the ring.
- Loop Method: Crochet a small loop of sturdy cord or thick yarn and attach it to the top of the apple, then loop that through the wooden ring.
Finally, go back through your work and weave in all loose ends securely. Give the apple a little squeeze to ensure the stuffing and rattle are perfectly distributed.
Tips
To make your crochet apple rattle look professional and ensure it is safe for a baby, keep these tips in mind:
- Master the Invisible Decrease: In amigurumi, standard decreases can leave small gaps. Using the “invisible decrease” method (inserting the hook into the front loops only of the next two stitches) will make your shaping look much smoother and tighter.
- Tension is Key: Aim for tight, consistent tension. You want the fabric to be dense enough that you cannot see the stuffing through the stitches. This is especially important for baby toys.
- Safety First: Always inspect your wooden ring for any rough edges before giving it to a child. Additionally, ensure the rattle is firmly encased in stuffing so it cannot migrate near the surface.
- Washability: Since babies often chew on their toys, recommend that the recipient hand-wash the toy in cool, mild soapy water and air dry it to maintain the shape and integrity of the yarn.