Carefree Duck Crochet Pattern: An Adorable Amigurumi Tutorial
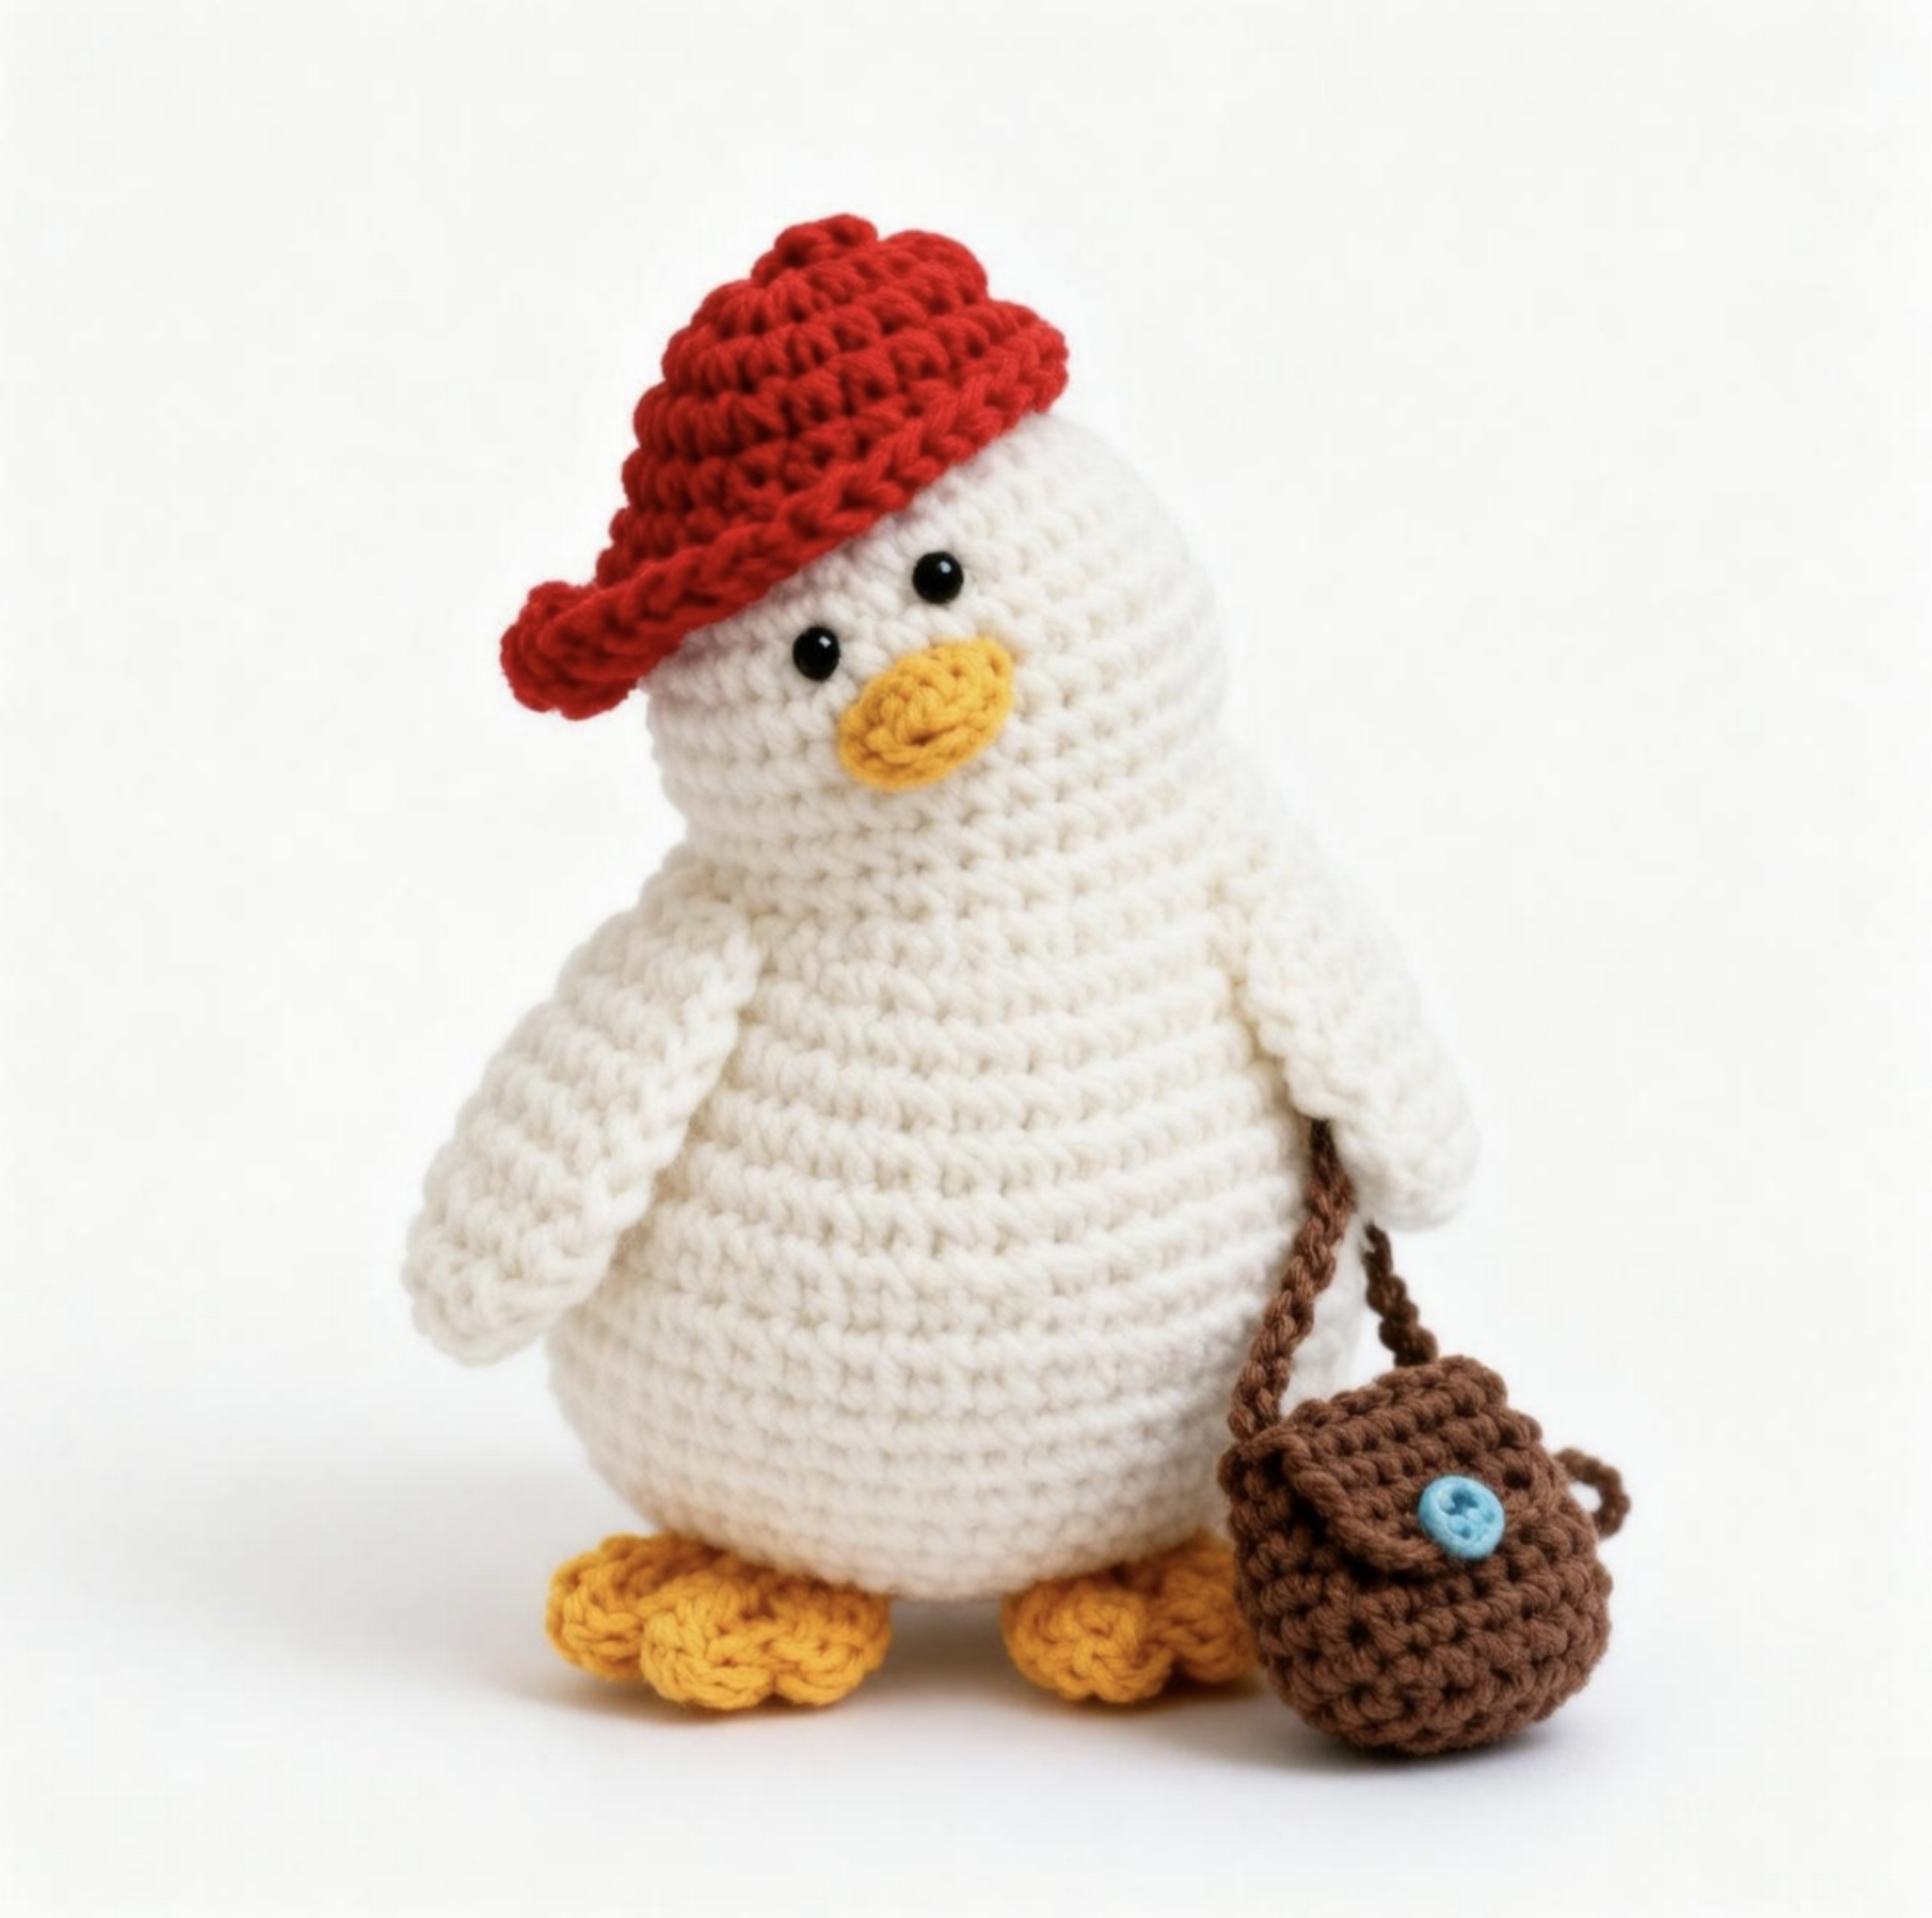
Are you looking for your next cozy crochet project? Meet the Carefree Duck! This charming, quirky amigurumi character is the perfect companion for your desk, a delightful gift for a friend, or a fun addition to your handmade collection. With its tiny crossbody bag and stylish little red hat, this duck brings a sense of “chill vibes” to anyone who sees it.
This pattern is designed with beginners in mind. While it involves some shaping to give the duck its unique, rounded silhouette, the stitches used are fundamental to crochet. If you can master the single crochet and the magic ring, you are well on your way to creating this little masterpiece. Grab your favorite yarn, settle into your favorite chair, and let’s get hooking!
Materials & Abbreviations
Before we begin, ensure you have all your supplies ready. To achieve the look seen in the photos, I recommend using a medium-weight (worsted weight) cotton or acrylic yarn. Cotton provides excellent stitch definition, which is wonderful for amigurumi.
Supplies Needed
- Yarn: Medium weight (Size 4) yarn in White (body), Yellow (beak and feet), Red (hat), and Brown (bag).
- Crochet Hook: A 3.5mm (E) or 4.0mm (G) hook. Using a slightly smaller hook than the yarn suggests helps keep your stitches tight so the stuffing doesn’t show through.
- Safety Eyes: Small black safety eyes (approximately 6mm to 8mm).
- Stuffing: Polyfill or any soft fiberfill.
- Notions: A yarn needle for sewing, scissors, and a small blue bead for the bag detail.
- Stitch Marker: Highly recommended to keep track of your rounds.
US Crochet Abbreviations
Please note that all terms used in this pattern are in US terminology:
- ch: chain
- sc: single crochet
- inc: increase (2 sc in one stitch)
- dec: decrease (sc 2 stitches together)
- hdc: half double crochet
- dc: double crochet
- dc2tog: double crochet two together (decrease)
- sl st: slip stitch
- mr: magic ring
- BLO: back loop only
- FLO: front loop only
- st(s): stitch(es)
Step-by-Step Instructions
The Body
The body is the heart of your duck. It uses a unique shaping technique where we slip stitch into specific previous rounds to create a tapered, organic shape.
Round 1: Create a magic ring and work 6 sc into it (6).
Round 2: 6 inc (12).
Round 3: (1 sc, inc) repeat 6 times (18).
Rounds 4–6: 18 sc (18).
Round 7: Sl st into the 7th stitch of Round 6, then work 6 sc. This starts the shaping.
Round 8: Sl st into the 6th stitch of Round 6, then work: 2 sc, inc, 2 sc, inc, 2 sc (14).
Round 9: Sl st into the 5th stitch of Round 6, then work 12 sc (14).
Round 10: Sl st into the 4th stitch of Round 6, then work: 5 sc, inc, 2 sc, inc, 5 sc (16).
Round 11: Sl st into the 1st stitch of Round 6, then work 22 sc (22).
Round 12 (Transition Round): Sl st into the 7th stitch of Round 1, then work 10 sc (10).
Round 13 (Shaping Round): Sl st into the 6th stitch of Round 11, then work: 4 sc, inc, 2 sc, inc, 4 sc (16).
Round 14: Sl st into the 5th stitch of Round 11, then work 16 sc (16).
Round 15: Sl st into the 4th stitch of Round 11, then work: 7 sc, inc, 2 sc, inc, 7 sc (20).
Round 16: Sl st into the 1st stitch of Round 11, then work 26 sc (26).
Round 17: 26 sc (26).
Round 18: (12 sc, inc) repeat 2 times (28).
Round 19: (3 sc, inc, 3 sc) repeat 4 times (32).
Rounds 20–23: 32 sc (32).
Round 24: (1 sc, dec, 1 sc) repeat 8 times (24).
Round 25: (1 sc, dec) repeat 8 times (16).
Round 26: 8 dec (8).
Fasten off, leaving a long tail for sewing. Stuff the body firmly with fiberfill before closing the hole.
The Hat
A little red hat makes this duck instantly stylish!
Round 1: Create a magic ring and work 6 sc into it (6).
Round 2: 6 inc (12).
Round 3: (1 sc, inc) repeat 6 times (18).
Round 4: 18 sc (18).
Round 5 (Decorative Edge): Working in the front loops only (FLO): ch 2, 1 dc, 2 dc in the same stitch, 1 dc, 2 ch, sl st into the same stitch. Repeat this pattern around to create a cute, scalloped ruffle.
The Wings (Make 2)
The wings are worked in rows, so you will need to turn your work after each row.
Row 1: ch 2, turn. Starting from the 2nd ch from the hook, work 1 inc (2).
Row 2: ch 1, turn. 1 sc, inc (3).
Rows 3–4: ch 1, turn. 3 sc (3).
Row 5: ch 1, turn. 1 dec, 1 sc (2).
Edging: To give the wing shape, work sc all along the two long sides of the piece. When you reach the sharp corner, work 3 sc into that single stitch to round it off.
The Feet (Make 2)
These little bright yellow feet add a pop of color!
Round 1: Create a magic ring and work 6 sc into it (6).
Round 2: Working in the back loops only (BLO), 6 inc (12).
Round 3: ch 2, turn. In the same base stitch as the last ch, work: (sl st, 2 ch, 1 hdc, 2 ch) repeat this sequence 2 times to create the “toes.”
Edging: Working in the front loops only (FLO) from Round 2, work 6 sc around the edge.
The Beak
Round 1: ch 3, turn. Starting from the 2nd ch from the hook, work 2 sc (2). Fasten off, leaving a tail for sewing.
The Crossbody Bag
Every carefree duck needs a place for its treasures!
Round 1: ch 5, turn. Starting from the 2nd ch from the hook, work: 1 inc, 2 sc, 3 sc in one stitch, 2 sc, 1 sc (10).
Rounds 2–4: 10 sc (10).
Round 5: 5 sc (5).
Round 6: ch 1, 1 dec, 1 sc, 1 dec (3).
Round 7: ch 1, 1 dec, 1 sc (2).
Strap: Create a chain of your desired length to serve as the shoulder strap. Attach it to the sides of the bag. Don’t forget to sew a small blue bead onto the front of the bag for a cute “button” detail!
Finishing
Assembly is where the magic happens! Use your yarn needle and the tails left from your work to carefully attach each piece:
- Eyes: Place the safety eyes on the head/upper body area, ensuring they are symmetrical.
- Beak: Sew the beak centered between and slightly below the eyes.
- Hat: Place the hat on top of the head. You can tilt it slightly to one side for extra character.
- Wings: Sew the wings to the sides of the body.
- Feet: Attach the feet to the bottom of the body.
- Bag: Sew the bag to the side of the duck so it hangs naturally over the body with the strap across the chest.
Tips for Success
Working with amigurumi can be a bit tricky at first, but these tips will help you achieve a professional look:
- Tension is Key: Try to keep your stitches tight. If your stitches are too loose, the white stuffing will peek through, which can distract from the finished shape.
- Use Stitch Markers: Since amigurumi is worked in continuous spirals, it is very easy to lose your place. Always mark the first stitch of every round.
- Stuffing Technique: When stuffing the body, push the fiberfill into the corners and crevices using your crochet hook or a pencil. This prevents lumps and ensures a smooth, rounded appearance.
- Invisible Decreases: For a cleaner look, try using the “invisible decrease” method (inserting the hook into the front loops only of the next two stitches) to minimize gaps in your work.