Adorable Plush Crochet Sheep Pattern: DIY Amigurumi Bo the Lamb
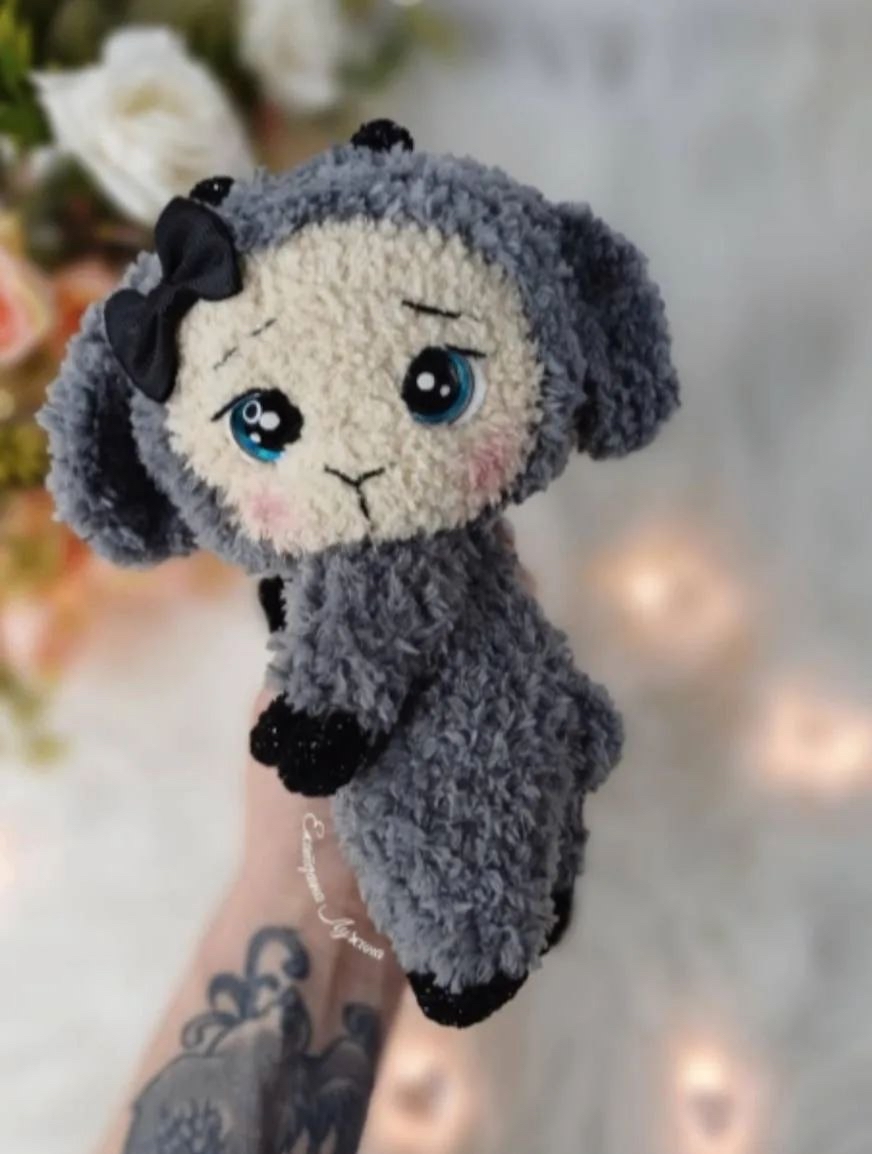
Are you looking for your next cuddle-worthy crochet project? This adorable plush crochet sheep pattern is the perfect weekend craft! Lovingly named Bo the Lamb, this sweet, soft amigurumi features a chunky textured body, velvety little hooves, and a face that is sure to melt anyone’s heart. Standing at about 7 inches tall, Bo is the perfect size for nurseries, gifts, or adding to your own plushie collection.
This beginner-friendly tutorial uses super bulky plush yarn to create a incredibly soft, huggable texture quickly. Let’s gather our materials and get ready to crochet!
Materials & Abbreviations
Materials Needed
- Main Color Yarn (Body & Ears): Super Bulky textured plush or boucle yarn (such as Himalaya Koala, or US equivalents like Lion Brand Go For Faux or Bernat Blanket) — approx. 2.4 oz (67g).
- Accent Color Yarn (Hooves): Velvet or chenille medium-to-bulky yarn (such as LaVita Velur or Premier Parfait Chunky) in pink or your choice of contrast color — approx. 0.3 oz (8g).
- Muzzle Yarn: Soft fine or DK weight yarn (such as Alize Softy or any plush sport weight) in white or cream — approx. 0.2 oz (5g).
- Embroidery Thread: Cotton embroidery thread in dark brown or black (for eyelids, eyelashes, nose, and mouth) and white (for the eye whites).
- Safety Eyes: 16 mm safety eyes.
- Crochet Hooks: Size 3.0 mm (approx. US C-2 or D-3) and 3.5 mm (US E-4).
- Stuffing: High-quality polyester fiberfill.
- Jointing: One 35 mm plastic amigurumi joint (for a rotating head).
- Tools: Sharp scissors, stitch markers, a long tapestry needle, and strong sculpting thread.
- Optional: Dry pink pastel and a small makeup brush for blushing the cheeks.
Abbreviations (US Crochet Terms)
- MR: Magic Ring (Magic Circle)
- ch: Chain
- sc: Single crochet
- hdc: Half double crochet
- dc: Double crochet
- inc: Increase (2 single crochets in the same stitch)
- dec: Decrease (single crochet 2 stitches together, use invisible decrease for best results)
- BLO: Back loops only
- sl st: Slip stitch
- bobble: 5-dc bobble stitch with a single top (used for the tail)
- sts: Stitches
- Rnd: Round
Step-by-Step Instructions
Upper Legs / Arms (Make 2)
We will start by making the arms. Use your 3.0 mm hook and the Accent Color (velvet yarn).
- Rnd 1: 6 sc in MR (6)
- Rnd 2: (sc, inc) x 3 (9)
- Rnd 3: 9 sc in BLO (9)
- Rnd 4-5: 9 sc (9) — 2 rounds total.
- Switch to the Main Color (plush textured yarn).
- Rnd 6: 9 sc in BLO (9)
- Rnd 7: (2 sc, inc) x 3 (12)
- Rnd 8-13: 12 sc (12) — 6 rounds total.
Stuff the leg lightly up to Round 6 only. Do not stuff the upper part of the arm so it sits flat against the body. Fasten off, weave in, and hide the yarn tail. Repeat for the second arm.
Lower Legs (Make 2)
Use your 3.0 mm hook and the Accent Color (velvet yarn).
- Rnd 1: 6 sc in MR (6)
- Rnd 2: 6 inc (12)
- Rnd 3: 12 sc in BLO (12)
- Rnd 4-5: 12 sc (12) — 2 rounds total.
- Switch to the Main Color (plush textured yarn).
- Rnd 6: 12 sc in BLO (12)
- Rnd 7: (3 sc, inc) x 3 (15)
- Rnd 8-9: 15 sc (15) — 2 rounds total.
- Rnd 10: 7 sc, inc, 6 sc, inc (17)
Fasten off and hide the yarn tail on the first leg only. Crochet the second leg exactly the same way, but do not cut the yarn. We will continue directly from the second leg to join them together and build the body.
Body
Switch to your 3.5 mm hook and continue using the Main Color yarn.
- Rnd 11: sl st to join the second leg to the first leg. Work 17 sc around the first leg, inc in the joining slip stitch, work 17 sc around the second leg, inc in the joining slip stitch (38)
- Rnd 12: 18 sc, 2 inc, 18 sc (40) (Note: Keep the increases centered at the front for the tummy. If necessary, work a few shift stitches to keep it aligned).
- Rnd 13: 40 sc (40)
- Rnd 14: 39 sc, work 1 bobble stitch in the 40th stitch (40) (This bobble stitch forms the cute little tail at the back!)
- Rnd 15: 40 sc (40)
- Rnd 16: dec, 36 sc, dec (38)
- Rnd 17: 17 sc, 2 dec, 17 sc (36) (Note: Keep these decreases centered over the tummy).
- Rnd 18: 36 sc (36)
- Rnd 19: (4 sc, dec) x 6 (30)
- Rnd 20: 30 sc (30)
- Rnd 21: (3 sc, dec) x 6 (24)
- Rnd 22: 24 sc (24)
- Rnd 23: (2 sc, dec) x 6 (18)
- Rnd 24 (Joining the Arms): In this round, we will join the arms by crocheting through both the arm layers and the body layers. Align the arms symmetrically on each side: 2 sc, 5 sc through both the folded arm and the body, 4 sc across the chest, 5 sc through the second folded arm and the body, 2 sc (18)
- Rnd 25: (sc, dec) x 6 (12)
Stuff the body firmly with fiberfill. Take your 35 mm plastic joint and insert the stem pointing upwards through the neck opening. This will allow the head to rotate smoothly once attached.
- Rnd 26: 6 dec (6)
Cut the yarn, leaving a short tail. Weave the tail through the front loops of the remaining 6 stitches, pull tightly to close the opening, secure, and hide the end inside the body.
Head
We will start by crocheting the muzzle using the 3.0 mm hook and the Muzzle Yarn (fine/soft white yarn).
- Rnd 1: ch 6. Starting in the 2nd chain from hook, work: 4 sc, 3 sc in the last chain stitch. Turn to work along the opposite side of the chain: 3 sc, inc (12)
- Rnd 2: inc, 3 sc, 3 inc, 3 sc, 2 inc (18)
- Rnd 3: sc, inc, 3 sc, (sc, inc) x 3, 3 sc, (inc, sc) x 2 (24)
- Rnd 4: 24 sc (24)
- Rnd 5: 11 sc, 12 inc, sc (36) (The increases will shape the cheeks).
- Rnd 6: 11 sc, (sc, inc) x 12, sc (48)
- Rnd 7-8: 48 sc (48) — 2 rounds total.
Insert the 16 mm safety eyes between Rounds 4 and 5. The distance between the eye posts should be 8 stitches. Secure the washers firmly at the back.
Switch to the 3.5 mm hook and the Main Color (plush textured yarn).
- Rnd 9-14: 48 sc (48) — 6 rounds total.
- Rnd 15: (6 sc, dec) x 6 (42)
Now, push the stem of the plastic joint (which is sticking out of the neck of your body) through the center bottom of the head, between Rounds 11 and 12. Secure the plastic joint washer from the inside of the head. Press down firmly until it clicks in place.
- Rnd 16: 42 sc (42)
- Rnd 17: (5 sc, dec) x 6 (36)
- Rnd 18: 36 sc (36)
- Rnd 19: (4 sc, dec) x 6 (30)
- Rnd 20: 30 sc (30)
- Rnd 21: (3 sc, dec) x 6 (24)
- Rnd 22: (2 sc, dec) x 6 (18)
- Rnd 23: (sc, dec) x 6 (12)
- Rnd 24: 6 dec (6)
Fill the head firmly with fiberfill before closing. Once stuffed, weave the yarn through the front loops of the last 6 stitches, pull shut, knot, and hide the thread inside the head.
Ears (Make 2)
Use your 3.5 mm hook and the Main Color (plush textured yarn).
- Rnd 1: ch 7. Starting in the 2nd chain from hook, work: 3 sc, 2 hdc, 6 hdc in the last chain stitch. Turn and work along the opposite side of the chain: 2 hdc, 2 sc, inc (17)
- Rnd 2: 2 inc, 2 sc, hdc, (hdc, hdc inc) x 3, hdc, 4 sc, inc (23)
- Rnd 3: (inc, sc) x 2, 3 hdc, (2 hdc, hdc inc) x 3, 5 hdc, 2 sc (28)
Fasten off, leaving a long tail for sewing. Repeat for the second ear.
Finishing & Assembly
Face & Eye Sculpting
To give Bo the perfect, expressive look, we will perform simple soft-sculpting (needle sculpting) using a long needle and strong, matching thread.
- Eye Sculpting: Insert your needle at the bottom of the head (Point A). Bring it out at the inner corner of the right eye (Point B). Insert it at the outer corner of the right eye (Point C) and bring it out at the outer corner of the left eye (Point D). Insert at the inner corner of the left eye (Point E) and bring it back down to Point A. Pull the thread firmly to sink the eyes slightly into the head, creating cute sockets. Tie a secure knot at Point A and hide the ends.
- Mouth Sculpting: Insert your needle at Point A (neck) and bring it out at the bottom-center of the white muzzle. Insert it slightly higher/to the side to create a small mouth indentation, then bring it back to Point A. Pull gently to create a sweet, soft chin. Tie off and weave in.
- Embroidering Details:
- With white embroidery thread, stitch a vertical line along the outer edge of each safety eye to create eye whites.
- With dark brown or black embroidery thread, stitch cute eyelashes, eyelids, and fine, soft eyebrows just above the eyes.
- Embroider a small “Y” shape on the front of the muzzle to form the nose and mouth.
Hoof Definition
To give Bo realistic-looking split hooves, thread a tapestry needle with your pink accent color yarn. Insert the needle at the base of the foot/arm, wrap the yarn around the center front of the pink section, and pull it tight toward the back to create a cleft-hoof indentation. Knot and secure the thread inside the limb.
Attaching Ears and Optional Horns
Pin the ears symmetrically to the sides of the head. Fold the top of the ears slightly forward before sewing to give them a natural, floppy look. Sew them securely in place.
Optional Horns: If you’d like to make a little ram instead, use your accent velvet yarn to crochet tiny horns directly onto the head. Attach yarn a couple of stitches away from the ears and work: sc, 2 hdc, dc, hdc, sl st directly on the surface of the head. Fasten off and weave in the ends.
Tips for the Perfect Amigurumi Sheep
- Managing Textured Yarn: Textured boucle and plush yarns can make it hard to see your stitches. Use your fingers to feel for the stitch openings, and always use a stitch marker at the beginning of each round.
- Tight Stitches: Keep your tension firm. When working with plush yarn, a loose gauge can let the white polyester stuffing peek through. If your stitches look loose, try dropping down half a hook size.
- Blushing: For a sweet, glowing look, apply a small amount of dry pink pastel (or even cosmetic powder blush) to Bo’s cheeks and nose with a fluffy brush. Start light and build the color slowly!
Your adorable Bo the Lamb is now complete! Enjoy your cute new plush companion, or gift them to someone special who will cherish their soft, handmade charm.