How to Crochet a Firework Throw: A Colorful Ripple Blanket Pattern
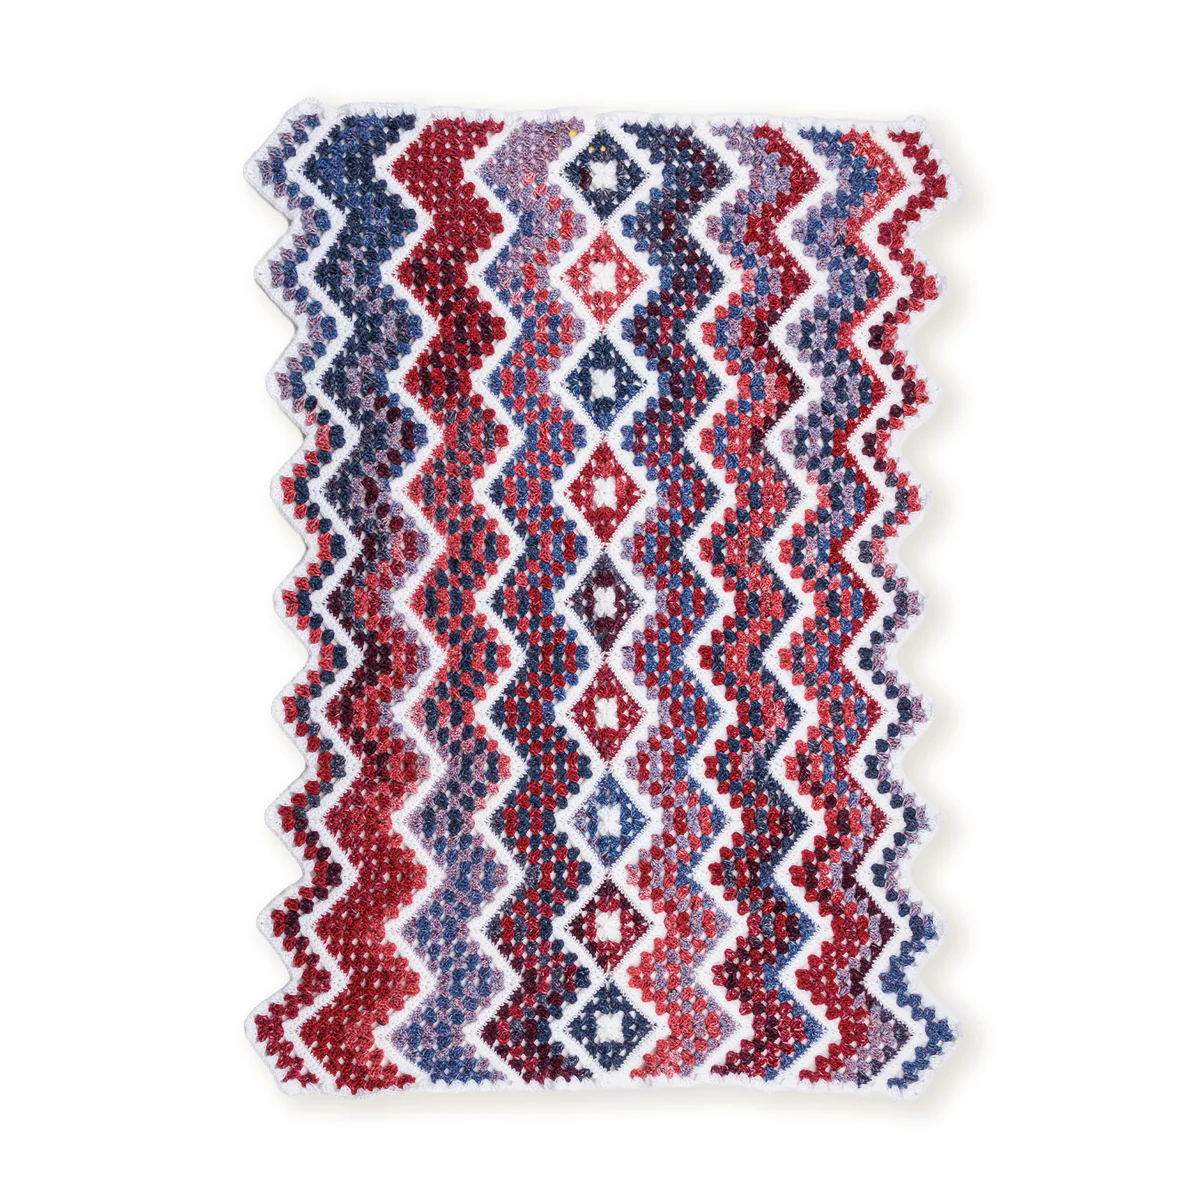
If you are looking for a project that combines the classic charm of granny squares with the dynamic movement of a ripple stitch, this Crochet Firework Throw is the perfect choice. With its vibrant color shifts and rhythmic waves, this blanket looks like a celebration in yarn form. Whether you are decorating for a holiday or looking for a cozy, eye-catching addition to your living room, this pattern delivers a stunning result without requiring advanced technical skills.
This throw is designed for crocheters who are comfortable with basic stitches but want to challenge themselves with a bit of assembly and pattern repeating. The result is a medium-weight blanket measuring approximately 41 inches wide by 52 inches long, making it an ideal size for curling up on the couch.
Materials & Abbreviations
Before you begin, gather your supplies. This pattern uses a medium-weight yarn to ensure the blanket is durable and warm, while the US I/9 hook provides a drape that isn’t too stiff.
Materials Needed
- Yarn A (Multi-color/Striped): Approximately 1,318 yards of Medium Weight 4 yarn (e.g., a multicolored “Firework” style yarn).
- Yarn B (Solid White): Approximately 614 yards of Medium Weight 4 yarn.
- Crochet Hook: Size US I/9 (5.5 mm).
- Notions: Yarn needle for weaving in ends and scissors.
Abbreviations (US Terms)
- Approx: Approximately
- Beg: Beginning
- Ch: Chain
- Dc: Double crochet
- Rep: Repeat
- Rnd: Round
- RS: Right side
- Sc: Single crochet
- Sc2tog: Single crochet two together (decrease)
- Sl st: Slip stitch
- Sp: Space
- St: Stitch
- Yoh: Yarn over hook
Pattern Notes
To keep your edges neat and your shapes consistent, keep these notes in mind: a chain 3 at the beginning of rows or rounds counts as a double crochet. A chain 6 at the beginning of a round counts as one double crochet and a chain-3 space. Always join your rounds with a slip stitch to the first stitch unless otherwise noted. The construction of this throw features a center column of Granny Square Motifs running vertically, with Ripple Sections worked out from either side.
Step-by-Step Instructions
Part 1: The Granny Square Motif
You will need to make nine of these squares. These act as the anchors for the entire blanket.
Round 1: Using Yarn B, chain 4 and join with a slip stitch to the first chain to form a ring. Chain 3 (counts as dc), work 2 dc into the ring. Repeat (chain 3, 3 dc in ring) three more times. Chain 3 and join with a slip stitch. Fasten off Yarn B.
Round 2: Join Yarn A with a slip stitch into any chain-3 space. Chain 6. Work 3 dc into the same space as the slip stitch. Chain 1, work (3 dc, chain 3, 3 dc) in the next chain-3 space. Repeat from the asterisk twice more. Chain 1, work 2 dc in the first chain-3 space. Join with a slip stitch to the 3rd chain of the starting chain-6.
Round 3: Slip stitch into the first chain-3 space. Chain 6. Work 3 dc into the same space as the last slip stitch. Chain 1, work 3 dc in the next chain-1 space, chain 1. Then work (3 dc, chain 3, 3 dc) in the next chain-3 space. Repeat from the first asterisk twice more, then repeat from the first asterisk to the second asterisk once. Join with a slip stitch to the 3rd chain of the starting chain-6. Fasten off.
Part 2: Ripple Section (First Side)
Now we will join the motifs and create the wavy “firework” effect on the first half of the blanket.
The Joining Row
Working on the right side (RS), join Yarn B with a slip stitch to any chain-3 space of any Granny Square. Chain 1, work 1 sc in the same space. Work 1 sc in each dc and chain-1 space until you reach the next chain-3 space. In that space, work (1 sc, chain 2, 1 sc). Work 1 sc in each dc and chain-1 space to the next chain-3 space, then work 1 sc in that space. Work 1 sc in any chain-3 space of the next Granny Square. Repeat from the asterisk 7 more times, then repeat from the asterisk to the double asterisk once. Turn. You should now have 234 sc and 9 chain-2 spaces.
Building the Ripple
Rows 2 and 3: Chain 1, sc2tog. Work 1 sc in each stitch until the next chain-2 space. In the chain-2 space, work (1 sc, chain 2, 1 sc). Work 1 sc in each of the next 11 stitches. Work sc2tog twice. Repeat from the asterisk 7 more times, then repeat from the asterisk to the double asterisk once. End with a sc2tog. Turn. Join Yarn A and break Yarn B.
Row 4: Using Yarn A, slip stitch across the first two stitches. Chain 3, work 2 dc in the same space as the last slip stitch. (Chain 1, skip next 3 sc, work 3 dc in next sc) twice. Chain 1, skip next 3 sc, work (3 dc, chain 2, 3 dc) in the next chain-2 space. (Chain 1, skip next 3 sc, work 3 dc in next sc) 3 times. Skip the next stitch and work 3 dc in the next sc. Repeat from the asterisk 7 more times, then repeat from the asterisk to the double asterisk once. Turn.
Rows 5 through 8: Slip stitch across the first 3 dc and chain-1 space. Chain 3, work 2 dc in the same space as the last slip stitch. (Chain 1, work 3 dc in next chain-1 space) twice. Chain 1, work (3 dc, chain 2, 3 dc) in the next chain-2 space. (Chain 1, work 3 dc in next chain-1 space) 3 times. Skip the next 6 dc and work 3 dc in the next chain-1 space. Repeat from the asterisk 7 times, then repeat from the asterisk to the double asterisk once. Turn. Join Yarn B and break Yarn A.
Row 9: Using Yarn B, slip stitch across the first 3 dc and chain-1 space. Chain 1, work 1 sc in the same space. Work 1 sc in each dc and chain-1 space until the next chain-2 space. In that space, work (1 sc, chain 2, 1 sc). Work (1 sc in each of the next 3 dc, 1 sc in the next chain-1 space) 3 times. Skip the next 6 dc. Repeat from the asterisk 7 more times, then repeat from the asterisk to the double asterisk once. Turn.
Continuing the Pattern: Repeat rows 2 through 9 twice more. Then, repeat rows 2 through 5 once more. Fasten off.
Part 3: Ripple Section (Second Side)
The second side is a mirror image of the first. With the right side of the unworked edges of the Granny Squares facing you, join Yarn B with a slip stitch to the first chain-3 space (this is the same space where the first side ended).
Row 1 (Joining): Chain 1, work 1 sc in the same space. Repeat the joining row sequence used for the first side: 1 sc in each dc and chain-1 space, (1 sc, chain 2, 1 sc) in the chain-3 space, and 1 sc in each subsequent space until all motifs are joined. Turn.
Rows 2 through 29: Work exactly as you did for the first Ripple Section. Fasten off.
Finishing the Blanket
The Border Round
The border ties the entire project together and gives the edges a professional, polished look. Join Yarn B with a slip stitch to the first chain-1 space at the top right corner of the blanket.
Across the Top: Working in the stitches of the last row of the first Ripple Section, chain 3 and work 2 dc in the same space. (Chain 1, 3 dc in next chain-1 space) twice. Chain 1, work (3 dc, chain 2, 3 dc) in the next chain-2 space. (Chain 1, 3 dc in next chain-1 space) 3 times. Skip the next 6 dc and work 3 dc in the next chain-1 space. Repeat from the asterisk 7 more times, then repeat from the asterisk to the double asterisk once. Chain 1, skip the next 2 dc, and work (3 dc, chain 2, 3 dc) in the last dc to create the corner.
Down the Side: Chain 1 and skip the first row. Work 3 dc around the post of the next dc. Chain 1. Skip the next row and work 3 dc around the post of the next sc. Chain 1. Skip the next row and work (3 dc around post of next dc, chain 1) 5 times. Repeat this sequence twice more. Skip the next row and work 3 dc around the post of the next sc. Chain 1, skip the next row, and work 3 dc in the chain-3 space of the Granny Square. Repeat the post-stitch sequence once more. Work 3 dc around the post of the next dc and skip the next row.
Across the Bottom: Working in the stitches of the last row of the second Ripple Section, work (3 dc, chain 2, 3 dc) in the first dc. Chain 1, work 3 dc in the next chain-1 space. Repeat from the asterisk until the end of the row. Chain 1, join with a slip stitch, and fasten off.
Tips for Success
- Check Your Gauge: Because this pattern involves joining separate motifs with ripple rows, gauge is very important. If your stitches are too tight, the blanket may pull or pucker.
- Post Stitch Precision: When working the border, ensure you are working “around the post” of the stitch rather than into the top loop. This creates a sturdy, raised edge that prevents the blanket from curling.
- Yarn Management: With so many color changes and joining rows, you will have several ends to weave in. Use a yarn needle to weave these ends back into the fabric for at least two inches to ensure they don’t pop out after washing.
- Blocking: For a truly professional finish, steam block your finished throw. This will relax the ripple stitches and make the granny squares lay flat.